> ## Documentation Index
> Fetch the complete documentation index at: https://docs.invopop.com/llms.txt
> Use this file to discover all available pages before exploring further.
# Invopop CLI
> Install the Invopop command-line tool, sign in with your account, and check, store and send documents from your terminal or through an AI assistant.
The Invopop CLI is a small program you run in your terminal. It lets you do most of what the [Console](/console/index) does without opening a browser: check an invoice, send it through a workflow, look up a job, or reserve the next invoice number. It is also the easiest way to let an AI assistant such as Claude Code work in your workspace on your behalf.
You don't need to be a developer to use it. If you can open a terminal and paste a line of text, you can use the CLI.
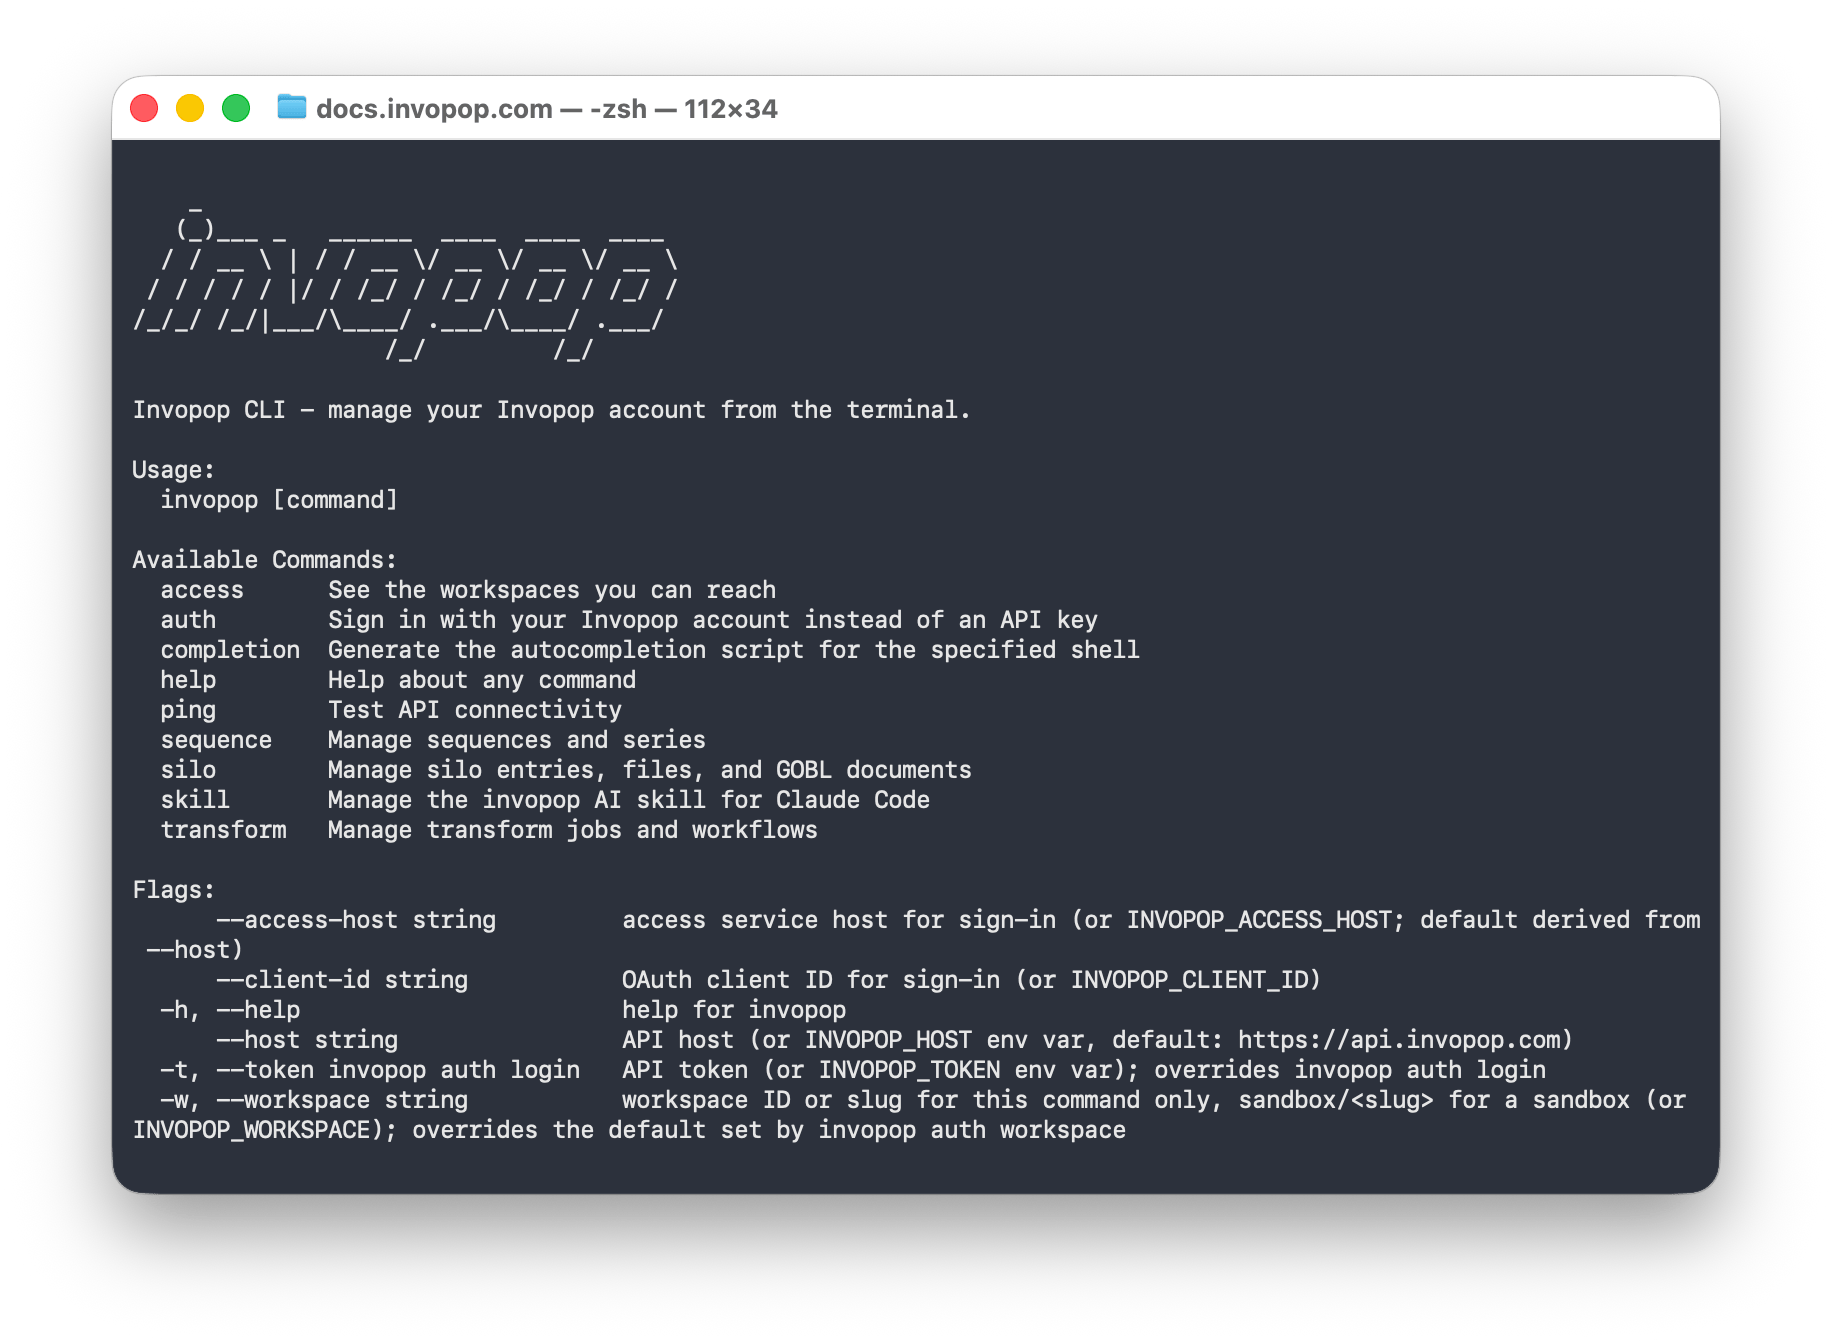 The CLI is open source at [github.com/invopop/cli](https://github.com/invopop/cli). Everything it does goes through the same public API as the Console, so it can only do what your account is allowed to do.
## Install
If you have [Homebrew](https://brew.sh), this is the simplest option and keeps the CLI up to date with your other tools.
```bash theme={"system"}
brew install invopop/tap/invopop
```
Homebrew builds the CLI from source the first time, so the install can take a minute.
Download the file for your computer from the [releases page](https://github.com/invopop/cli/releases). Builds are available for macOS, Linux and Windows. Unpack it and move the `invopop` program somewhere on your `PATH`.
```bash theme={"system"}
go install github.com/invopop/cli/cmd/invopop@latest
```
Check that it worked with `invopop --help`. You should see the list of commands.
## Sign in
The login command opens your browser so you can sign in with the same account you use for the Console. The browser then shows a short code to paste back into the terminal, and the CLI asks which of your workspaces to use by default.
```bash theme={"system"}
invopop auth login
```
From then on every command runs in that workspace with the same permissions you have in the Console. The CLI keeps you signed in for a week and renews its access on its own.
```bash theme={"system"}
invopop auth status # who you are and which workspace is active
invopop auth workspace # pick a different default workspace
invopop auth logout
```
If you belong to several workspaces, name one directly with its slug. Use `sandbox/` plus the slug for a sandbox, since live and sandbox workspaces can share a name. To run a single command elsewhere without changing your default, add `-w`:
```bash theme={"system"}
invopop auth workspace sandbox/my-company
invopop -w my-company silo entries list
```
Sandbox and live workspaces use exactly the same commands. Check `invopop auth status` before doing anything in a live workspace.
For scripts that run without a person present, use an [API key](/console/api-keys) from the Console instead. Put it in the `INVOPOP_TOKEN` environment variable or pass it with `--token`. An API key already belongs to one workspace, so it cannot be combined with `-w`.
## Everyday tasks
The CLI works with [GOBL](https://docs.gobl.org) documents, the same format the API uses, written in JSON or in YAML. Save this as `invoice.yaml` to follow along. There are no totals because Invopop calculates them for you.
```yaml invoice.yaml theme={"system"}
$schema: "https://gobl.org/draft-0/bill/invoice"
currency: "EUR"
issue_date: "2026-10-14"
series: "SAMPLE"
code: "0001"
supplier:
name: "My Company S.L."
tax_id:
country: "ES"
code: "B98602642"
customer:
name: "Customer Ltd"
tax_id:
country: "ES"
code: "A58818501"
lines:
- quantity: 1
item:
name: "Consulting services"
price: "100.00"
taxes:
- cat: "VAT"
rate: "standard"
```
**Check a document.** This fills in the totals, validates the document against the rules of the country involved and prints the result. Nothing is stored, so run it as often as you like. If something is wrong, such as an invalid tax ID, you get a message saying which field to fix.
```bash theme={"system"}
invopop silo build --file invoice.yaml
```
**Store a document.** Every stored document is a *silo entry*. The response includes an `id` you'll need later. Giving the entry a `--key` of your own, such as the invoice number in your system, lets you find it again by that key and makes the command safe to repeat.
```bash theme={"system"}
invopop silo entries create --file invoice.yaml --key my-invoice-0001
invopop silo entries fetch-key my-invoice-0001
```
**Send it through a workflow.** Workflows are the sequences of steps you set up in the Console. List them to find the `id` you want, then create a *job*, which runs one entry through one workflow. With `--wait`, the CLI waits up to that many seconds and shows you the outcome, including a `faults` list if a step failed. You can also pass `--file` instead of an entry ID and the CLI stores the document for you.
```bash theme={"system"}
invopop transform workflows list
invopop transform jobs create --workflow-id WORKFLOW_ID --silo-entry-id ENTRY_ID --wait 30
```
**Download a generated file.** Workflows often attach files to the entry, such as the invoice PDF or the XML sent to the tax authority. Fetch the entry to see its `files`, then download one. This is the one command that writes to disk instead of printing JSON.
```bash theme={"system"}
invopop silo entries fetch ENTRY_ID
invopop silo files download ENTRY_ID FILE_ID
```
**Reserve invoice numbers.** If Invopop manages your numbering, each call hands out the next unused number in a [series](/console/series).
```bash theme={"system"}
invopop sequence series list
invopop sequence entries create SERIES_ID
```
Results always come back as JSON, so they are easy to read, paste into a support ticket or pass to another tool. Every command accepts `--help` for the full list of options.
## Use with AI agents
Because every command is a line of text with JSON output, an assistant such as [Claude Code](https://claude.com/claude-code) can drive the CLI just as a person would. You describe what you want in plain language and the agent works out which commands to run.
The agent never gets a key of its own. It uses your sign-in, so it can only do what you are allowed to do, in the workspace you chose. You stay in charge of logging in: the agent cannot complete the browser sign-in for you and should never ask for the code the browser shows.
The CLI ships with a skill that teaches Claude Code how Invopop works. Install it, then type `/invopop` in Claude Code followed by what you need, for example "check whether invoice.yaml is valid and tell me what's wrong".
```bash theme={"system"}
invopop skill install
```
Start in a sandbox workspace, and ask the agent to run `invopop silo build` and show you the result before it sends anything. Documents sent from a live workspace are real and may be legally binding.
Any other assistant that can run terminal commands can use the CLI in the same way. Print the skill with `invopop skill show` and paste it into that tool's instructions. For agents that call the API directly, see the [agent primer](/llms).
This documentation is built and hosted on [Mintlify](https://mintlify.com), a developer documentation platform.
The CLI is open source at [github.com/invopop/cli](https://github.com/invopop/cli). Everything it does goes through the same public API as the Console, so it can only do what your account is allowed to do.
## Install
If you have [Homebrew](https://brew.sh), this is the simplest option and keeps the CLI up to date with your other tools.
```bash theme={"system"}
brew install invopop/tap/invopop
```
Homebrew builds the CLI from source the first time, so the install can take a minute.
Download the file for your computer from the [releases page](https://github.com/invopop/cli/releases). Builds are available for macOS, Linux and Windows. Unpack it and move the `invopop` program somewhere on your `PATH`.
```bash theme={"system"}
go install github.com/invopop/cli/cmd/invopop@latest
```
Check that it worked with `invopop --help`. You should see the list of commands.
## Sign in
The login command opens your browser so you can sign in with the same account you use for the Console. The browser then shows a short code to paste back into the terminal, and the CLI asks which of your workspaces to use by default.
```bash theme={"system"}
invopop auth login
```
From then on every command runs in that workspace with the same permissions you have in the Console. The CLI keeps you signed in for a week and renews its access on its own.
```bash theme={"system"}
invopop auth status # who you are and which workspace is active
invopop auth workspace # pick a different default workspace
invopop auth logout
```
If you belong to several workspaces, name one directly with its slug. Use `sandbox/` plus the slug for a sandbox, since live and sandbox workspaces can share a name. To run a single command elsewhere without changing your default, add `-w`:
```bash theme={"system"}
invopop auth workspace sandbox/my-company
invopop -w my-company silo entries list
```
Sandbox and live workspaces use exactly the same commands. Check `invopop auth status` before doing anything in a live workspace.
For scripts that run without a person present, use an [API key](/console/api-keys) from the Console instead. Put it in the `INVOPOP_TOKEN` environment variable or pass it with `--token`. An API key already belongs to one workspace, so it cannot be combined with `-w`.
## Everyday tasks
The CLI works with [GOBL](https://docs.gobl.org) documents, the same format the API uses, written in JSON or in YAML. Save this as `invoice.yaml` to follow along. There are no totals because Invopop calculates them for you.
```yaml invoice.yaml theme={"system"}
$schema: "https://gobl.org/draft-0/bill/invoice"
currency: "EUR"
issue_date: "2026-10-14"
series: "SAMPLE"
code: "0001"
supplier:
name: "My Company S.L."
tax_id:
country: "ES"
code: "B98602642"
customer:
name: "Customer Ltd"
tax_id:
country: "ES"
code: "A58818501"
lines:
- quantity: 1
item:
name: "Consulting services"
price: "100.00"
taxes:
- cat: "VAT"
rate: "standard"
```
**Check a document.** This fills in the totals, validates the document against the rules of the country involved and prints the result. Nothing is stored, so run it as often as you like. If something is wrong, such as an invalid tax ID, you get a message saying which field to fix.
```bash theme={"system"}
invopop silo build --file invoice.yaml
```
**Store a document.** Every stored document is a *silo entry*. The response includes an `id` you'll need later. Giving the entry a `--key` of your own, such as the invoice number in your system, lets you find it again by that key and makes the command safe to repeat.
```bash theme={"system"}
invopop silo entries create --file invoice.yaml --key my-invoice-0001
invopop silo entries fetch-key my-invoice-0001
```
**Send it through a workflow.** Workflows are the sequences of steps you set up in the Console. List them to find the `id` you want, then create a *job*, which runs one entry through one workflow. With `--wait`, the CLI waits up to that many seconds and shows you the outcome, including a `faults` list if a step failed. You can also pass `--file` instead of an entry ID and the CLI stores the document for you.
```bash theme={"system"}
invopop transform workflows list
invopop transform jobs create --workflow-id WORKFLOW_ID --silo-entry-id ENTRY_ID --wait 30
```
**Download a generated file.** Workflows often attach files to the entry, such as the invoice PDF or the XML sent to the tax authority. Fetch the entry to see its `files`, then download one. This is the one command that writes to disk instead of printing JSON.
```bash theme={"system"}
invopop silo entries fetch ENTRY_ID
invopop silo files download ENTRY_ID FILE_ID
```
**Reserve invoice numbers.** If Invopop manages your numbering, each call hands out the next unused number in a [series](/console/series).
```bash theme={"system"}
invopop sequence series list
invopop sequence entries create SERIES_ID
```
Results always come back as JSON, so they are easy to read, paste into a support ticket or pass to another tool. Every command accepts `--help` for the full list of options.
## Use with AI agents
Because every command is a line of text with JSON output, an assistant such as [Claude Code](https://claude.com/claude-code) can drive the CLI just as a person would. You describe what you want in plain language and the agent works out which commands to run.
The agent never gets a key of its own. It uses your sign-in, so it can only do what you are allowed to do, in the workspace you chose. You stay in charge of logging in: the agent cannot complete the browser sign-in for you and should never ask for the code the browser shows.
The CLI ships with a skill that teaches Claude Code how Invopop works. Install it, then type `/invopop` in Claude Code followed by what you need, for example "check whether invoice.yaml is valid and tell me what's wrong".
```bash theme={"system"}
invopop skill install
```
Start in a sandbox workspace, and ask the agent to run `invopop silo build` and show you the result before it sends anything. Documents sent from a live workspace are real and may be legally binding.
Any other assistant that can run terminal commands can use the CLI in the same way. Print the skill with `invopop skill show` and paste it into that tool's instructions. For agents that call the API directly, see the [agent primer](/llms).
This documentation is built and hosted on [Mintlify](https://mintlify.com), a developer documentation platform.