> ## Documentation Index
> Fetch the complete documentation index at: https://docs.invopop.com/llms.txt
> Use this file to discover all available pages before exploring further.
# Quickstart
> Sign up instructions and getting your first sandbox working
In this tutorial, you will:
1. Sign up for an Invopop account and get your first sandbox workspace working.
2. Invite your colleagues to join your workspace.
3. Create a simple workflow to issue an invoice.
4. Upload the invoice to the workflow and process it.
## Signing up
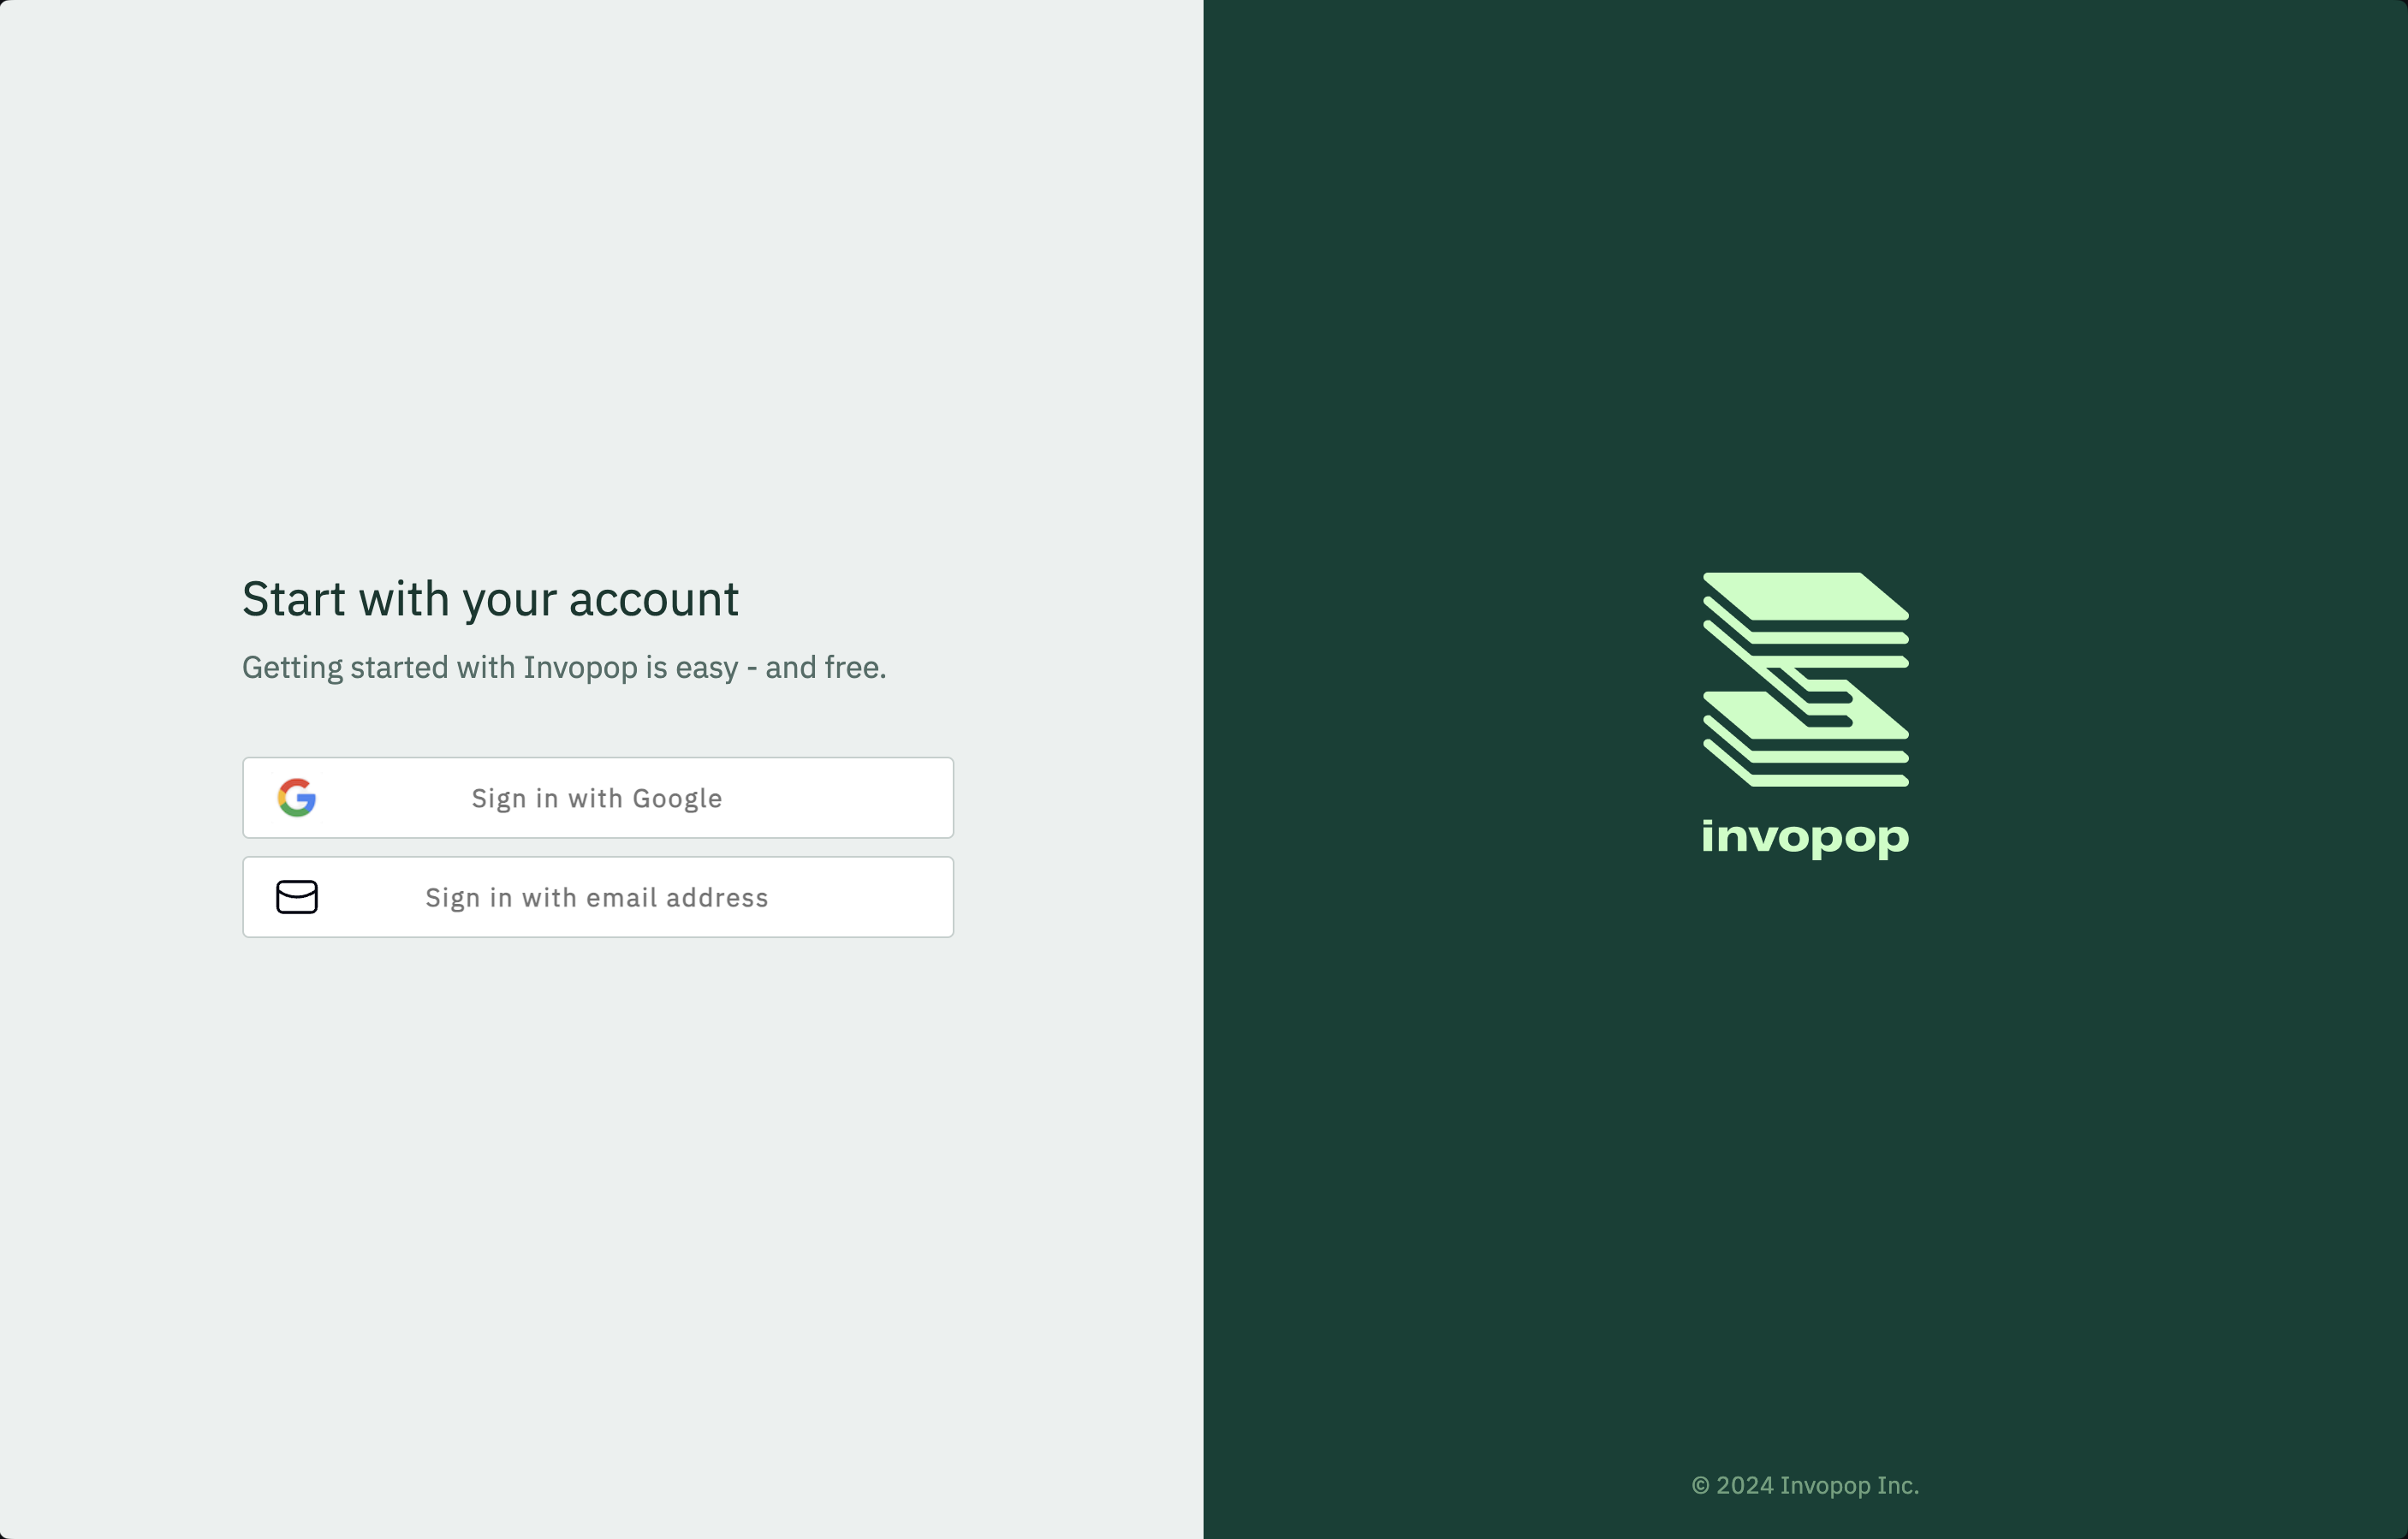
Go to [console.invopop.com](https://console.invopop.com) and select your sign up method. Selecting "Google" will take you to the Google sign-up page.
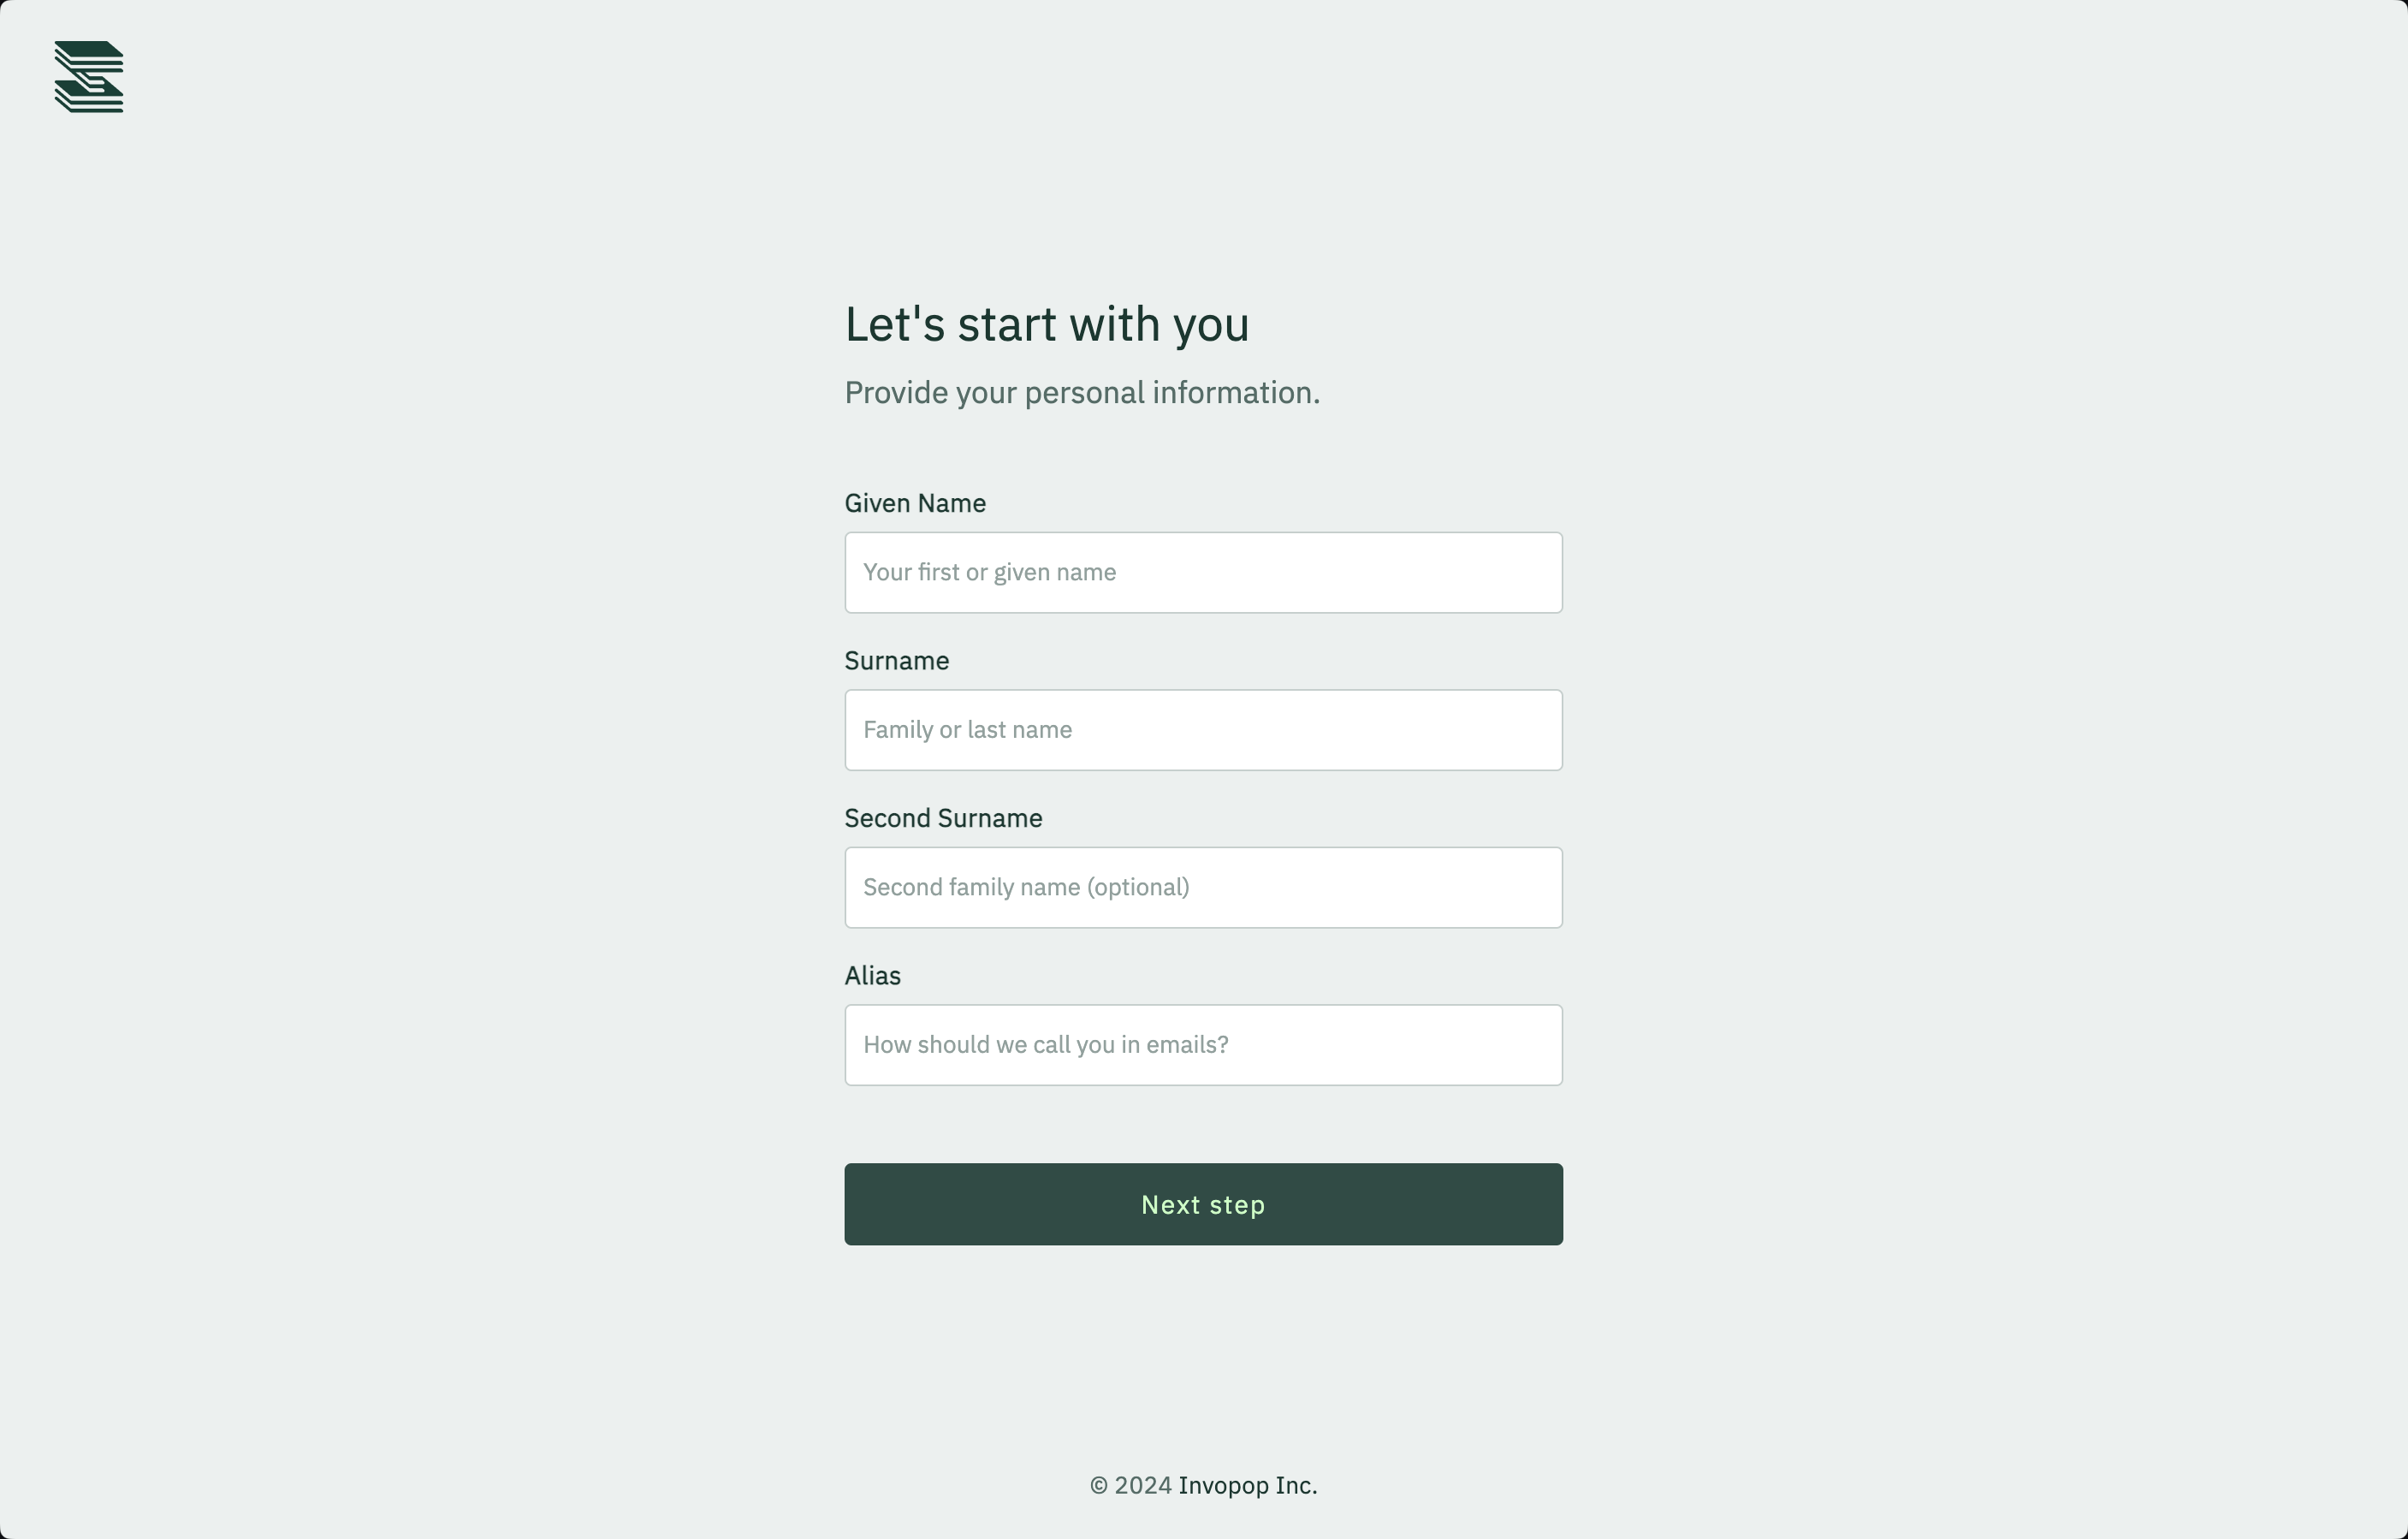
 Fill in the form with your name, company, and position. The company will become your organization in Invopop, more on that later.
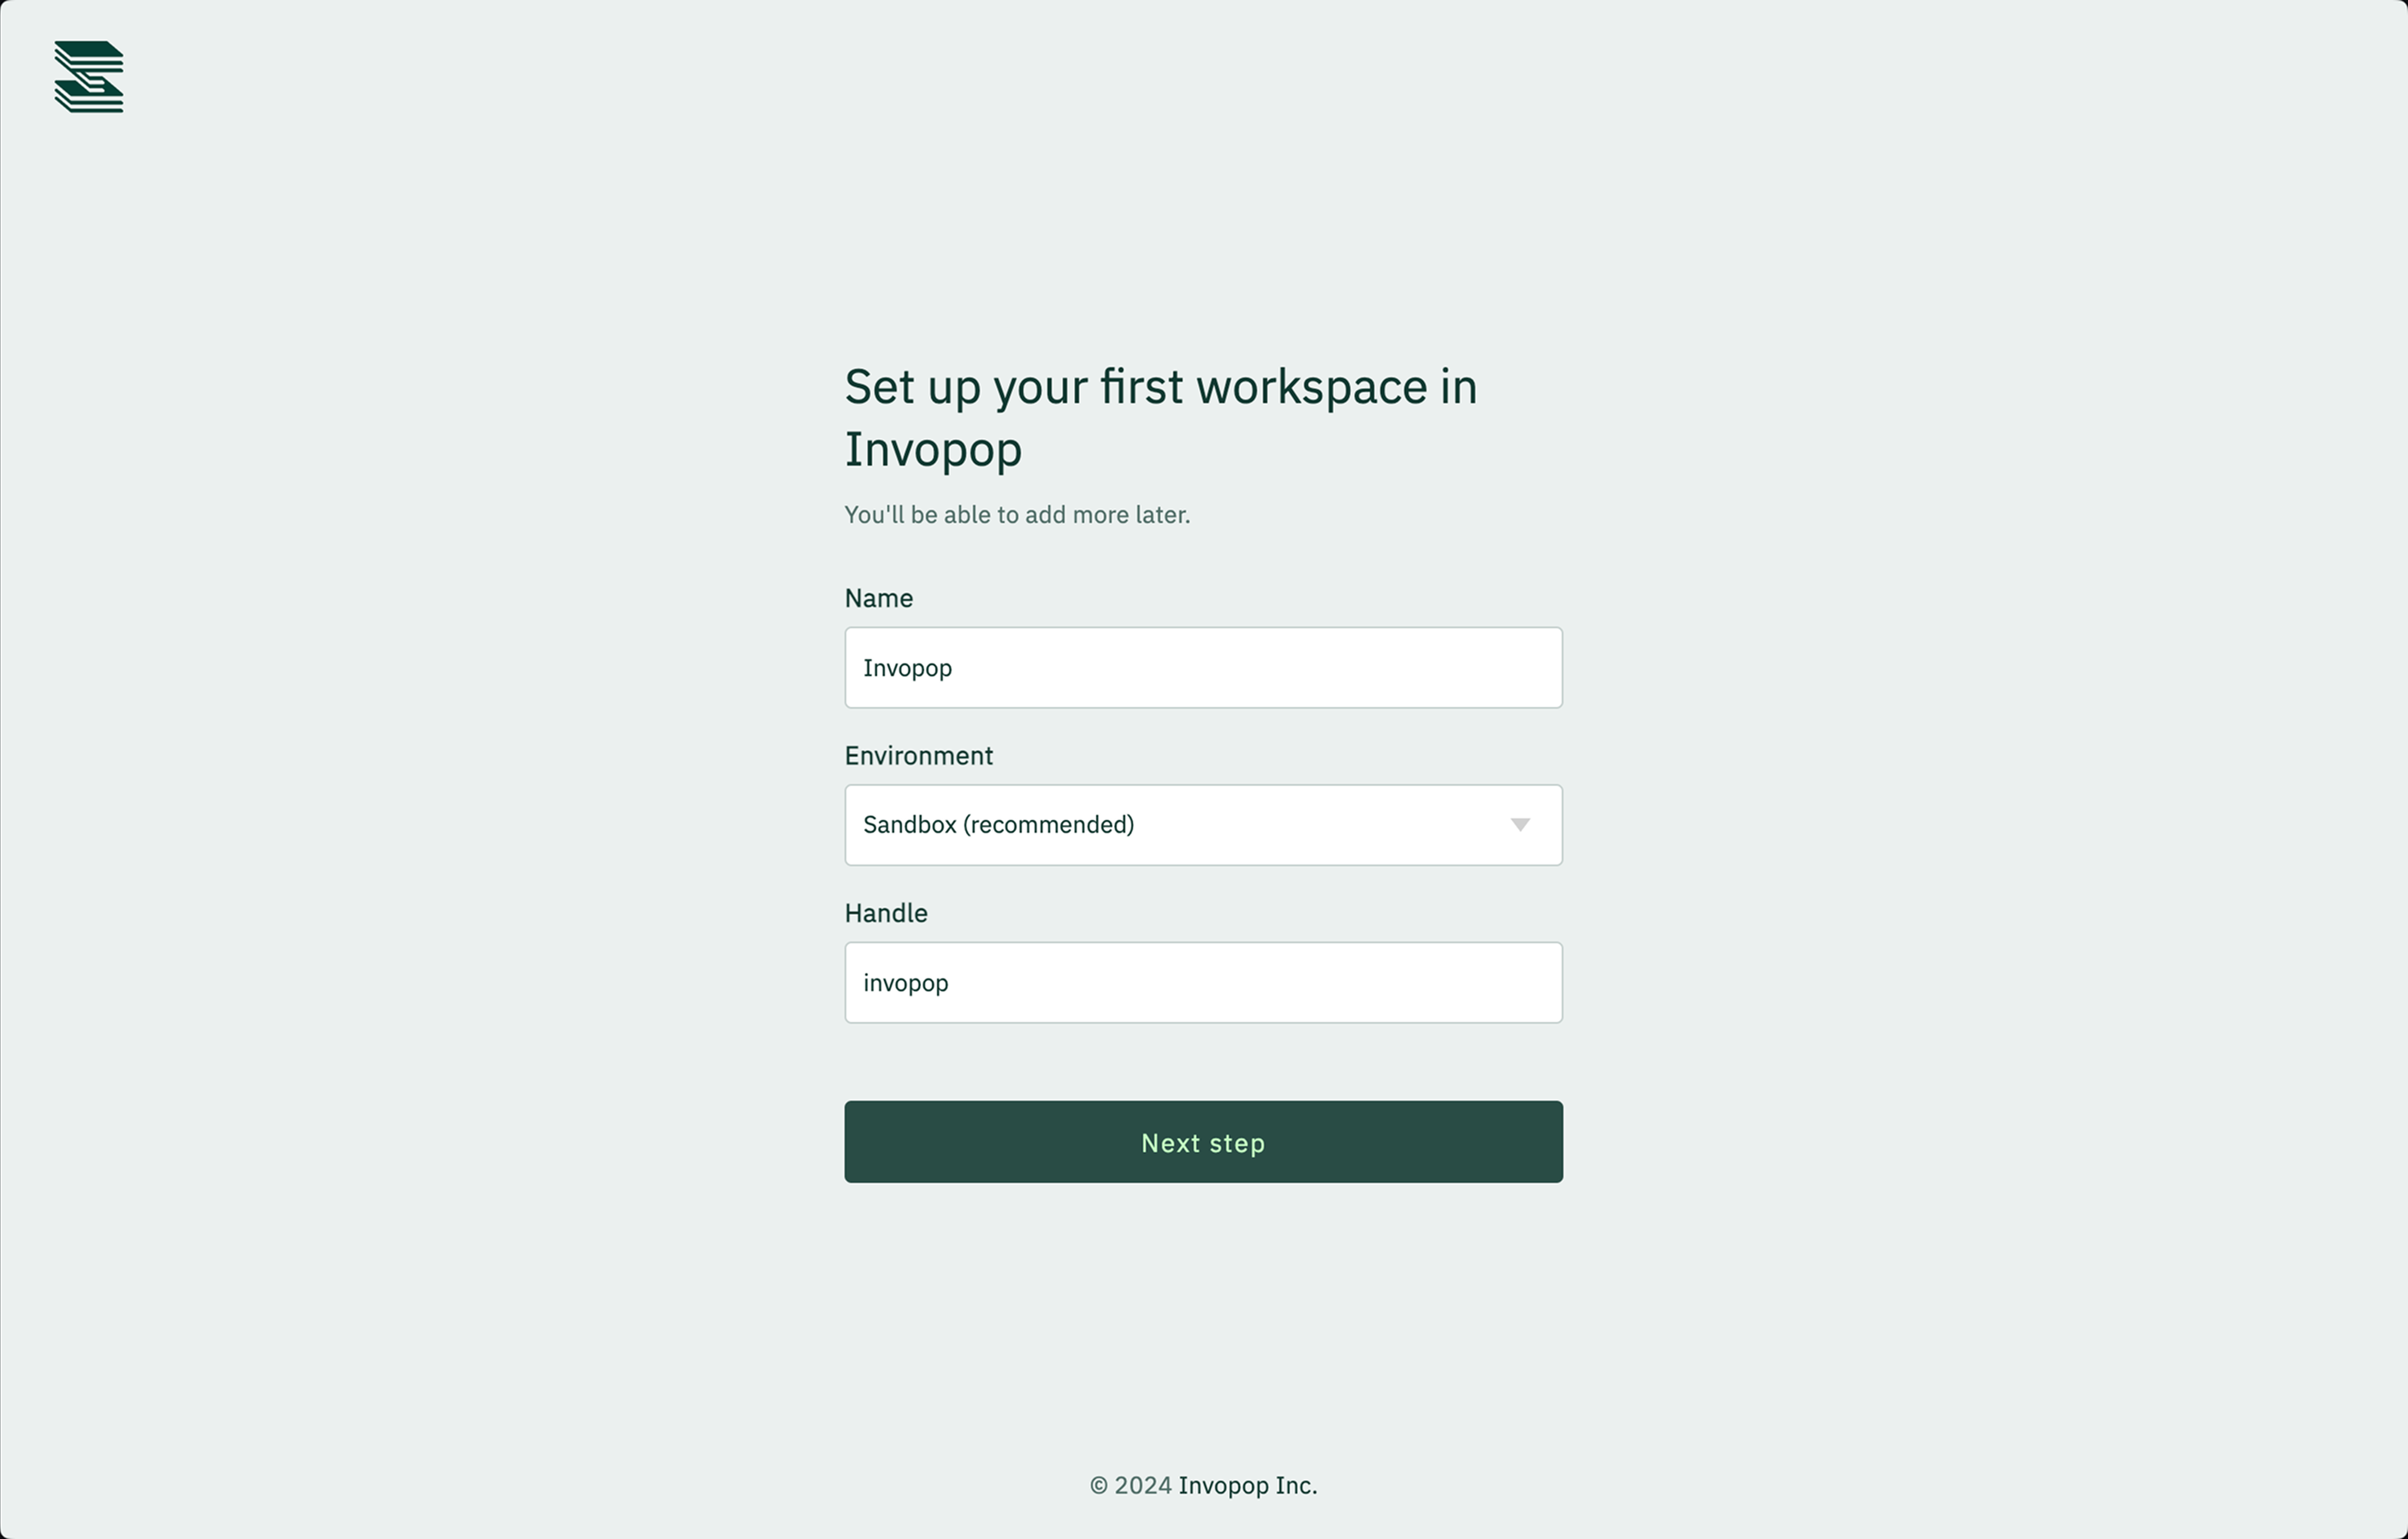
 You'll be prompted to create a first sandbox workspace. Don't worry, you can always create more workspaces later.
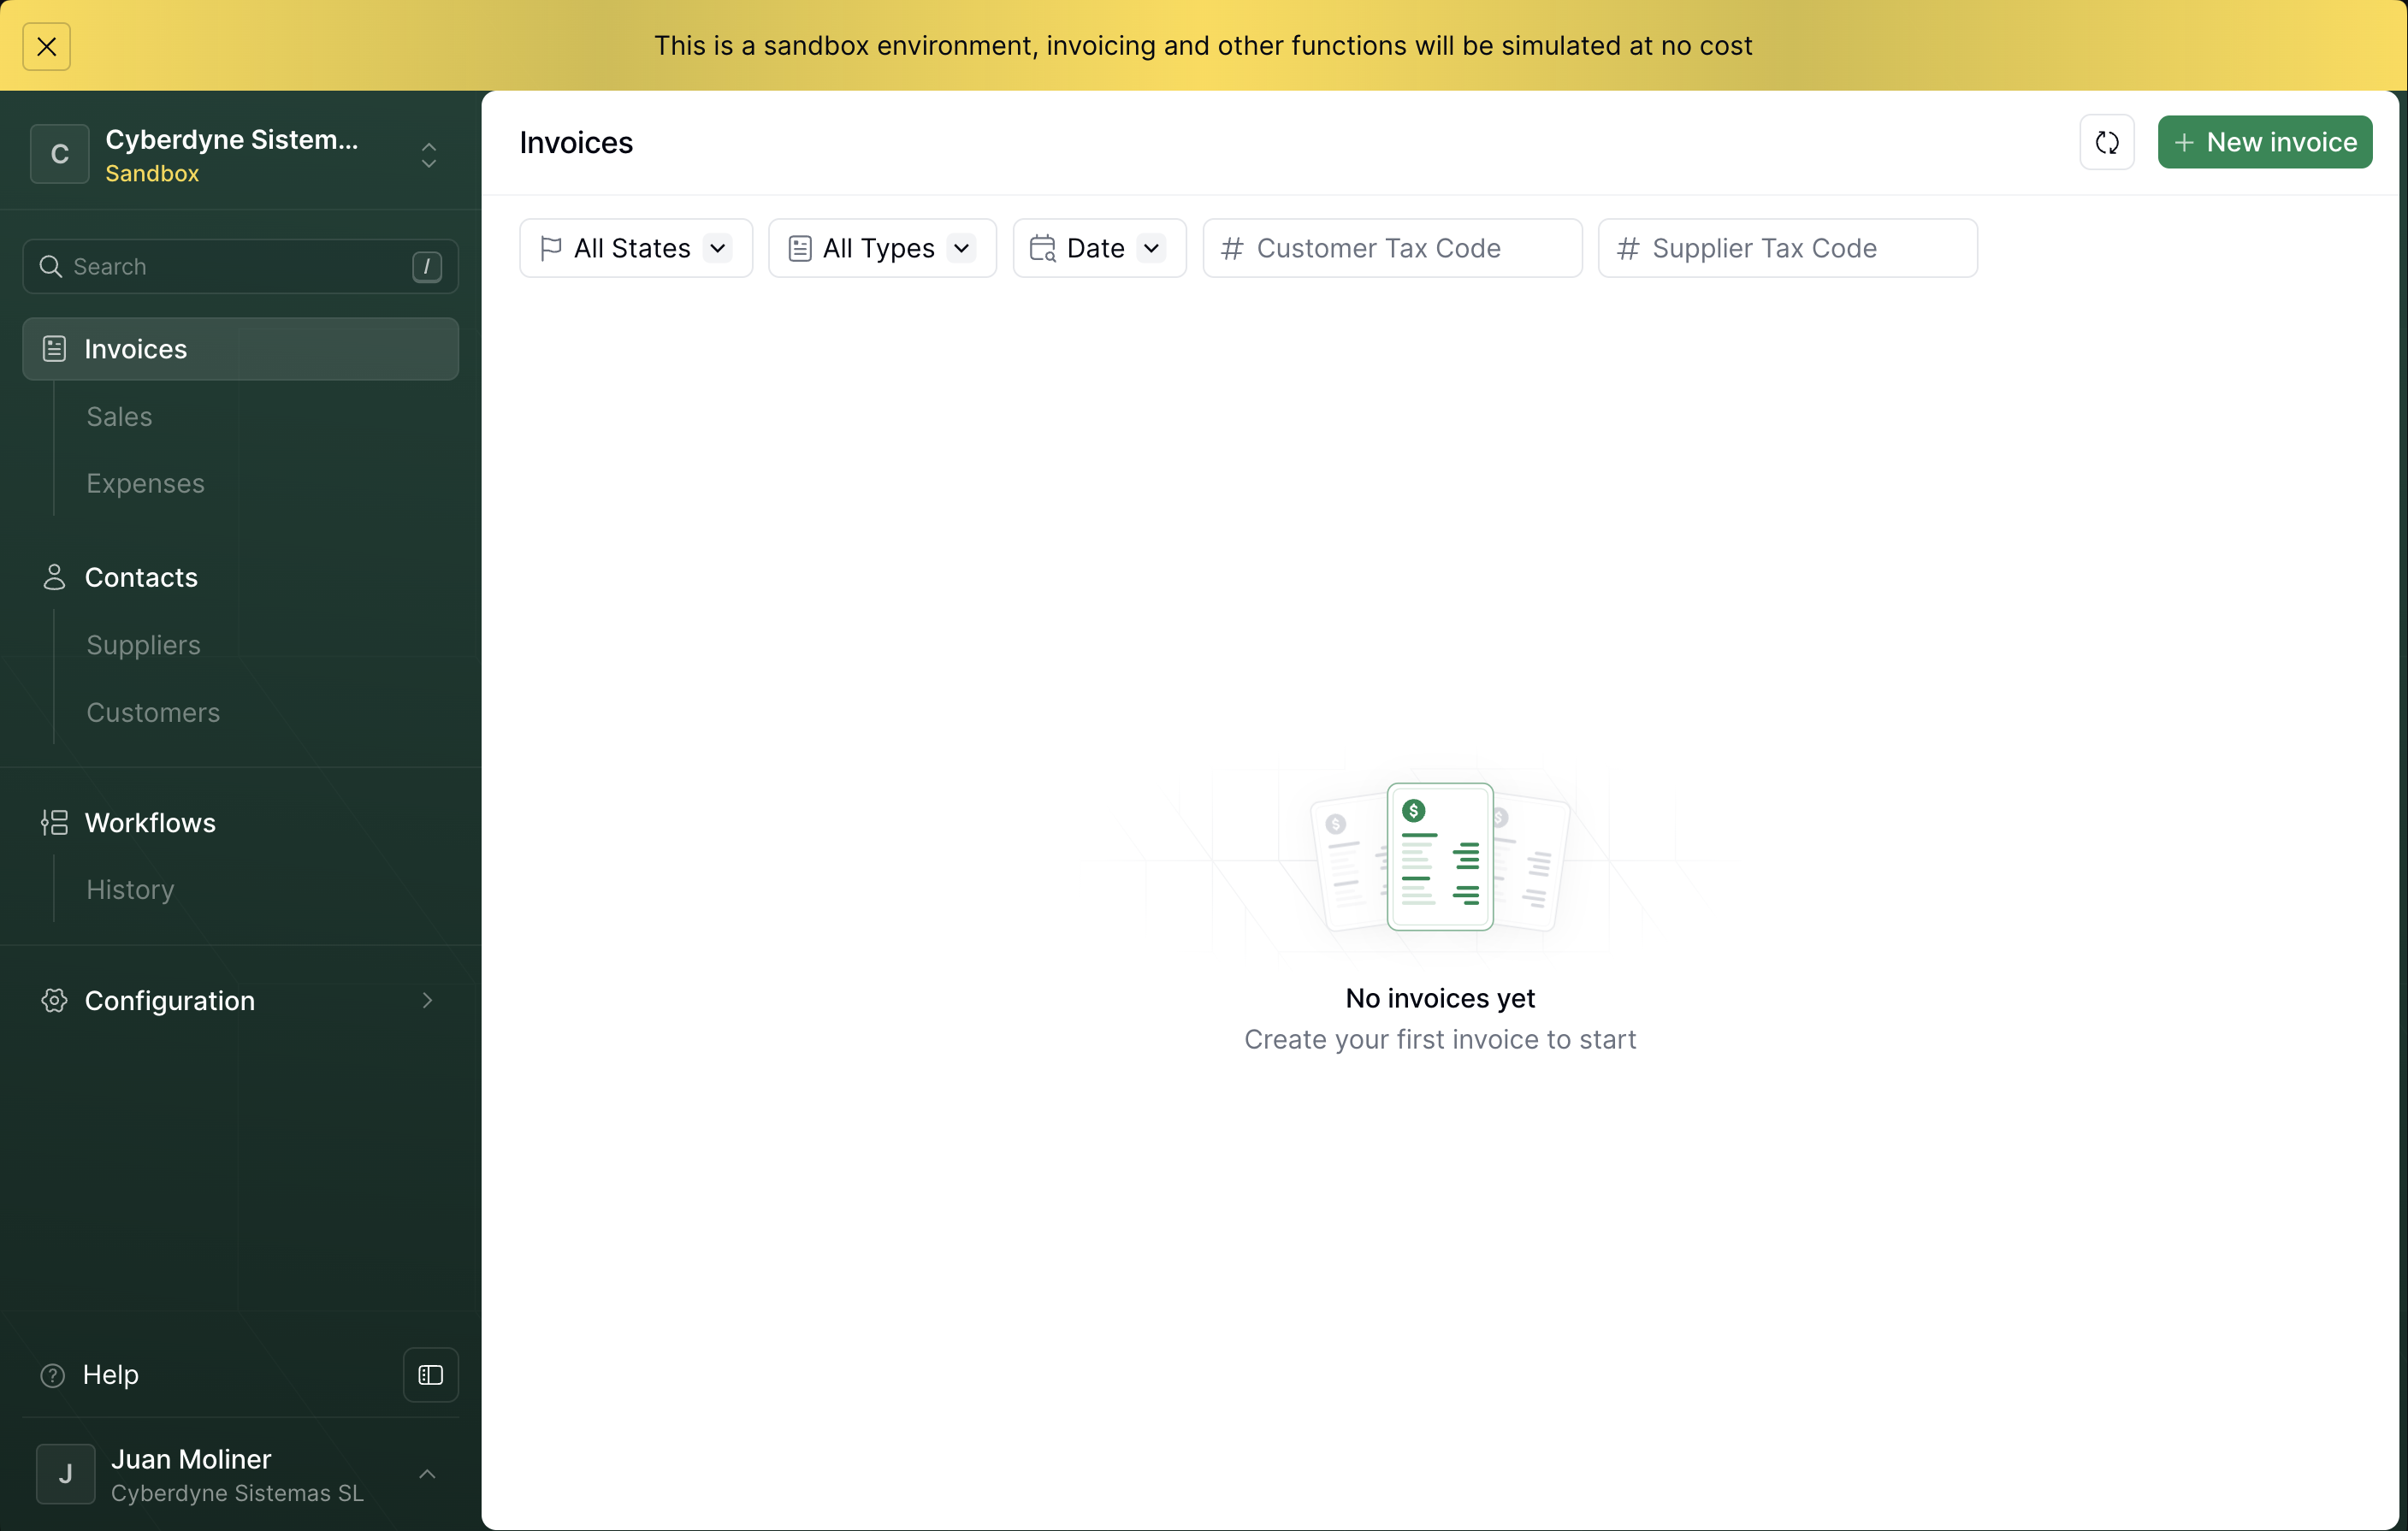
 You will be redirected to the Invopop console. Congratulations, you've just created your first sandbox workspace!
 ## Inviting colleagues
Now that you've signed up, you can invite your colleagues to join your organization.
1\.
Within the [Invopop console](https://console.invopop.com), click on your name on the bottom left corner, and select **Configure organization**.
You may be prompted login again, and you'll be redirected to the workspaces page.
## Inviting colleagues
Now that you've signed up, you can invite your colleagues to join your organization.
1\.
Within the [Invopop console](https://console.invopop.com), click on your name on the bottom left corner, and select **Configure organization**.
You may be prompted login again, and you'll be redirected to the workspaces page.
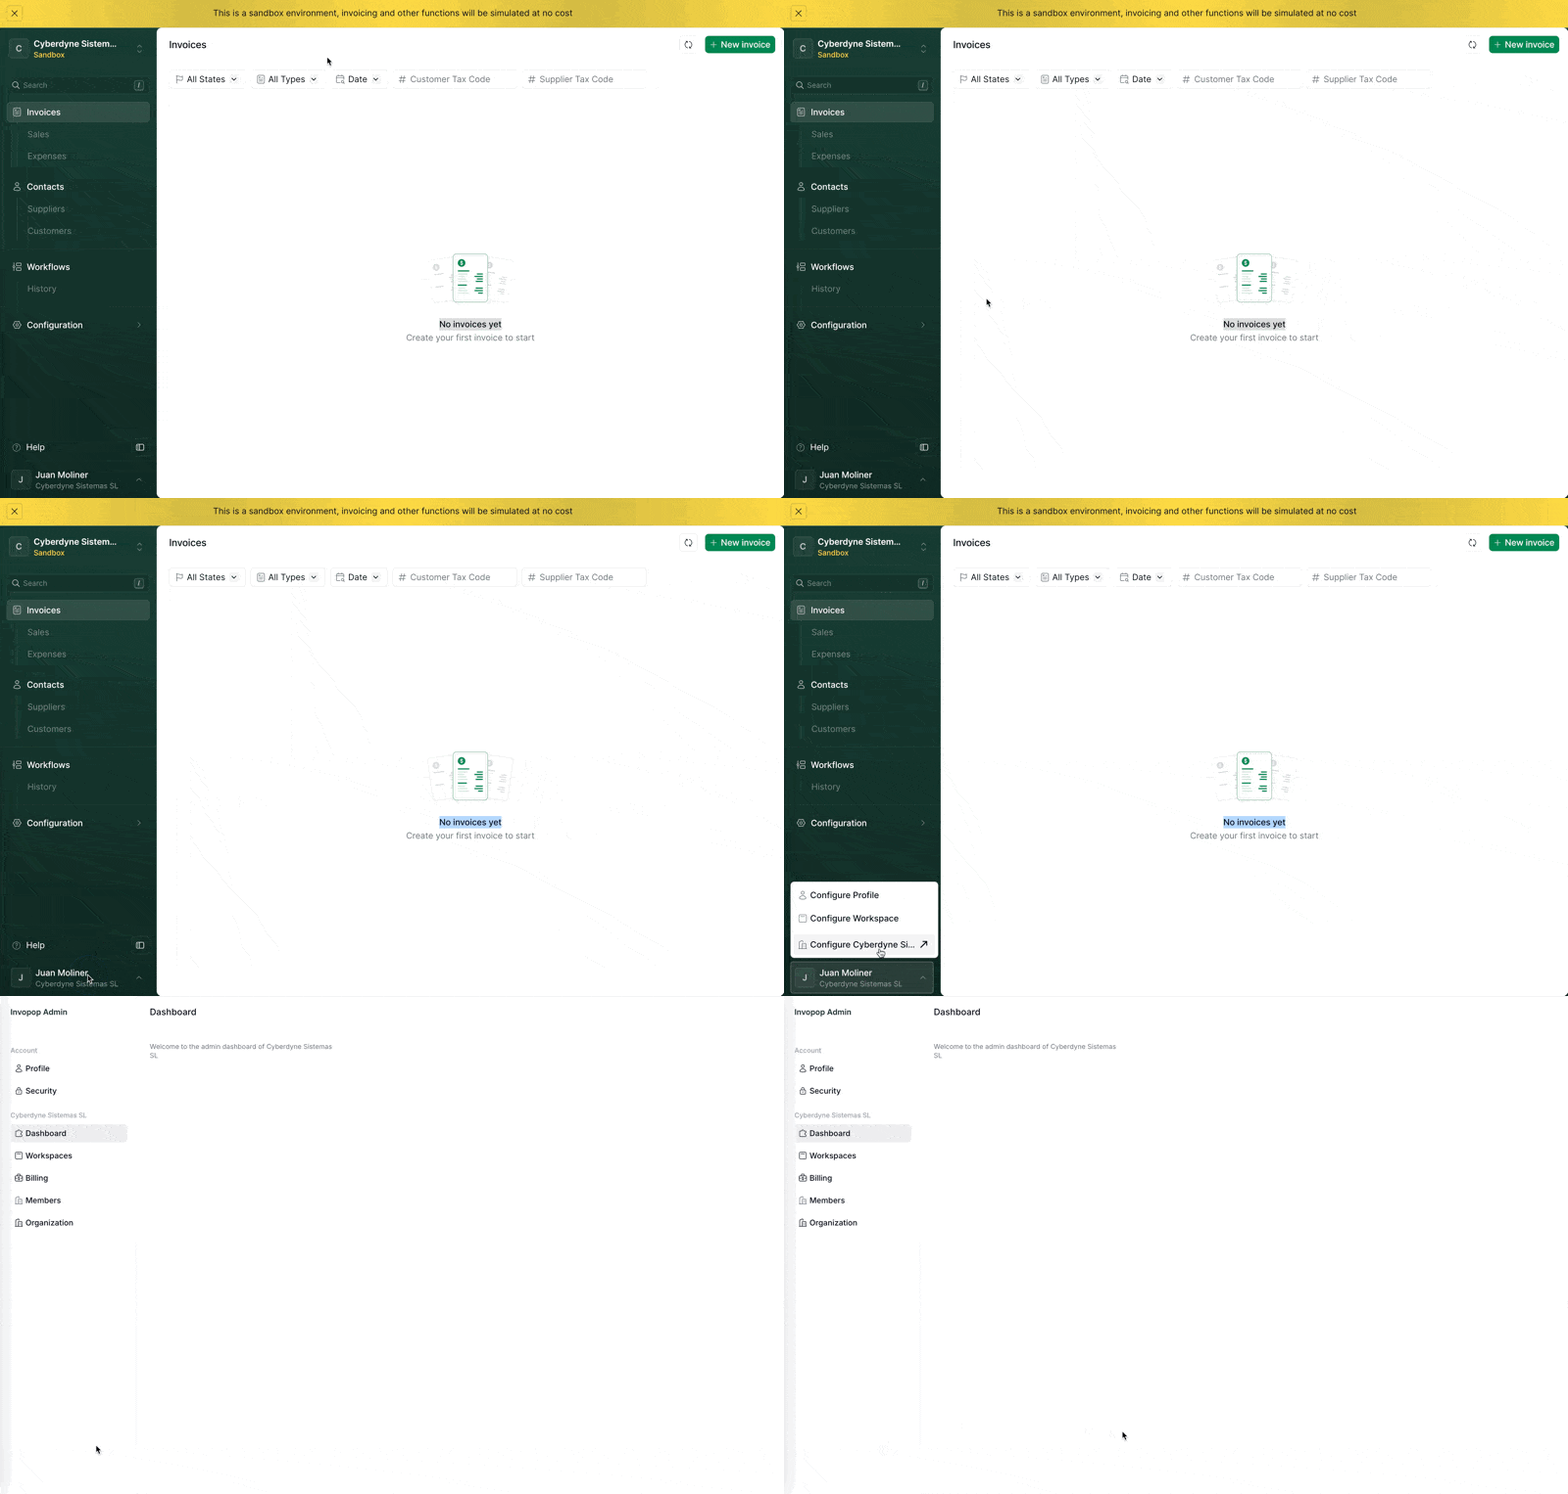 Click on the **Members** tab on the left. You'll see a list of all the members in your organization.
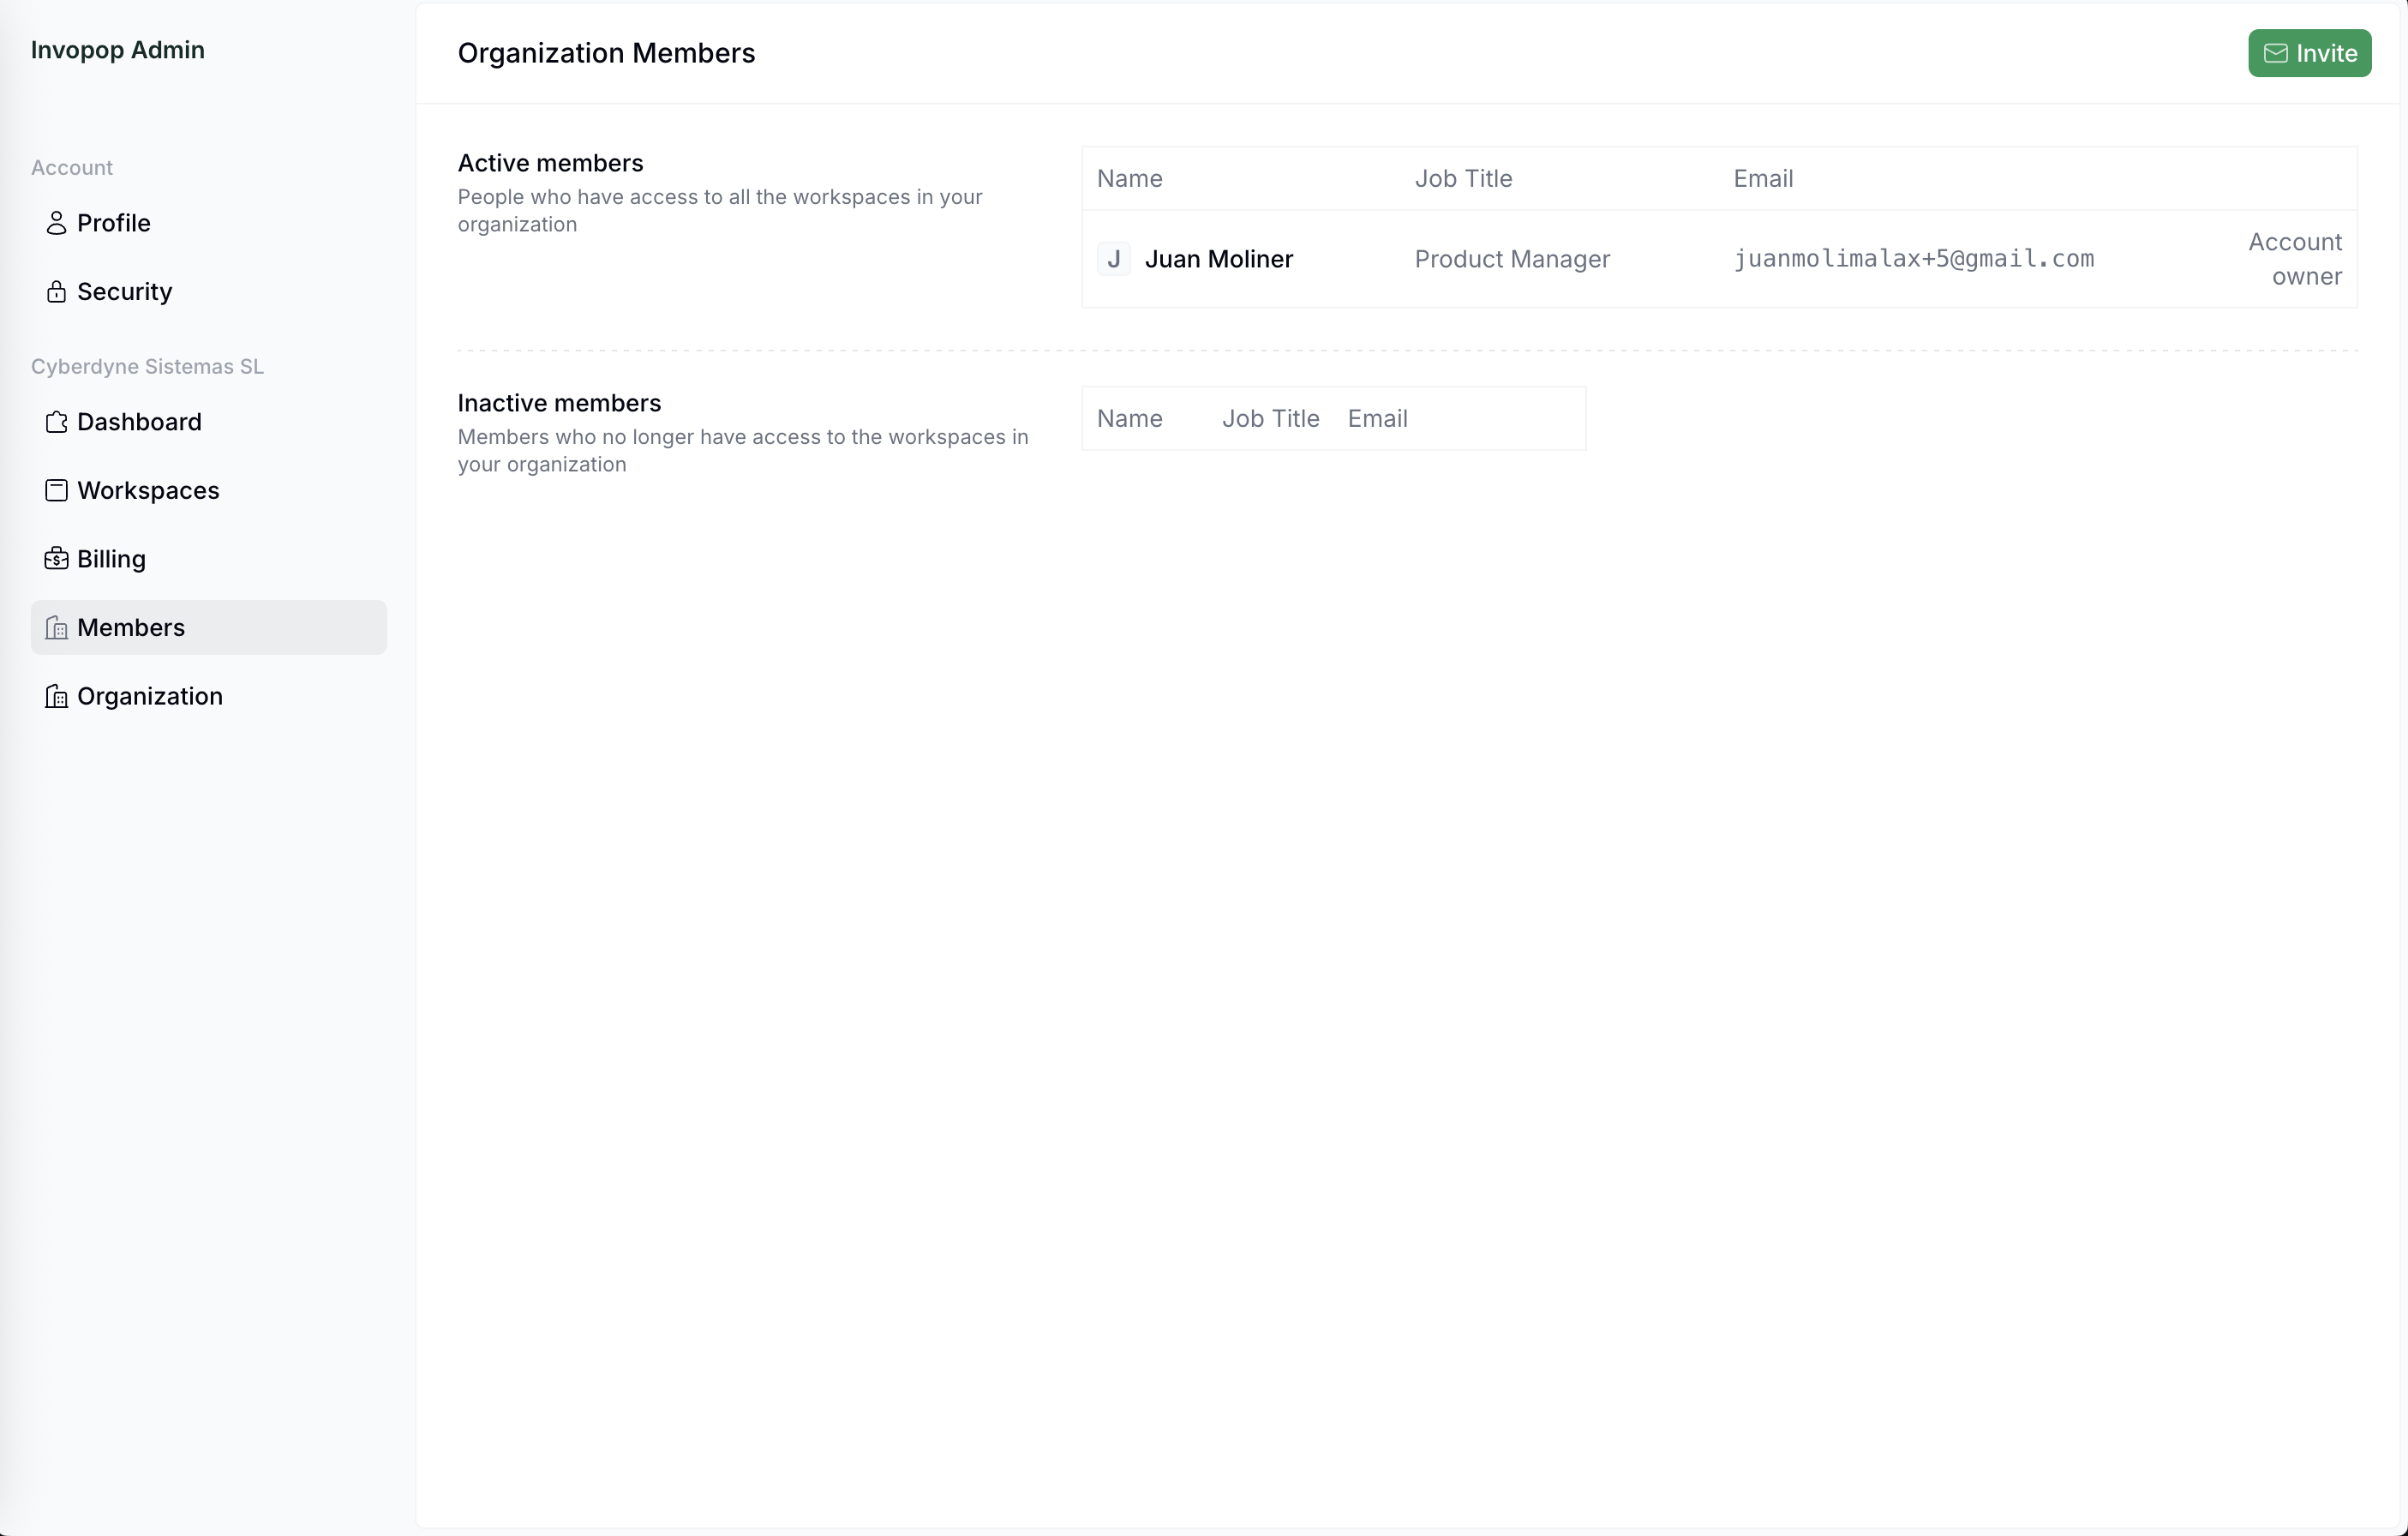 Fill in the form with your colleagues' email addresses and position and click on Send.
Your colleagues will receive an email with a link to join your organization and will be able to access any workspace associated with your organization.
## Creating a workflow
Now let's create your first workflow. We'll start with a simple workflow that generates a PDF invoice.
Go back to the workspace by clicking on the **Workspaces** tab, selecting your workspace and clicking on **Go to Console** or simply opening a new tab in [https://console.invopop.com](https://console.invopop.com).
Fill in the form with your colleagues' email addresses and position and click on Send.
Your colleagues will receive an email with a link to join your organization and will be able to access any workspace associated with your organization.
## Creating a workflow
Now let's create your first workflow. We'll start with a simple workflow that generates a PDF invoice.
Go back to the workspace by clicking on the **Workspaces** tab, selecting your workspace and clicking on **Go to Console** or simply opening a new tab in [https://console.invopop.com](https://console.invopop.com).
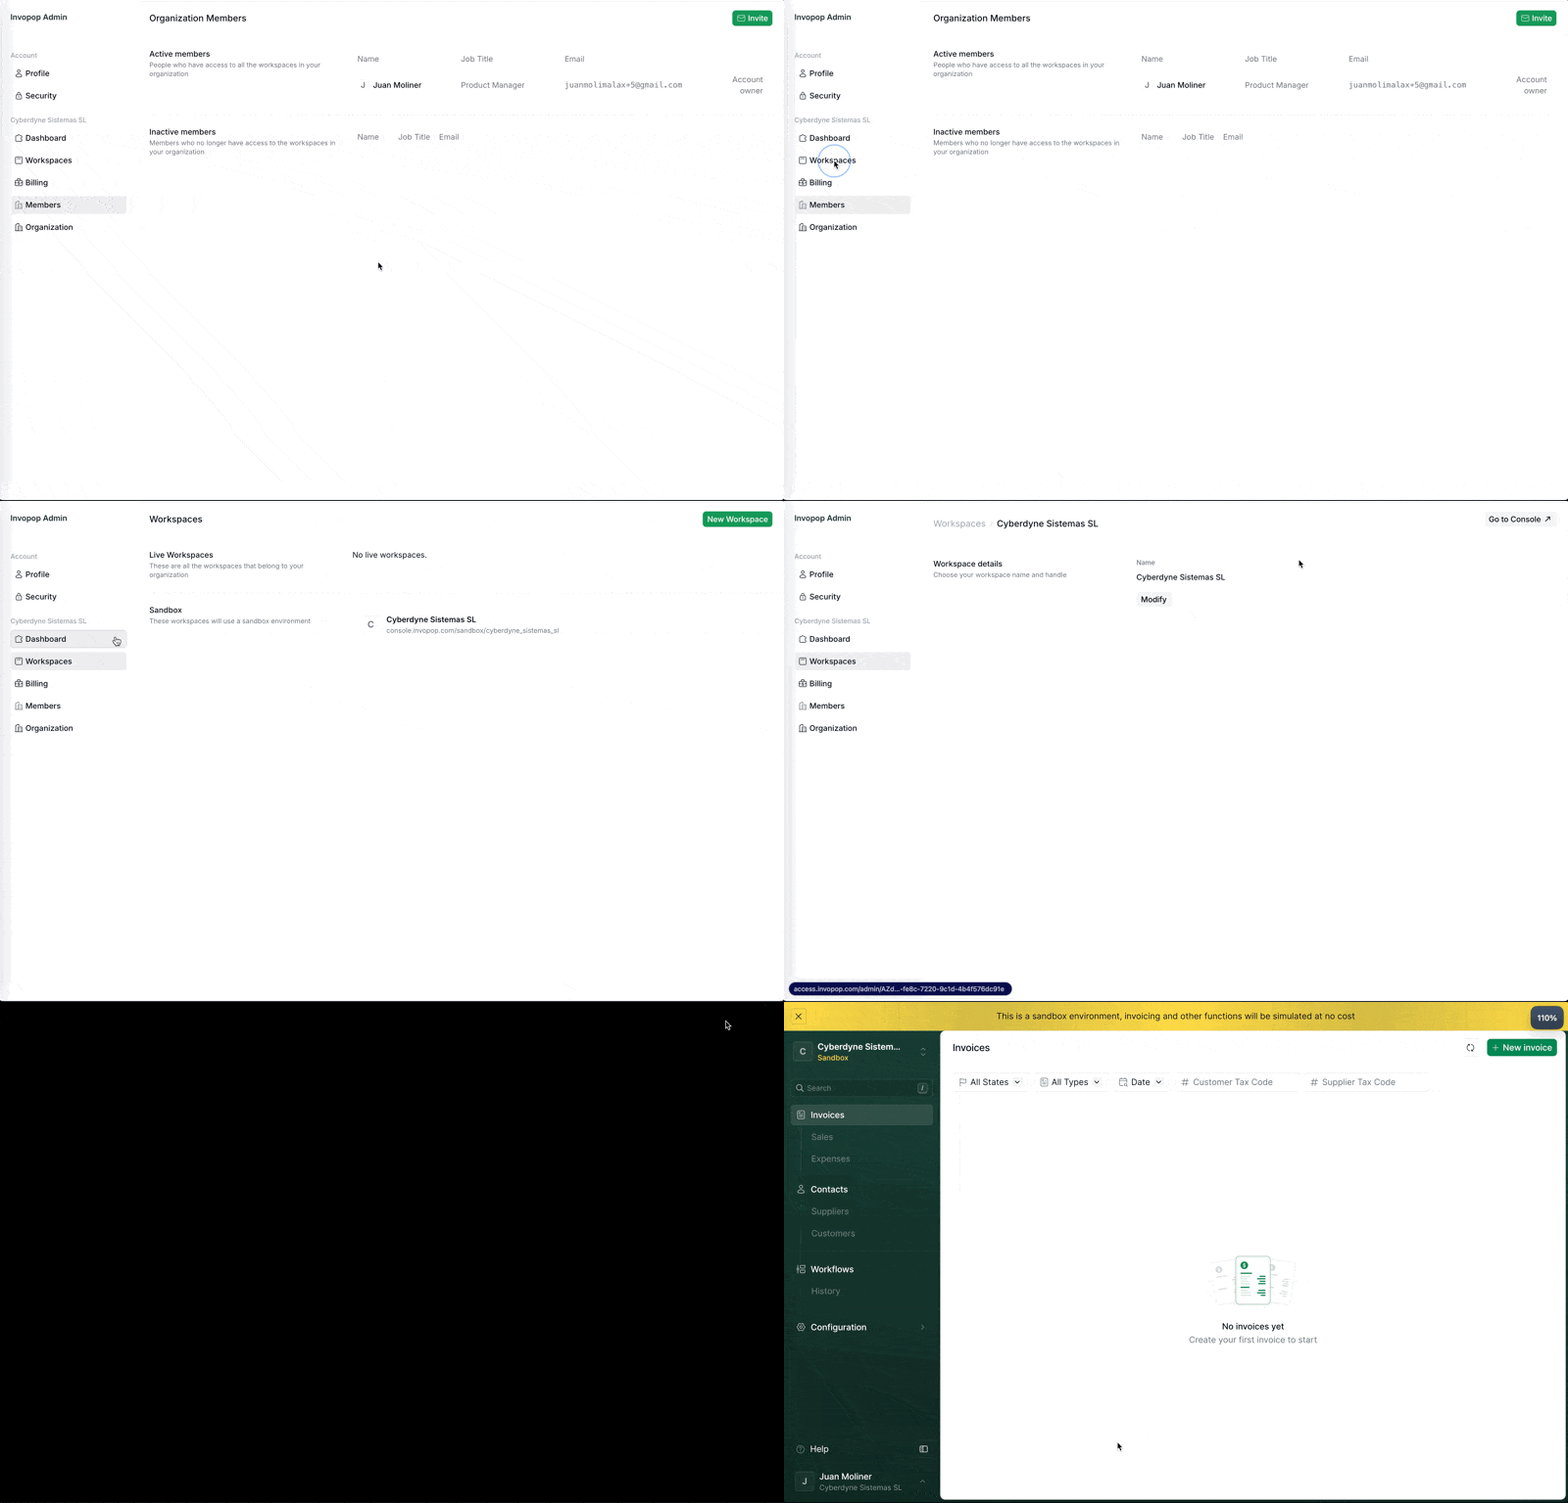 Click on the **Workflows** on the left sidebar. You'll see a list of all the workflows in your workspace.
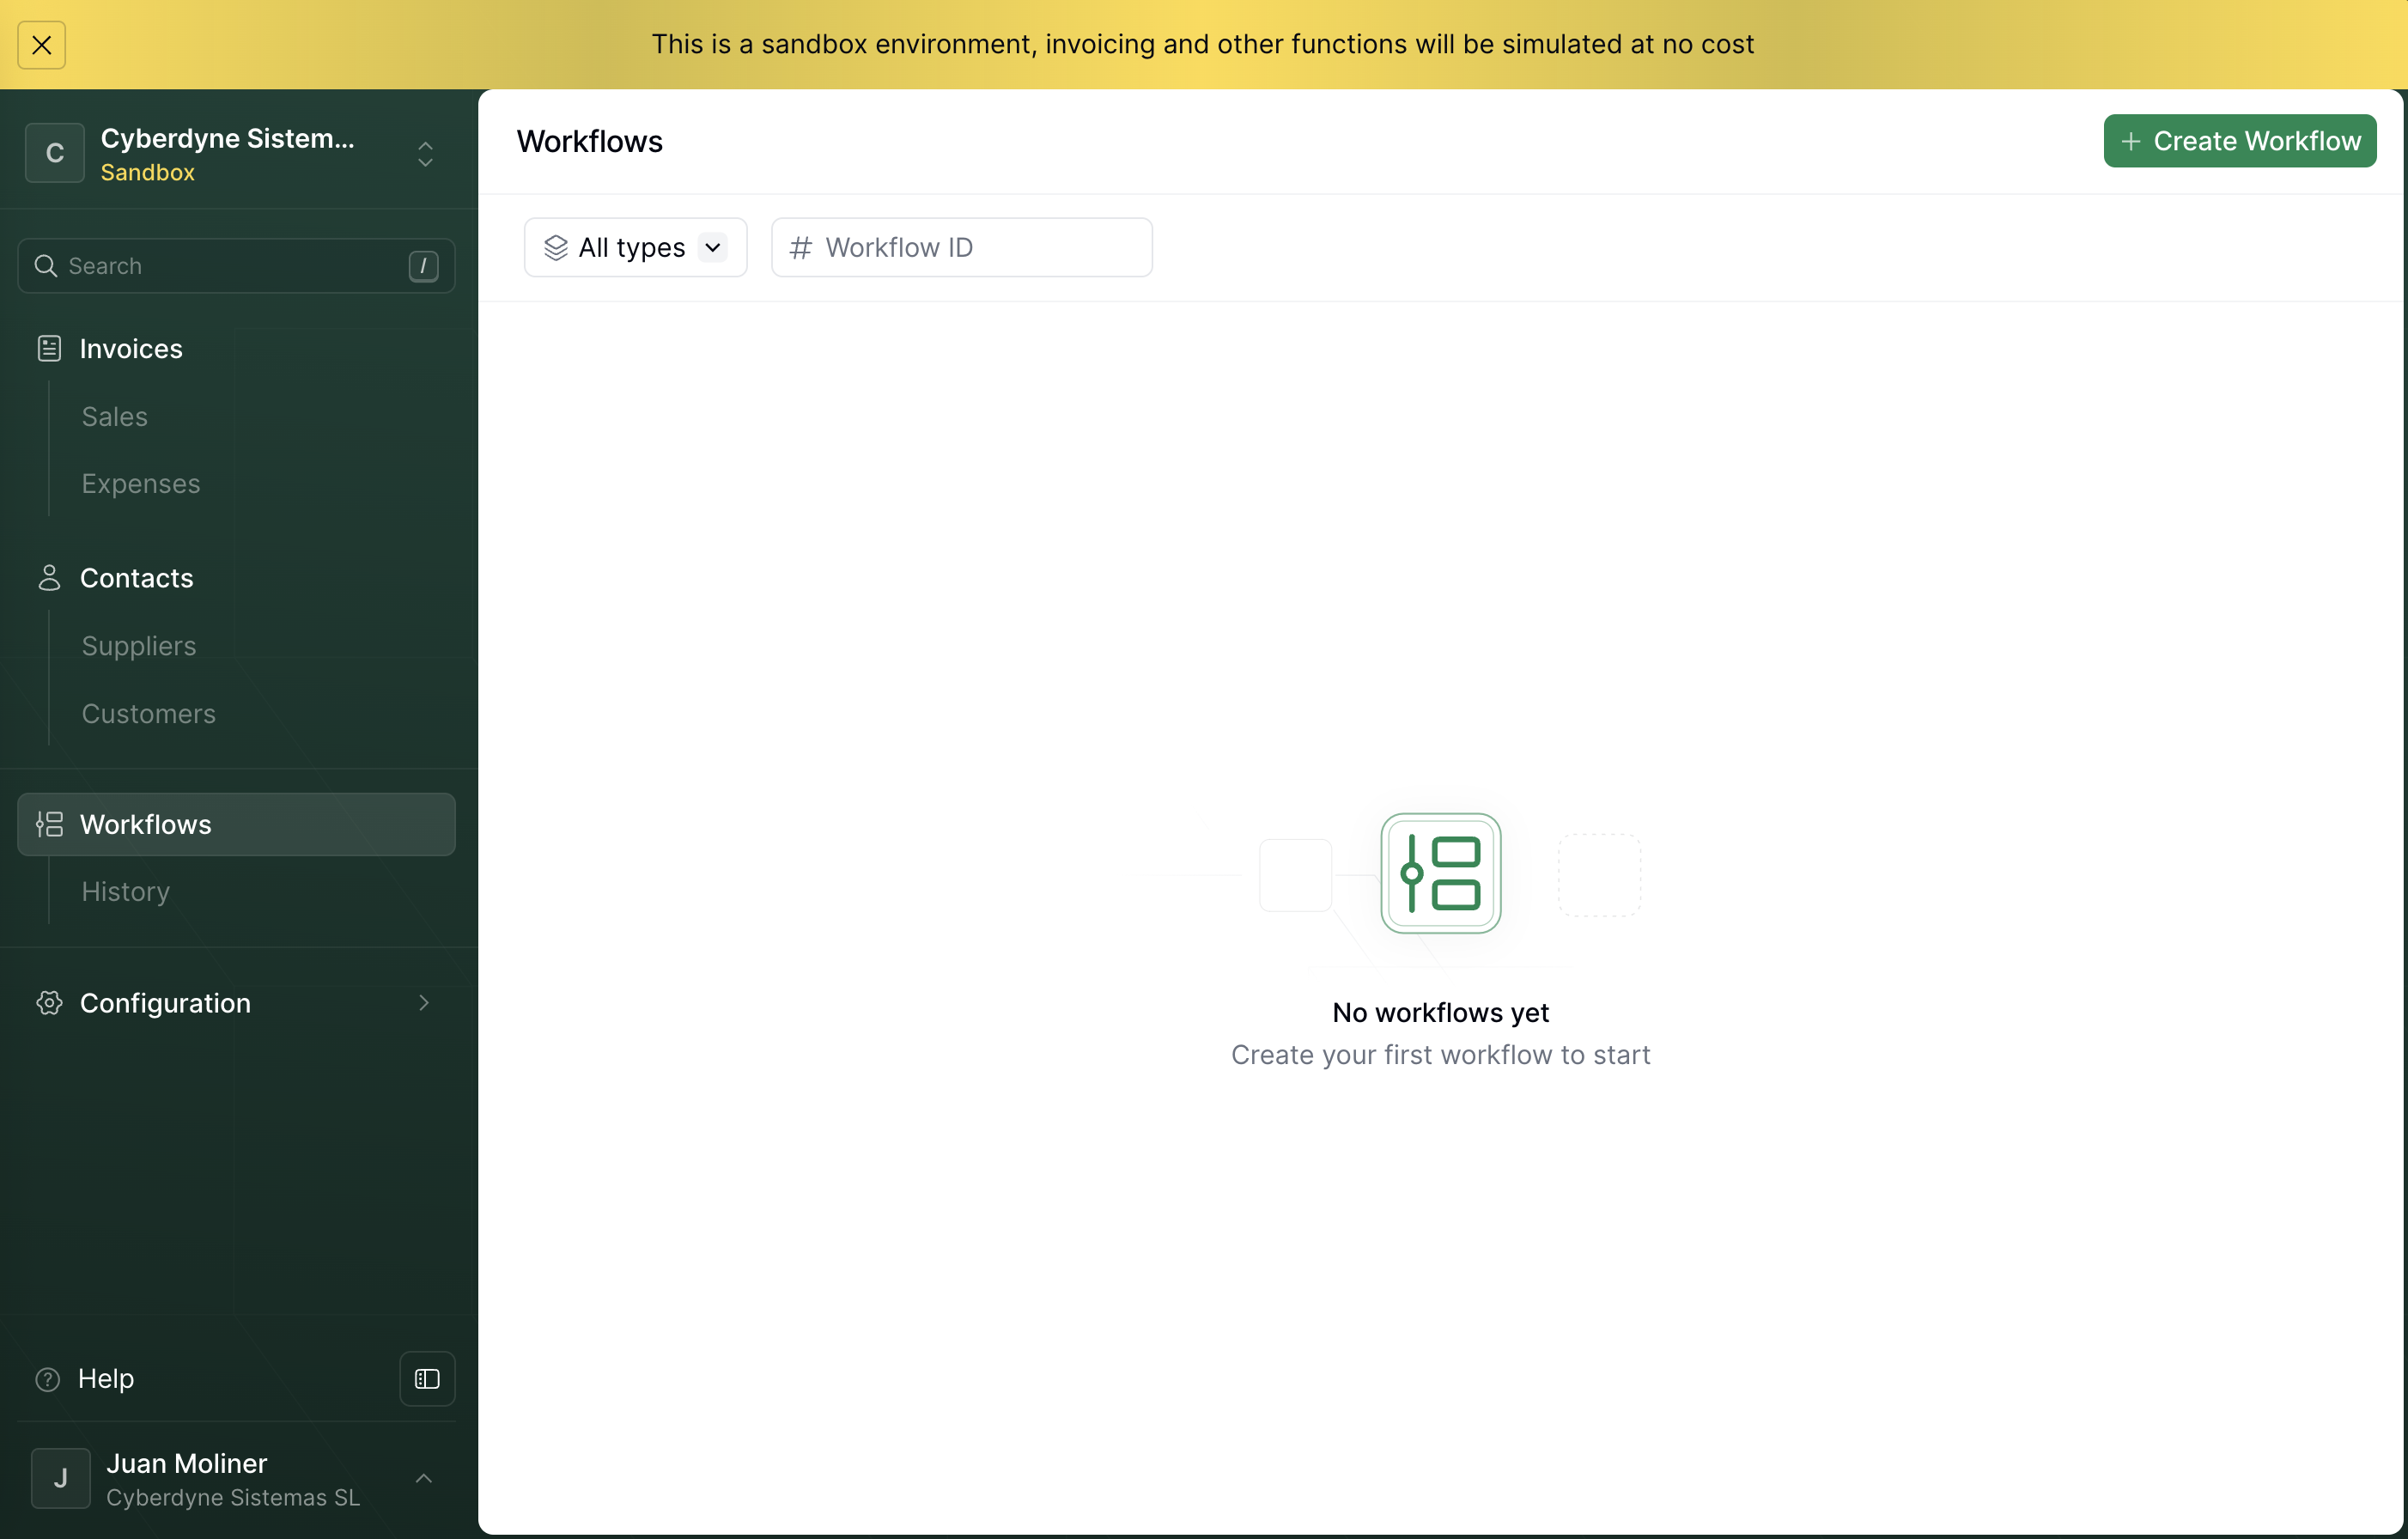 Click on the **Create workflow** button on the top right corner. You'll see a list of template workflows that you can use to get started.
Select the "PDF Invoice" template and click on **Load template**.
Let's add a step that sets the Document state to `Sent` after the PDF is generated. Click on the **+** button below the top right corner and select **Set state** in the right sidebar.
Click on the **Create workflow** button on the top right corner. You'll see a list of template workflows that you can use to get started.
Select the "PDF Invoice" template and click on **Load template**.
Let's add a step that sets the Document state to `Sent` after the PDF is generated. Click on the **+** button below the top right corner and select **Set state** in the right sidebar.
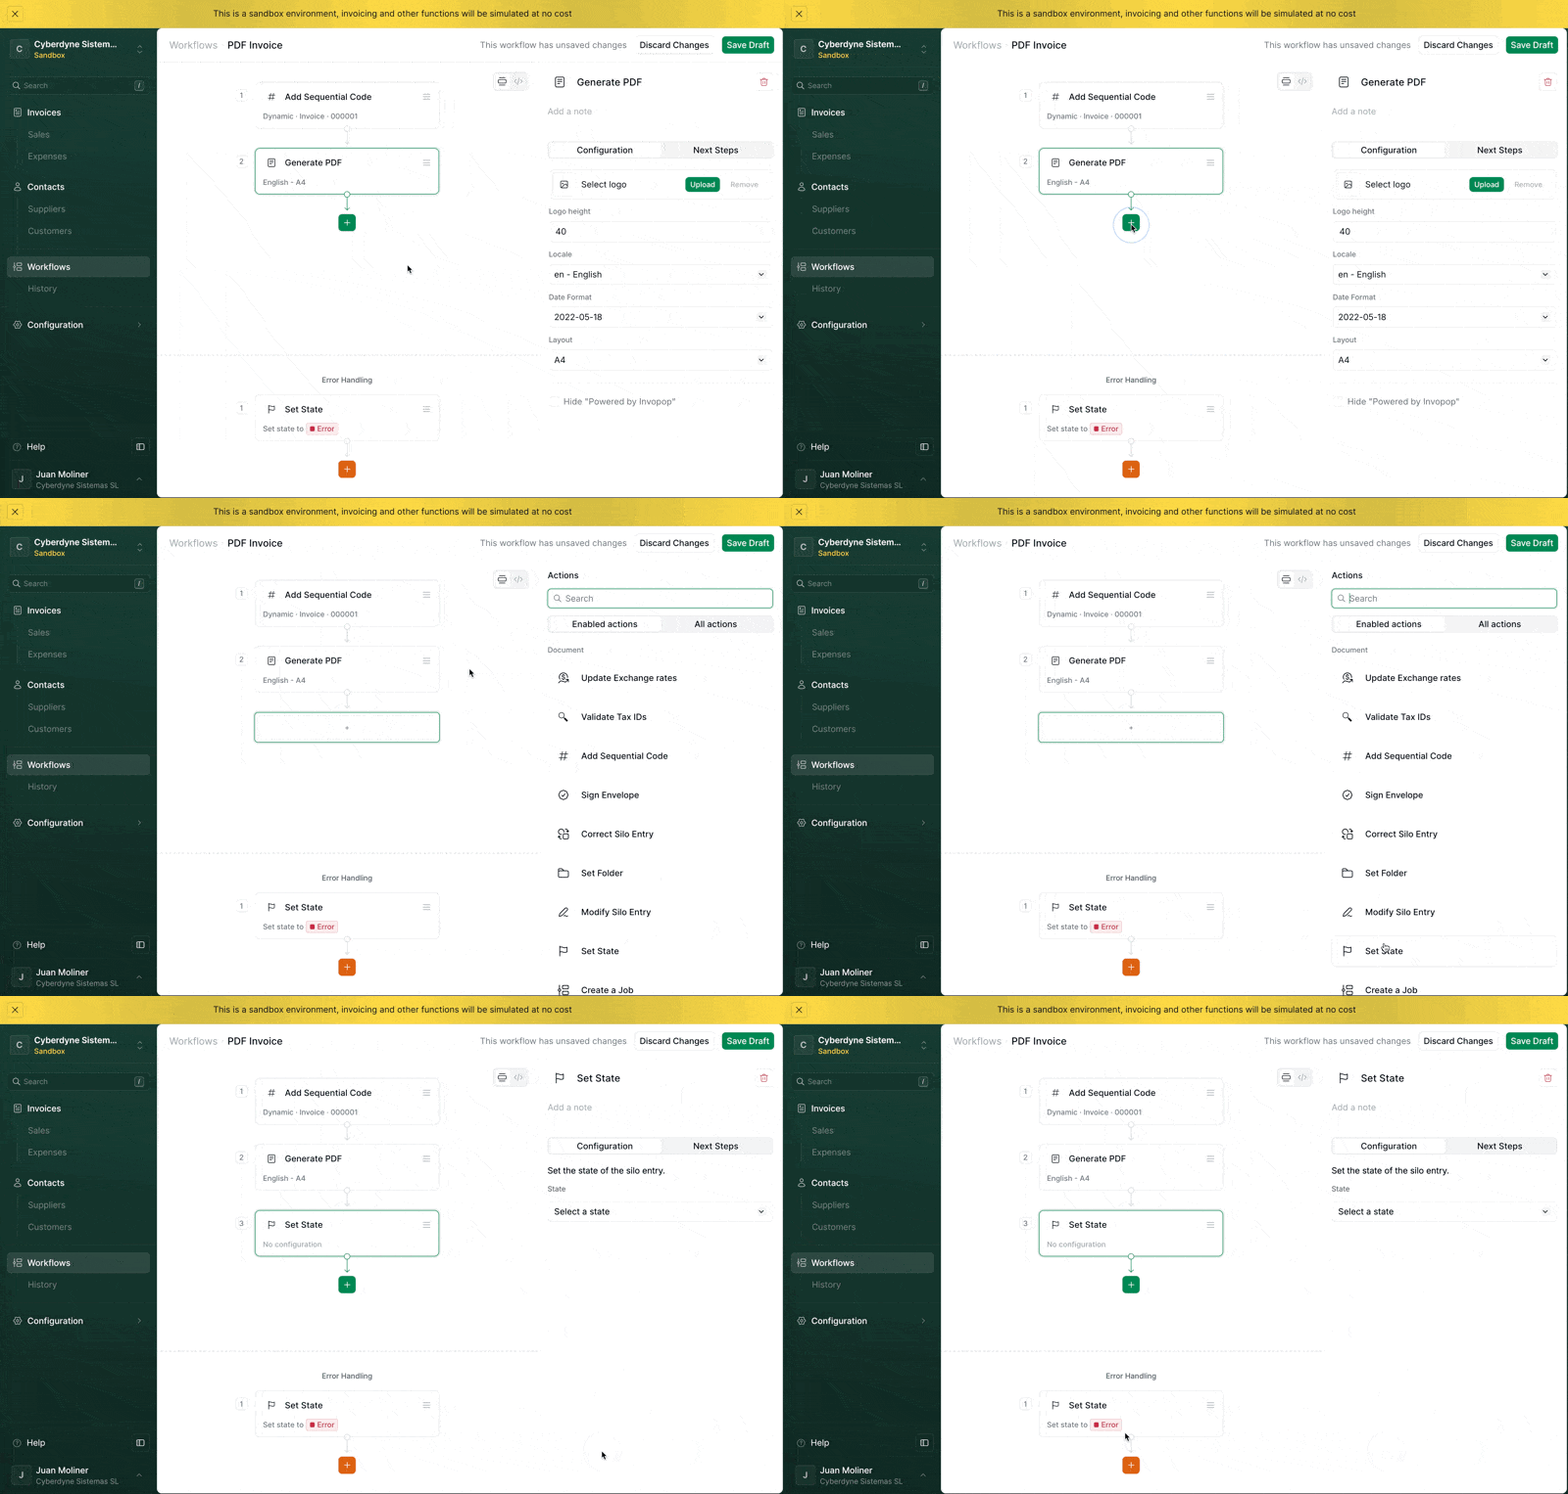 You should now see the configuration of the **Set state** step, otherwise click on the step you've just added. Select `Sent` in the **State** dropdown.
Click on the **Save Draft** button save your draft workflow. Now click on **Publish** so you can start using it in your workspace.
## Uploading an invoice
Now let's upload an invoice to your workspace that we'll later send to the 'PDF Invoice' workflow.
You can upload document manually from the Console or by using the API.
1. In the [Console](https://console.invopop.com), click on **Invoices** on the left sidebar.
2. Click on the **New invoice** button on the top right corner. You'll be redirected to the document editor.
3. The document editor has two modes: the *visual view* and the *code view*. Switch to the code view by clicking on the toggle below the Save button.
You should now see the configuration of the **Set state** step, otherwise click on the step you've just added. Select `Sent` in the **State** dropdown.
Click on the **Save Draft** button save your draft workflow. Now click on **Publish** so you can start using it in your workspace.
## Uploading an invoice
Now let's upload an invoice to your workspace that we'll later send to the 'PDF Invoice' workflow.
You can upload document manually from the Console or by using the API.
1. In the [Console](https://console.invopop.com), click on **Invoices** on the left sidebar.
2. Click on the **New invoice** button on the top right corner. You'll be redirected to the document editor.
3. The document editor has two modes: the *visual view* and the *code view*. Switch to the code view by clicking on the toggle below the Save button.
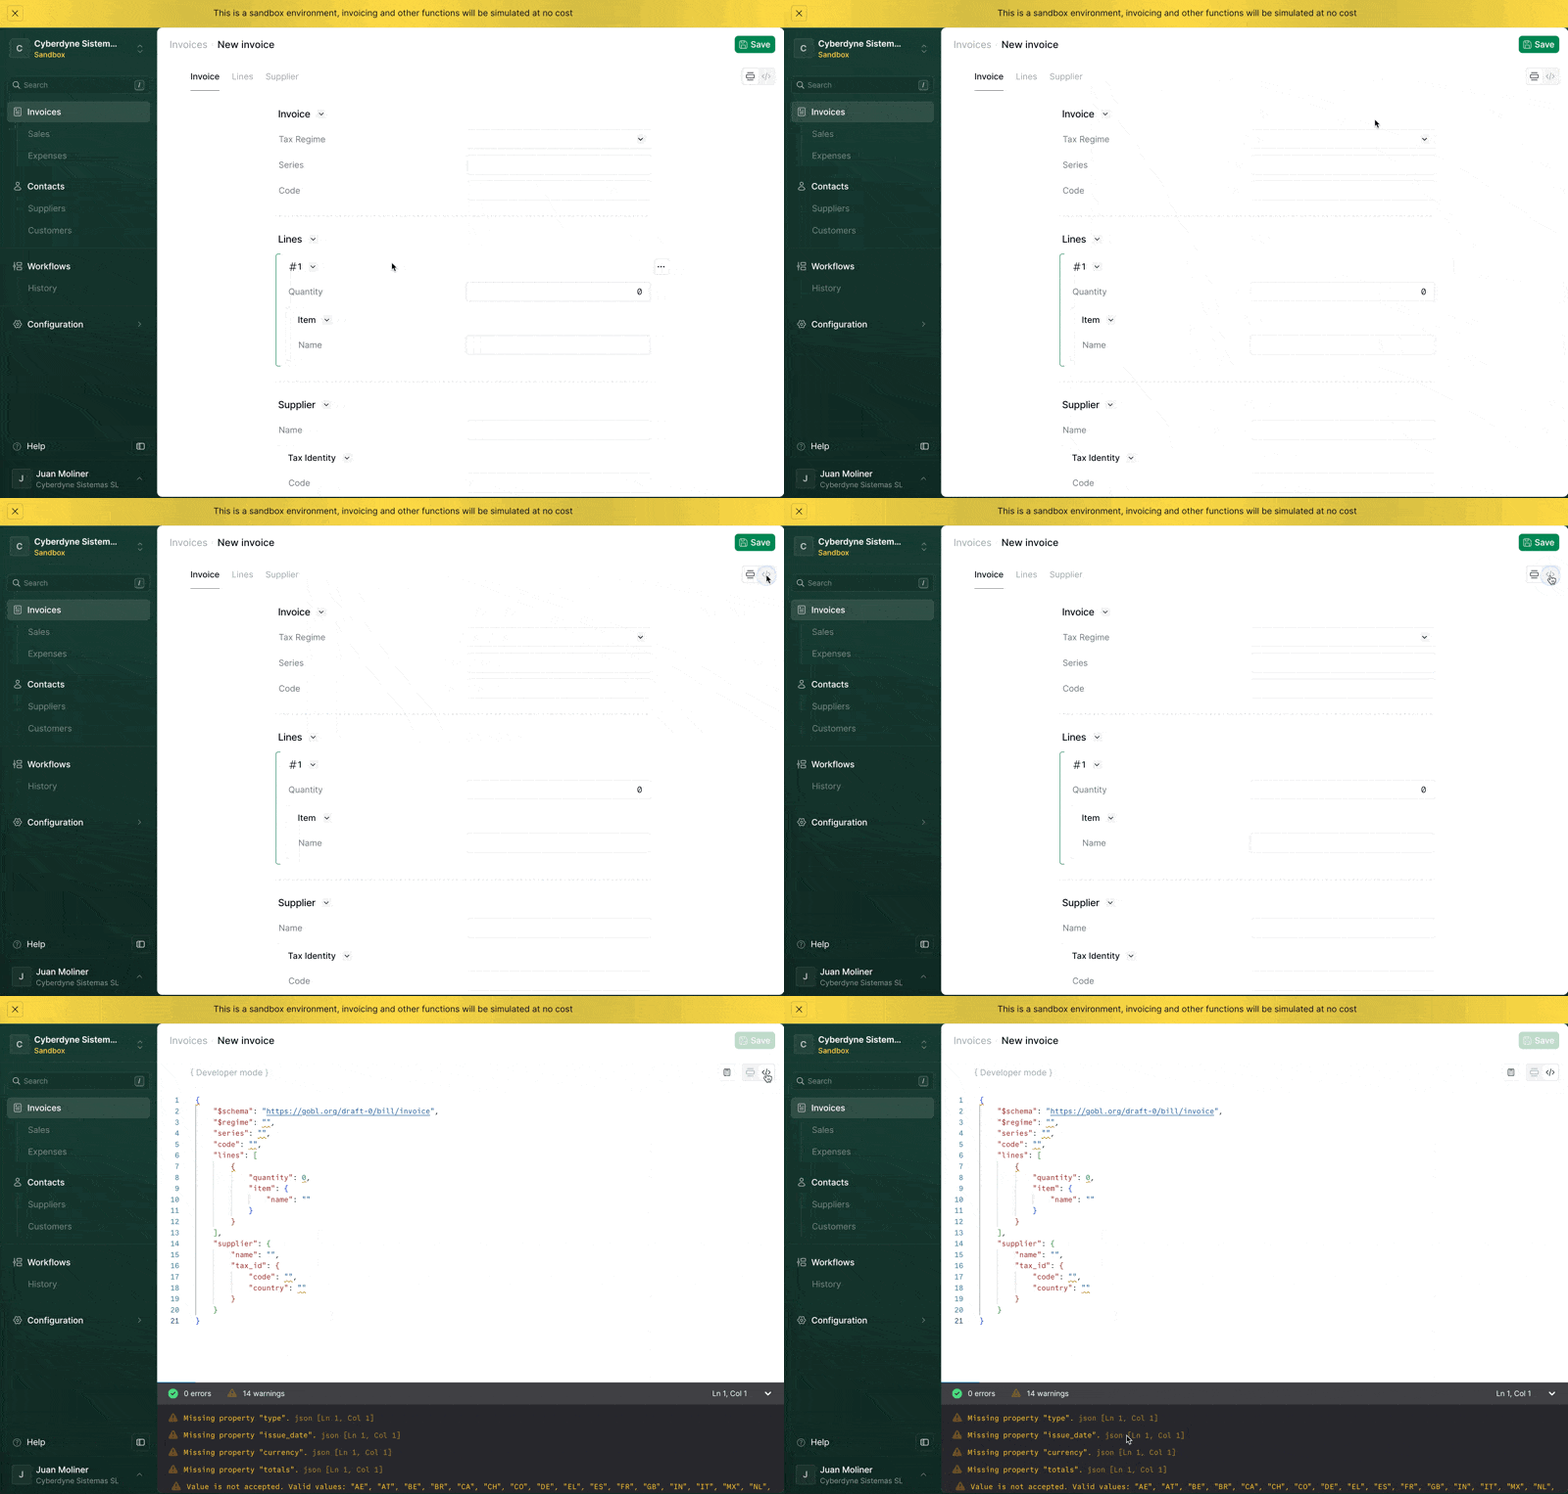 4. Copy the invoice example below and paste it in the code view.
```json Example invoice expandable theme={"system"}
{
"$schema": "https://gobl.org/draft-0/bill/invoice",
"$regime": "GB",
"uuid": "01975e35-426f-760e-aab8-a30b942fee07",
"type": "credit-note",
"series": "SAMPLE",
"code": "000002",
"issue_date": "2025-06-11",
"currency": "GBP",
"preceding": [
{
"uuid": "019035bd-4524-73ab-bf44-6037841ce5d9",
"type": "standard",
"issue_date": "2024-07-31",
"series": "SAMPLE",
"code": "001"
}
],
"supplier": {
"name": "Test Company Ltd.",
"tax_id": {
"country": "GB",
"code": "000472631"
},
"addresses": [
{
"num": "12",
"street": "Main Street",
"locality": "Hull",
"code": "HU17 7PQ",
"country": "GB"
}
],
"emails": [
{
"addr": "company@example.com"
}
]
},
"customer": {
"name": "Random Company Ltd.",
"tax_id": {
"country": "GB",
"code": "350983637"
},
"addresses": [
{
"num": "45",
"street": "Some Street",
"locality": "London",
"code": "SW1A 1AA",
"country": "GB"
}
],
"emails": [
{
"addr": "random@example.com"
}
]
},
"lines": [
{
"i": 1,
"quantity": "20",
"item": {
"name": "Development services",
"price": "90.00",
"unit": "h"
},
"sum": "1800.00",
"discounts": [
{
"reason": "Special discount",
"percent": "10%",
"amount": "180.00"
}
],
"taxes": [
{
"cat": "VAT",
"rate": "standard",
"percent": "20.0%"
}
],
"total": "1620.00"
}
],
"totals": {
"sum": "1620.00",
"total": "1620.00",
"taxes": {
"categories": [
{
"code": "VAT",
"rates": [
{
"key": "standard",
"base": "1620.00",
"percent": "20.0%",
"amount": "324.00"
}
],
"amount": "324.00"
}
],
"sum": "324.00"
},
"tax": "324.00",
"total_with_tax": "1944.00",
"payable": "1944.00"
}
}
```
5. Click on the **calculator** icon to *build* the invoice. This will normalize and validate fields and add any calculated fields.
4. Copy the invoice example below and paste it in the code view.
```json Example invoice expandable theme={"system"}
{
"$schema": "https://gobl.org/draft-0/bill/invoice",
"$regime": "GB",
"uuid": "01975e35-426f-760e-aab8-a30b942fee07",
"type": "credit-note",
"series": "SAMPLE",
"code": "000002",
"issue_date": "2025-06-11",
"currency": "GBP",
"preceding": [
{
"uuid": "019035bd-4524-73ab-bf44-6037841ce5d9",
"type": "standard",
"issue_date": "2024-07-31",
"series": "SAMPLE",
"code": "001"
}
],
"supplier": {
"name": "Test Company Ltd.",
"tax_id": {
"country": "GB",
"code": "000472631"
},
"addresses": [
{
"num": "12",
"street": "Main Street",
"locality": "Hull",
"code": "HU17 7PQ",
"country": "GB"
}
],
"emails": [
{
"addr": "company@example.com"
}
]
},
"customer": {
"name": "Random Company Ltd.",
"tax_id": {
"country": "GB",
"code": "350983637"
},
"addresses": [
{
"num": "45",
"street": "Some Street",
"locality": "London",
"code": "SW1A 1AA",
"country": "GB"
}
],
"emails": [
{
"addr": "random@example.com"
}
]
},
"lines": [
{
"i": 1,
"quantity": "20",
"item": {
"name": "Development services",
"price": "90.00",
"unit": "h"
},
"sum": "1800.00",
"discounts": [
{
"reason": "Special discount",
"percent": "10%",
"amount": "180.00"
}
],
"taxes": [
{
"cat": "VAT",
"rate": "standard",
"percent": "20.0%"
}
],
"total": "1620.00"
}
],
"totals": {
"sum": "1620.00",
"total": "1620.00",
"taxes": {
"categories": [
{
"code": "VAT",
"rates": [
{
"key": "standard",
"base": "1620.00",
"percent": "20.0%",
"amount": "324.00"
}
],
"amount": "324.00"
}
],
"sum": "324.00"
},
"tax": "324.00",
"total_with_tax": "1944.00",
"payable": "1944.00"
}
}
```
5. Click on the **calculator** icon to *build* the invoice. This will normalize and validate fields and add any calculated fields.
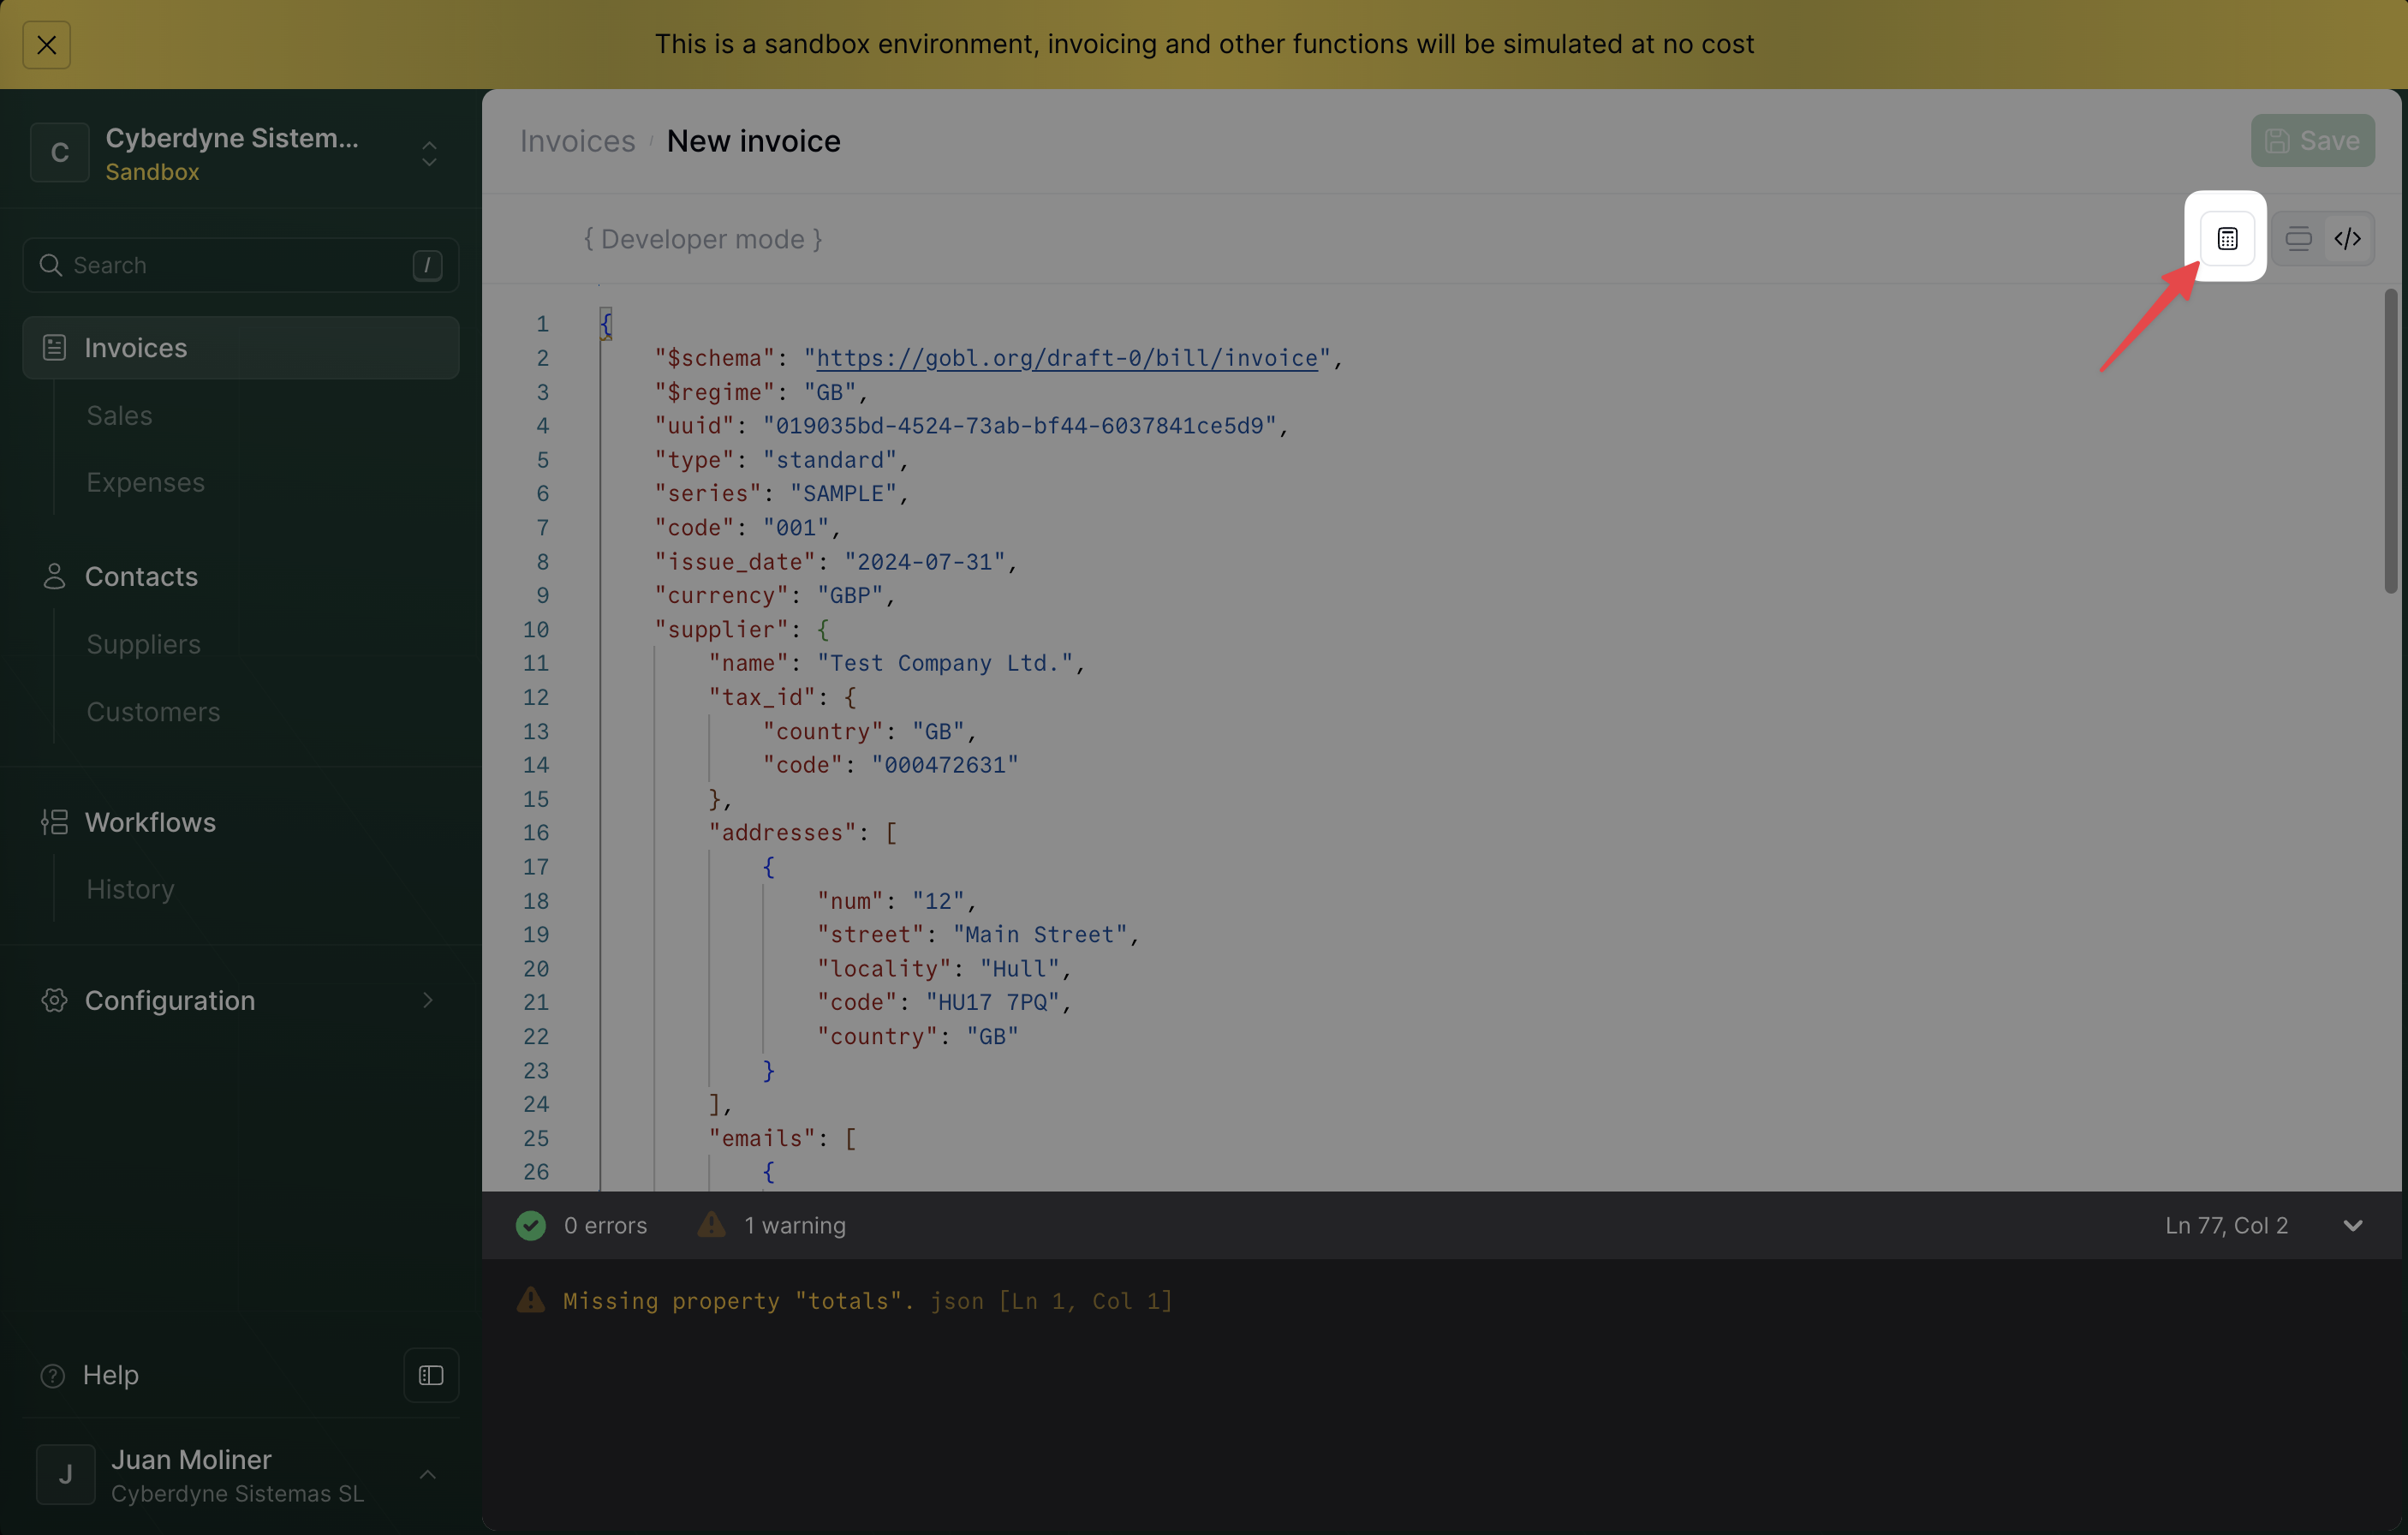 6. Click on the **Save** button on the top right corner to save the invoice. You'll be redirected to the *invoice detail* view.
Use the [Create an Entry](api-ref/transform/jobs/create-a-job-post) API endpoint with a request body that wraps your invoice in the required structure.
Your request body should look like this:
```json theme={"system"}
{
"content_type": "application/json",
"data": {}
}
```
Populate the `data` field with your complete invoice object. You can use the example below:
```json expandable theme={"system"}
{
"$schema": "https://gobl.org/draft-0/bill/invoice",
"$regime": "GB",
"uuid": "029035bd-4524-73ab-bf44-6037841ce5d9",
"type": "standard",
"series": "SAMPLE",
"code": "001",
"issue_date": "2024-07-31",
"currency": "GBP",
"supplier": {
"name": "Test Company Ltd.",
"tax_id": {
"country": "GB",
"code": "000472631"
},
"addresses": [
{
"num": "12",
"street": "Main Street",
"locality": "Hull",
"code": "HU17 7PQ",
"country": "GB"
}
],
"emails": [
{
"addr": "company@example.com"
}
]
},
"customer": {
"name": "Random Company Ltd.",
"tax_id": {
"country": "GB",
"code": "350983637"
},
"addresses": [
{
"num": "45",
"street": "Some Street",
"locality": "London",
"code": "SW1A 1AA",
"country": "GB"
}
],
"emails": [
{
"addr": "random@example.com"
}
]
},
"lines": [
{
"i": 1,
"quantity": "20",
"item": {
"name": "Development services",
"price": "90.00",
"unit": "h"
},
"sum": "1800.00",
"discounts": [
{
"reason": "Special discount",
"percent": "10%",
"amount": "180.00"
}
],
"taxes": [
{
"cat": "VAT",
"rate": "standard",
"percent": "20.0%"
}
],
"total": "1620.00"
}
],
"totals": {
"sum": "1620.00",
"total": "1620.00",
"taxes": {
"categories": [
{
"code": "VAT",
"rates": [
{
"key": "standard",
"base": "1620.00",
"percent": "20.0%",
"amount": "324.00"
}
],
"amount": "324.00"
}
],
"sum": "324.00"
},
"tax": "324.00",
"total_with_tax": "1944.00",
"payable": "1944.00"
}
}
```
If everything goes well, you'll get a `200 OK` response along with the JSON for your newly registered invoice.
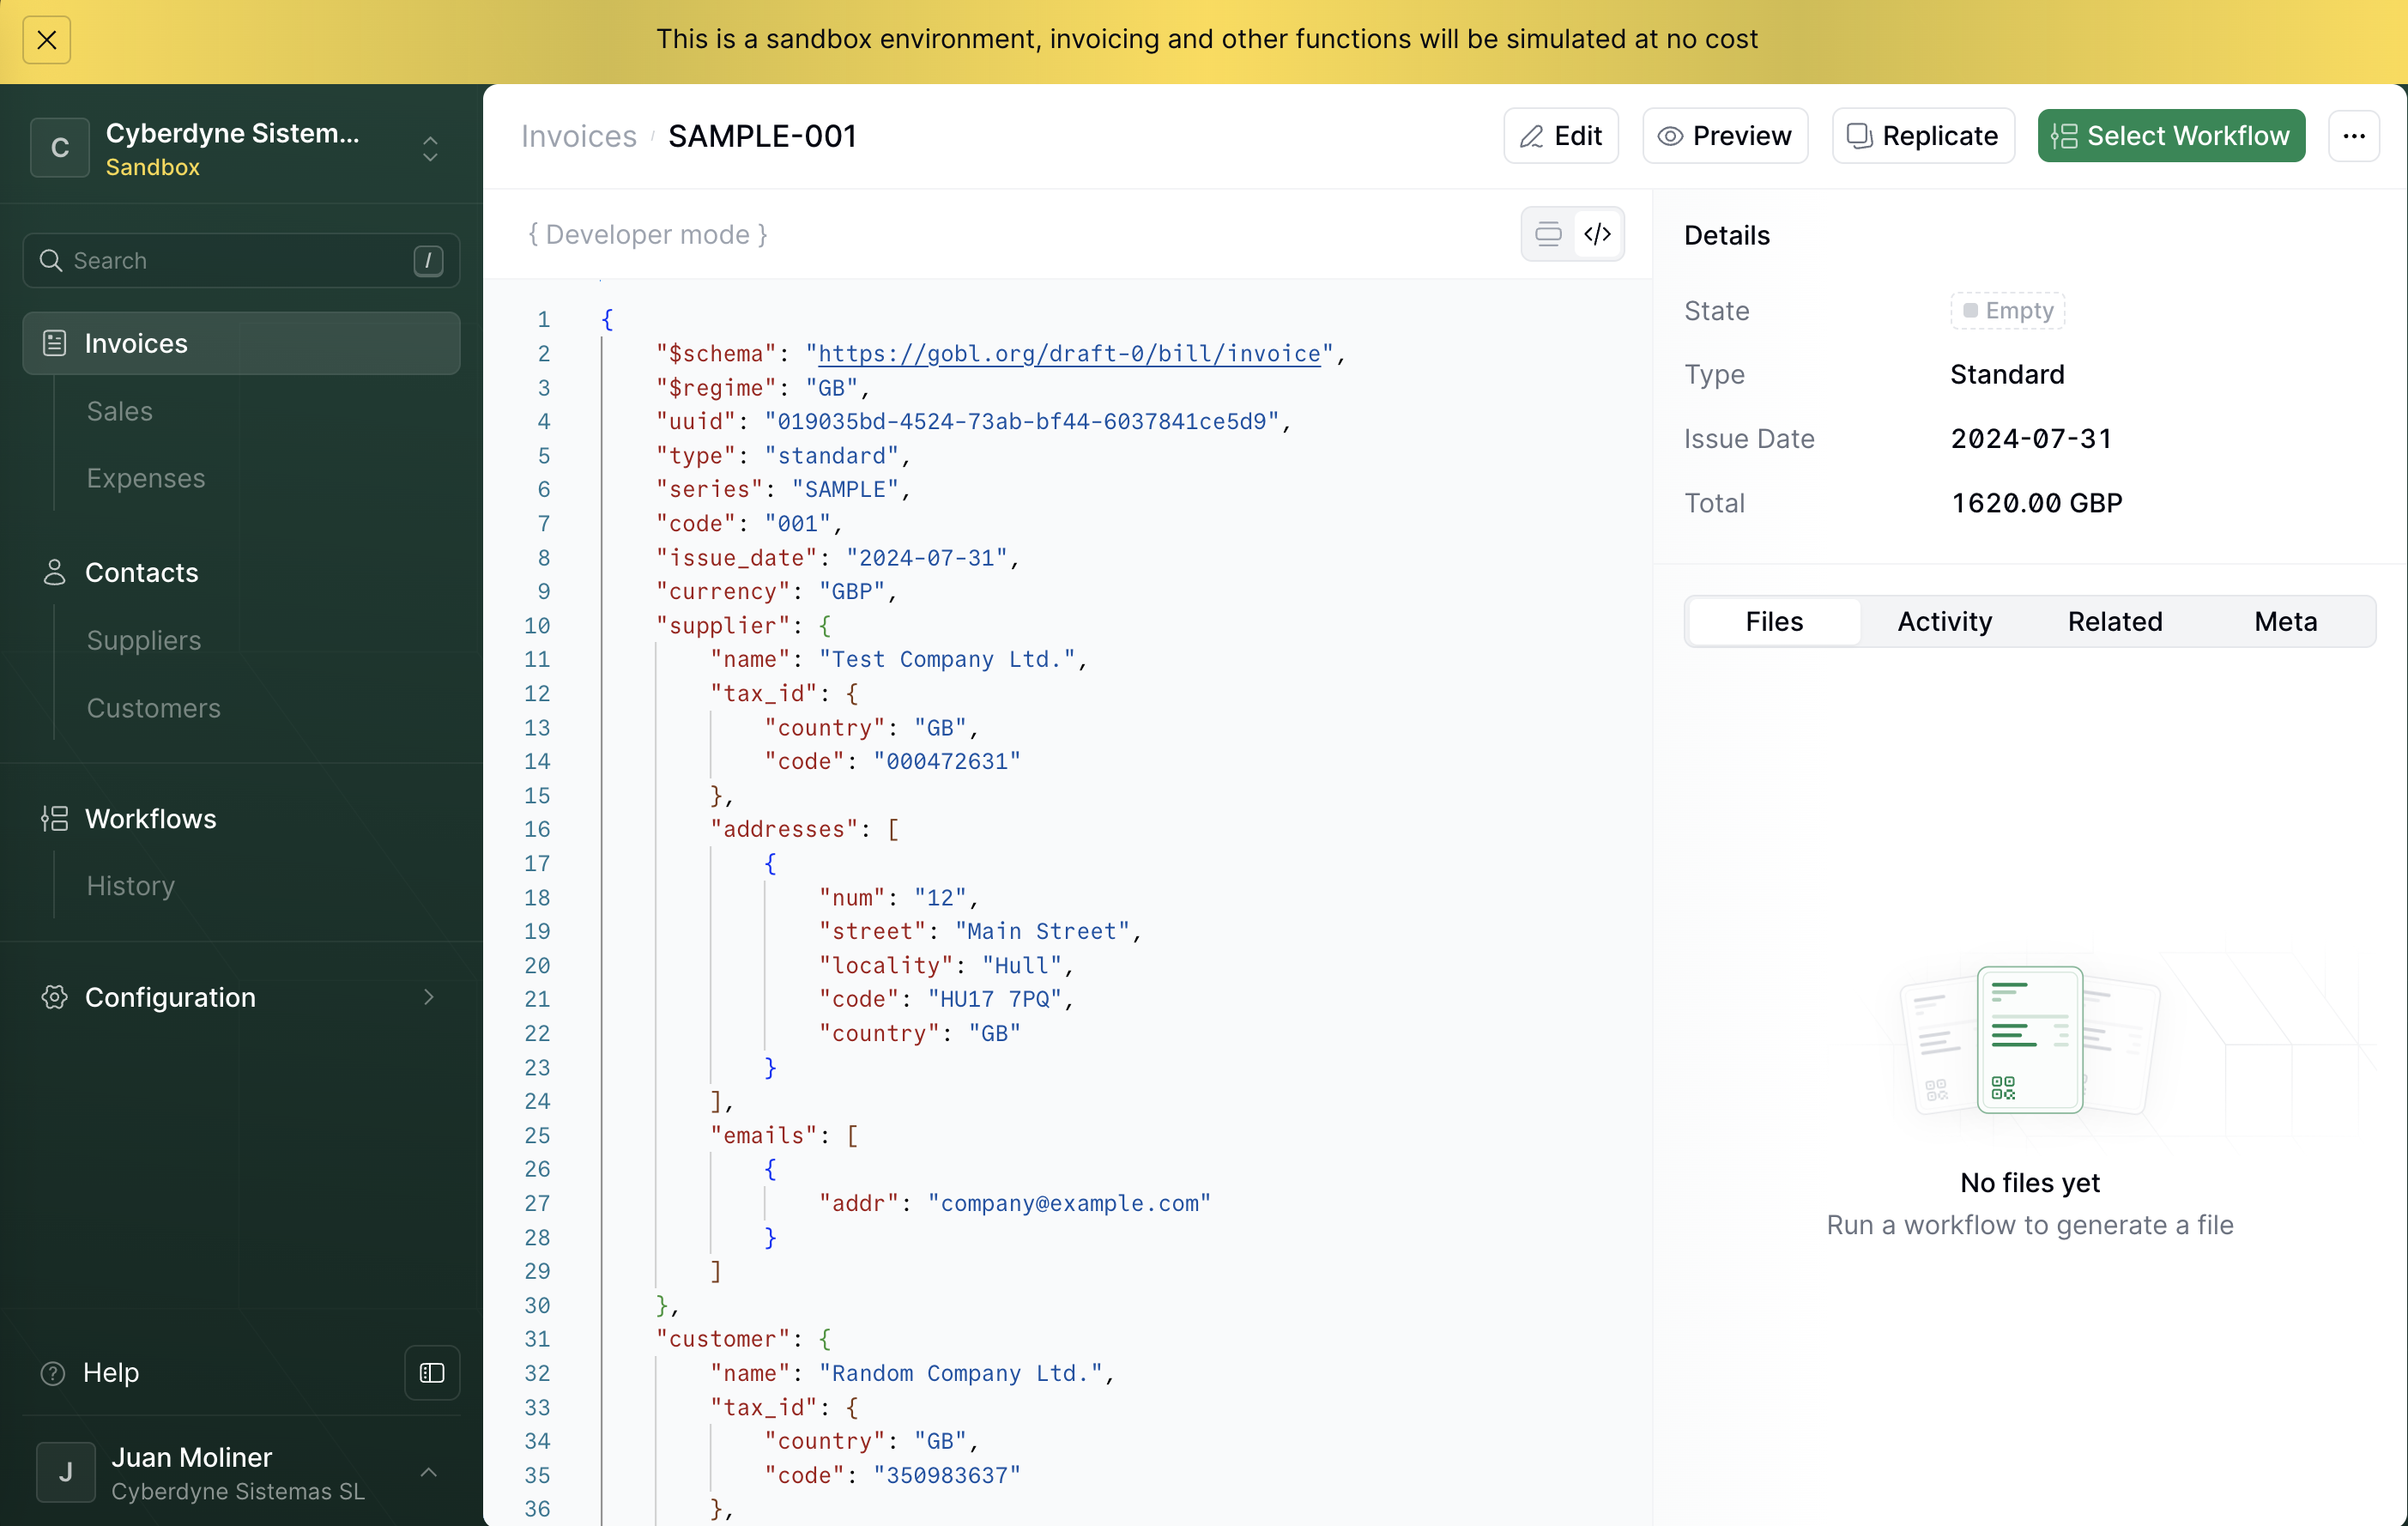
You've just created your first invoice! You can click on Preview to see how it'd look like in a PDF format.
6. Click on the **Save** button on the top right corner to save the invoice. You'll be redirected to the *invoice detail* view.
Use the [Create an Entry](api-ref/transform/jobs/create-a-job-post) API endpoint with a request body that wraps your invoice in the required structure.
Your request body should look like this:
```json theme={"system"}
{
"content_type": "application/json",
"data": {}
}
```
Populate the `data` field with your complete invoice object. You can use the example below:
```json expandable theme={"system"}
{
"$schema": "https://gobl.org/draft-0/bill/invoice",
"$regime": "GB",
"uuid": "029035bd-4524-73ab-bf44-6037841ce5d9",
"type": "standard",
"series": "SAMPLE",
"code": "001",
"issue_date": "2024-07-31",
"currency": "GBP",
"supplier": {
"name": "Test Company Ltd.",
"tax_id": {
"country": "GB",
"code": "000472631"
},
"addresses": [
{
"num": "12",
"street": "Main Street",
"locality": "Hull",
"code": "HU17 7PQ",
"country": "GB"
}
],
"emails": [
{
"addr": "company@example.com"
}
]
},
"customer": {
"name": "Random Company Ltd.",
"tax_id": {
"country": "GB",
"code": "350983637"
},
"addresses": [
{
"num": "45",
"street": "Some Street",
"locality": "London",
"code": "SW1A 1AA",
"country": "GB"
}
],
"emails": [
{
"addr": "random@example.com"
}
]
},
"lines": [
{
"i": 1,
"quantity": "20",
"item": {
"name": "Development services",
"price": "90.00",
"unit": "h"
},
"sum": "1800.00",
"discounts": [
{
"reason": "Special discount",
"percent": "10%",
"amount": "180.00"
}
],
"taxes": [
{
"cat": "VAT",
"rate": "standard",
"percent": "20.0%"
}
],
"total": "1620.00"
}
],
"totals": {
"sum": "1620.00",
"total": "1620.00",
"taxes": {
"categories": [
{
"code": "VAT",
"rates": [
{
"key": "standard",
"base": "1620.00",
"percent": "20.0%",
"amount": "324.00"
}
],
"amount": "324.00"
}
],
"sum": "324.00"
},
"tax": "324.00",
"total_with_tax": "1944.00",
"payable": "1944.00"
}
}
```
If everything goes well, you'll get a `200 OK` response along with the JSON for your newly registered invoice.
You've just created your first invoice! You can click on Preview to see how it'd look like in a PDF format.
 ## Processing an invoice
Next, we'll process the invoice by sending it to the 'PDF Invoice' workflow we set up earlier. You can do this manually from the Console or by using the API.
1. In the [Console](https://console.invopop.com), click on **Invoices** in the left sidebar.
> Select the invoice you just uploaded. This will open the document editor.
2. Click **Select Workflow** in the top-right corner to open the workflow selection dialog.
## Processing an invoice
Next, we'll process the invoice by sending it to the 'PDF Invoice' workflow we set up earlier. You can do this manually from the Console or by using the API.
1. In the [Console](https://console.invopop.com), click on **Invoices** in the left sidebar.
> Select the invoice you just uploaded. This will open the document editor.
2. Click **Select Workflow** in the top-right corner to open the workflow selection dialog.
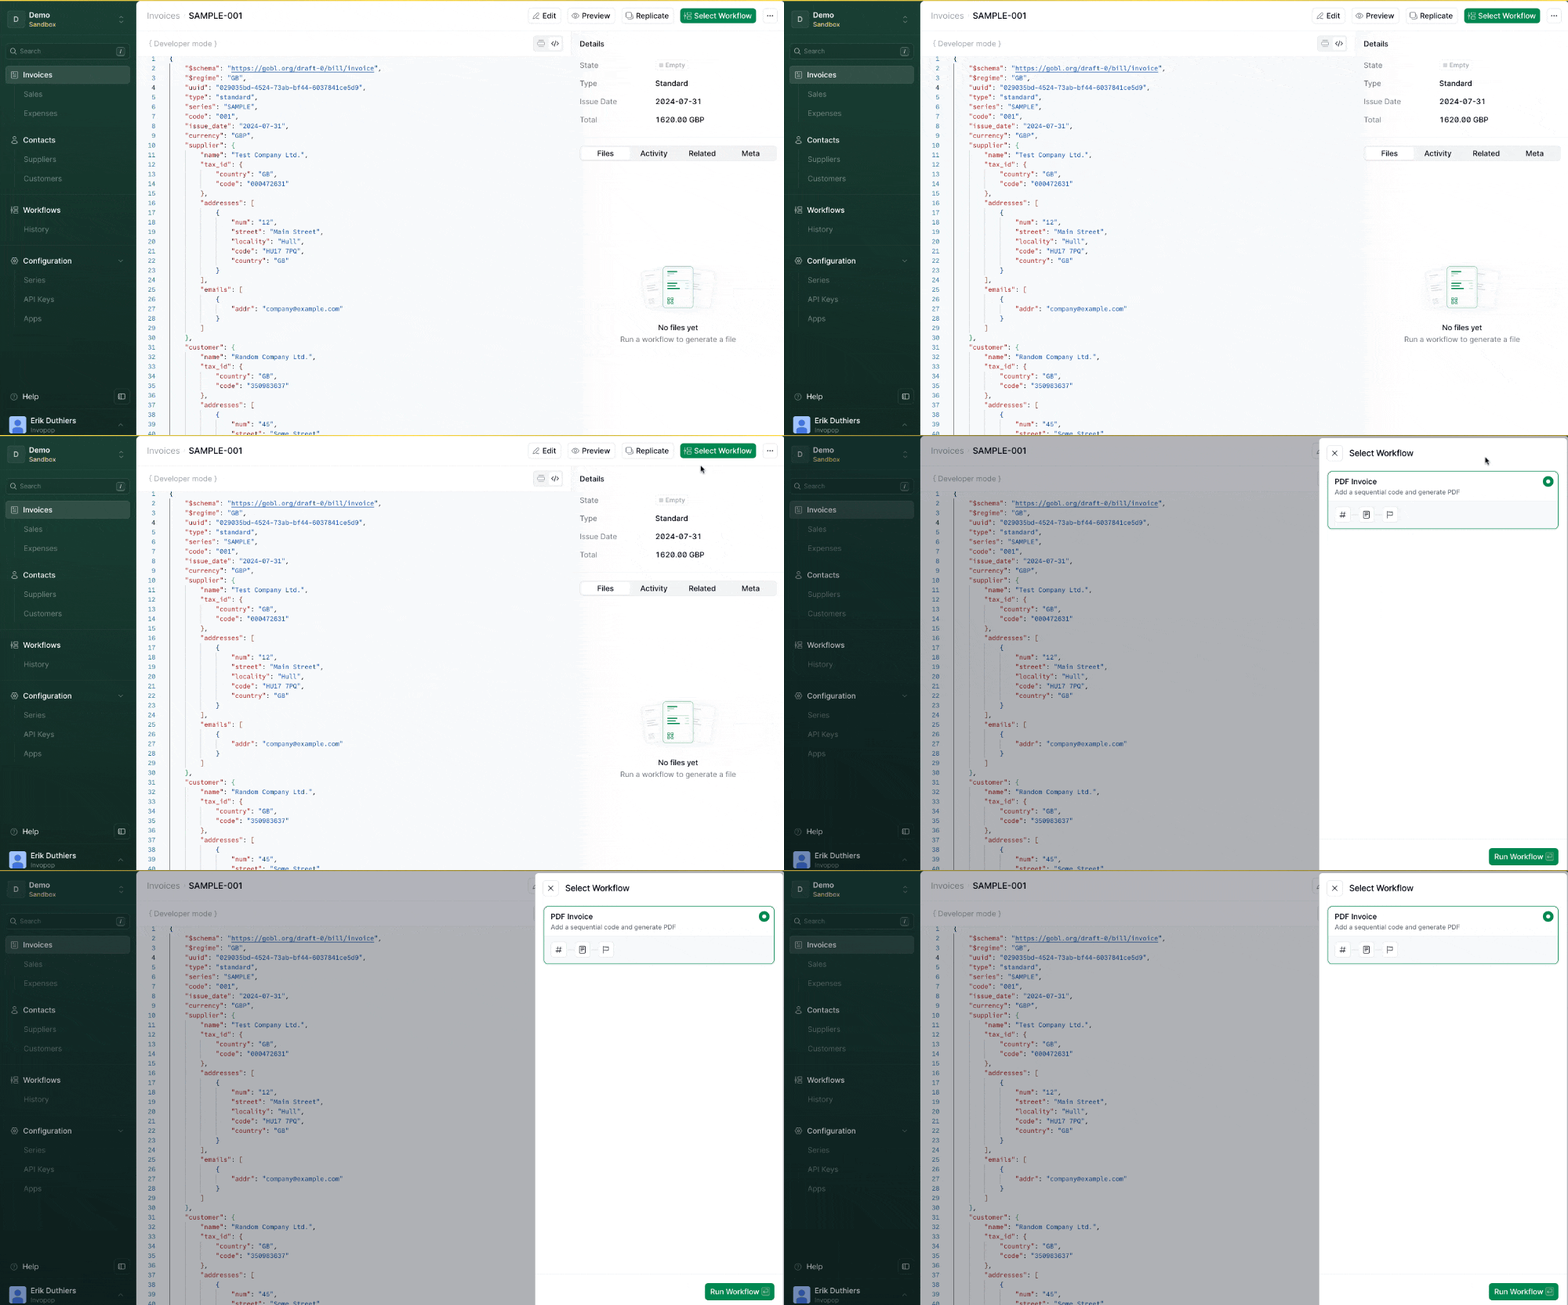 3. Select the workflow you want to run — in this case, **PDF Invoice** — and click **Run Workflow**.
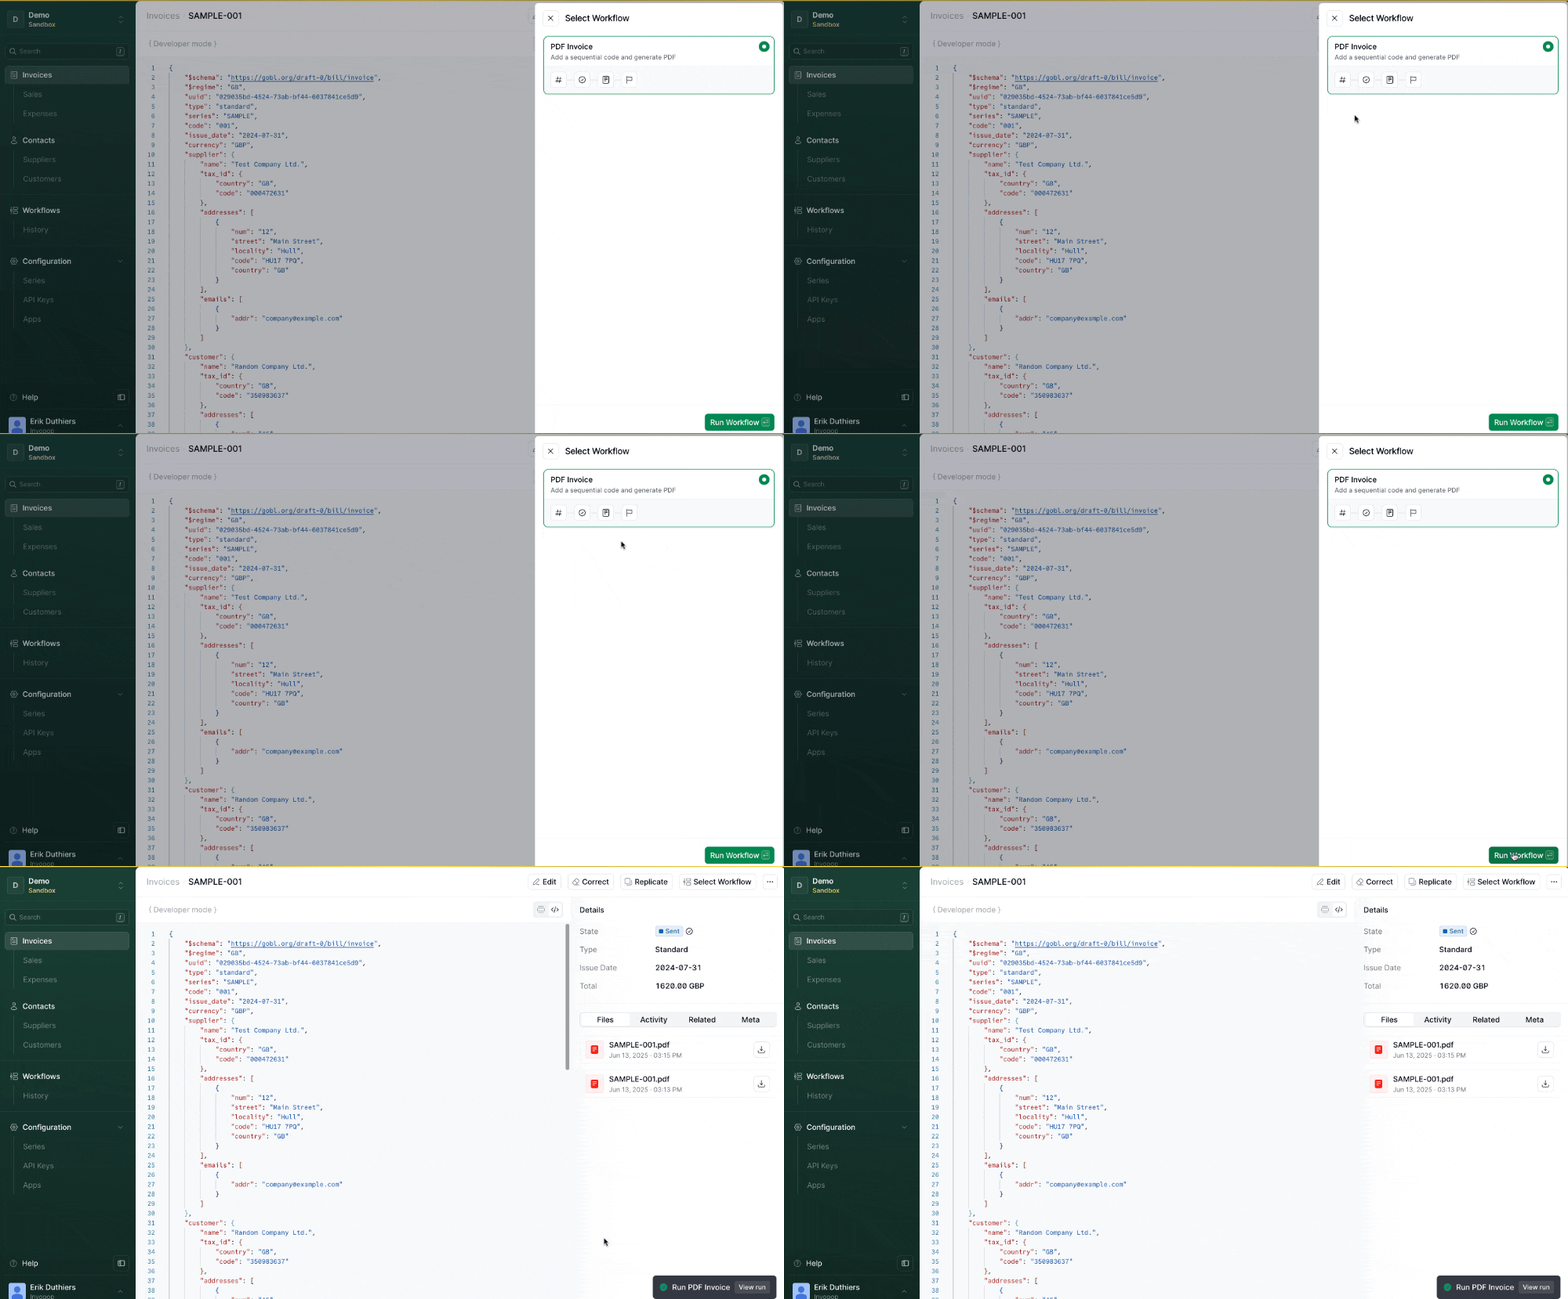 4. You'll see the **Status** of the invoice update to **Sent**, confirming it's been processed.
Use the [`Create a Job`](/api-ref/transform/jobs/create-a-job-post) API endpoint with the following request body:
```json theme={"system"}
{
"workflow_id": "186522a6-e697-4e34-8498-eee961bcb845",
"silo_entry_id": "03836750-461b-11f0-a07f-051acfb70532"
}
```
* `silo_entry_id` should reference the Silo Entry ID of the uploaded invoice.
* `workflow_id` should reference the ID of the workflow you created.
If everything goes smoothly, you'll receive a `202 Accepted` response confirming the invoice has been processed.
That's it! You've successfully processed your first invoice.
4. You'll see the **Status** of the invoice update to **Sent**, confirming it's been processed.
Use the [`Create a Job`](/api-ref/transform/jobs/create-a-job-post) API endpoint with the following request body:
```json theme={"system"}
{
"workflow_id": "186522a6-e697-4e34-8498-eee961bcb845",
"silo_entry_id": "03836750-461b-11f0-a07f-051acfb70532"
}
```
* `silo_entry_id` should reference the Silo Entry ID of the uploaded invoice.
* `workflow_id` should reference the ID of the workflow you created.
If everything goes smoothly, you'll receive a `202 Accepted` response confirming the invoice has been processed.
That's it! You've successfully processed your first invoice.