> ## Documentation Index
> Fetch the complete documentation index at: https://docs.invopop.com/llms.txt
> Use this file to discover all available pages before exploring further.
# Correct Invoices Guide
> Step by step guide to correct issued invoices with credit notes
In this tutorial, you will:
1. Understand what invoice corrections are and when to use them.
2. Learn about the three main correction types: **credit notes**, **debit notes**, and **corrective invoice**.
3. Explore different ways to issue a **credit note** to correct an invoice:
* [Using the API](#using-the-api):
* Upload a fully defined credit note
* Auto-generate a credit note from an existing invoice
* [Using the Console](#using-the-console) to create the credit note through the interface.
## Understanding invoice corrections
Billing mistakes happen, and when they do, they need to be addressed correctly. Depending on the nature of the error, different types of financial documents can be issued to correct an invoice. These are credit notes, debit notes, and corrective invoices.
Let's walk through how each of these works:
### Credit note (most common)
At Invopop, we generally recommend issuing a credit note if you need to cancel, refund, or adjust a validated invoice. They're the most widely accepted and straightforward method for making corrections.
A credit note is a document issued by the supplier to the buyer to indicate the intent to credit a specified amount. This doesn't modify the original invoice but adjusts the total amount due. Credit notes are typically issued when there's an error in the invoice, when goods are returned or services are rejected, or when the goods delivered are damaged.
### Debit note (rarely used)
A debit note is a document issued by the supplier to request additional funds related to a previously issued invoice (e.g., to account for omitted shipping costs).
For example, suppose a supplier sends an invoice to the buyer for a total of €400, and later realizes they forgot to include an additional €50. To correct this, the supplier could issue a debit note, linked to the original invoice, for the missing \$50 to inform the buyer of the outstanding amount.
Now, you might wonder: Why not just issue a new invoice for €50?
Well, they could, and that's exactly what we recommend at Invopop. While debit notes are a valid financial document, they're not commonly used in practice.
It's worth noting that some sources describe a debit note as a document issued by the buyer to the supplier. However, GOBL does not support this interpretation. In GOBL, documents from buyer to supplier fall under order management workflows.
### Corrective invoice (country-specific)
Some local regulations require a corrective invoice (also known as a rectifying invoice), when certain key details on an invoice need to be changed.
A corrective invoice is a new document that references and replaces the original one. It's typically used when there are significant errors in fields such as the buyer's name, tax ID, or invoice date, and it fully replaces the original invoice for legal and accounting purposes.
Countries that support corrective invoices include Spain and Poland.
It's worth noting that not all countries support corrective invoices, and in some countries where the tax regime does, such as Spain, GOBL may attempt to map credit and debit notes into the appropriate corrective format.
## Correcting your first invoice using a credit note
Before we dive in make sure you've completed the [Quickstart](/guides/getting-started/quickstart) tutorial, you should now have a processed invoice in your workspace.
Let's say there was a mistake in the invoice and we need to fix it. Once an invoice has been issued, it shouldn't be edited. Instead, we issue a **credit note** to make the correction.
There are two ways to do this:
* From the **Invopop Console**
* Using the **API**
Let's walk through both.
## Using the console
In the [Console](https://console.invopop.com), click on **Invoices** in the left sidebar and select the invoice you want to correct.
The invoice must be issued before a correction can be made.
Click on the **Correct** button in the top-right corner. This will open the **Correction** dialog.
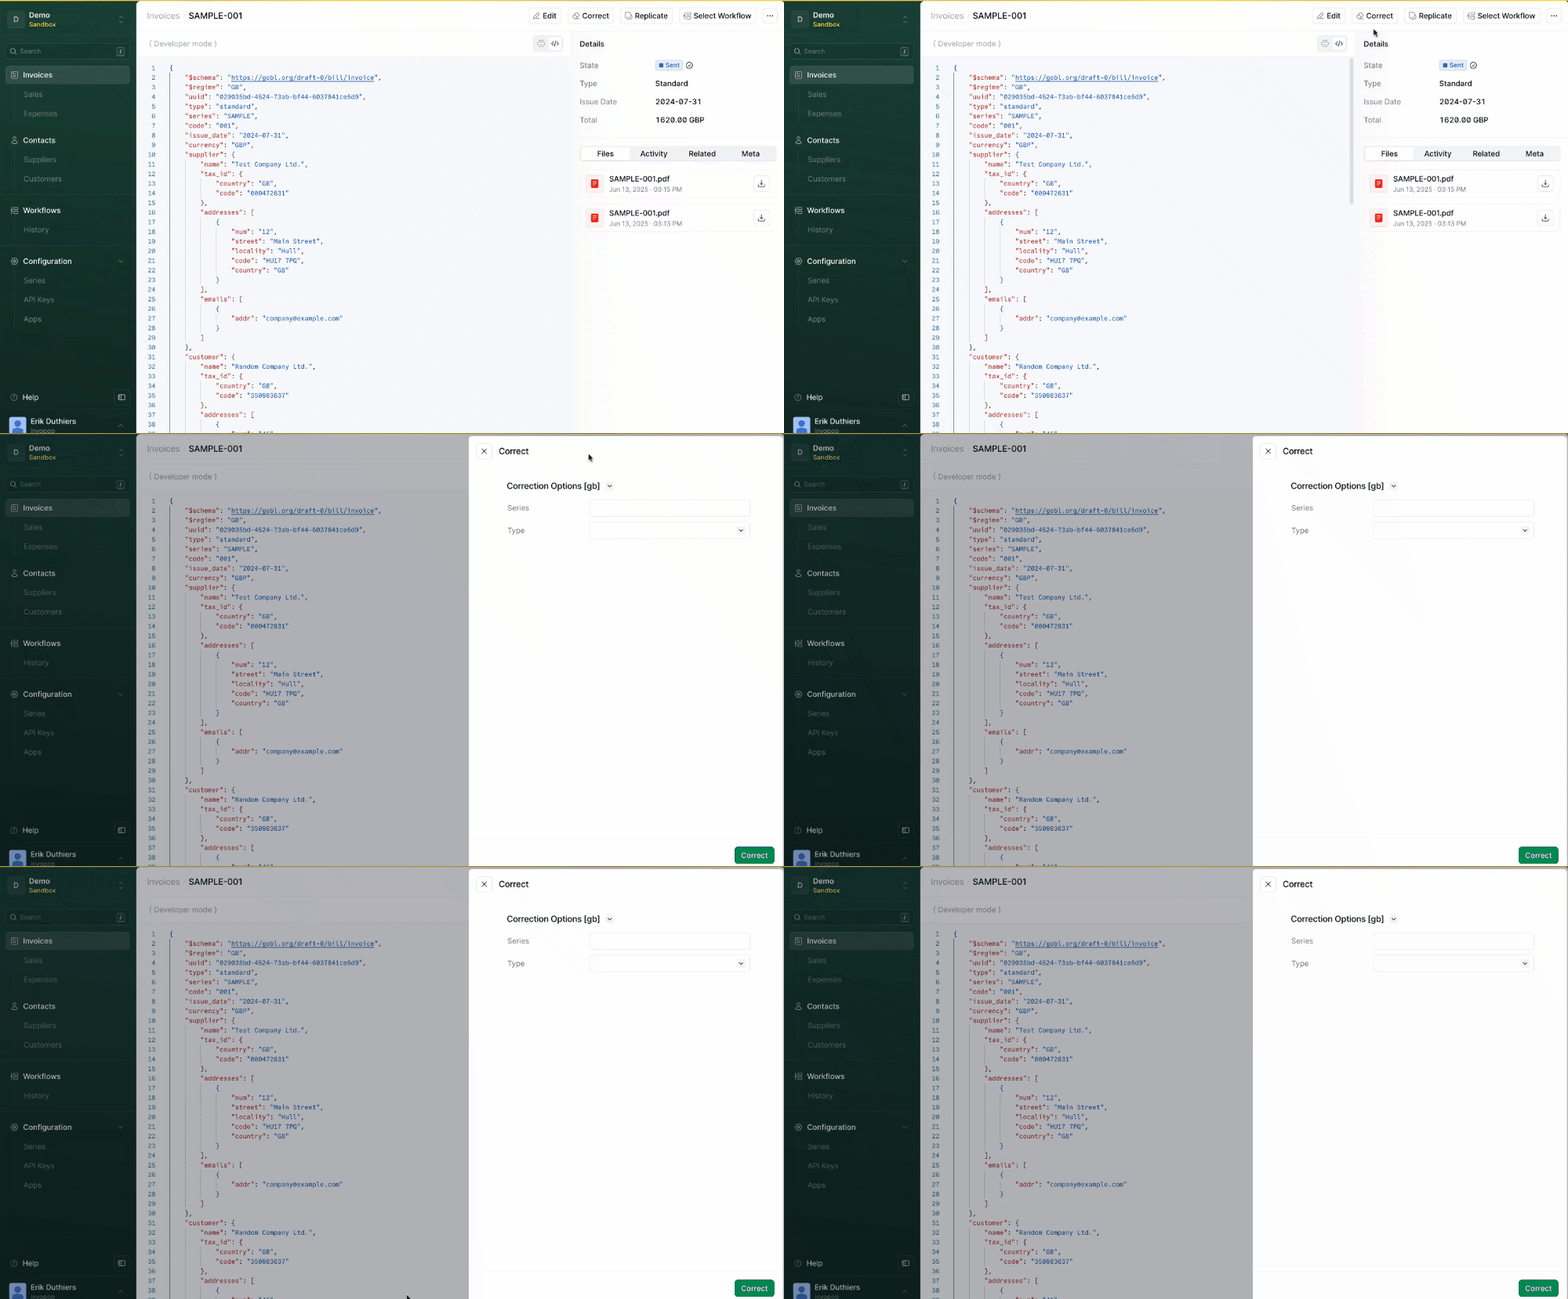 In the Series field, enter the series code for credit note (e.g., `CN`).
Under **Type**, select `credit-note` from the dropdown.
Click the **Correct** button at the bottom right of the dialog. This will generate the credit note based on the original invoice.
In the Series field, enter the series code for credit note (e.g., `CN`).
Under **Type**, select `credit-note` from the dropdown.
Click the **Correct** button at the bottom right of the dialog. This will generate the credit note based on the original invoice.
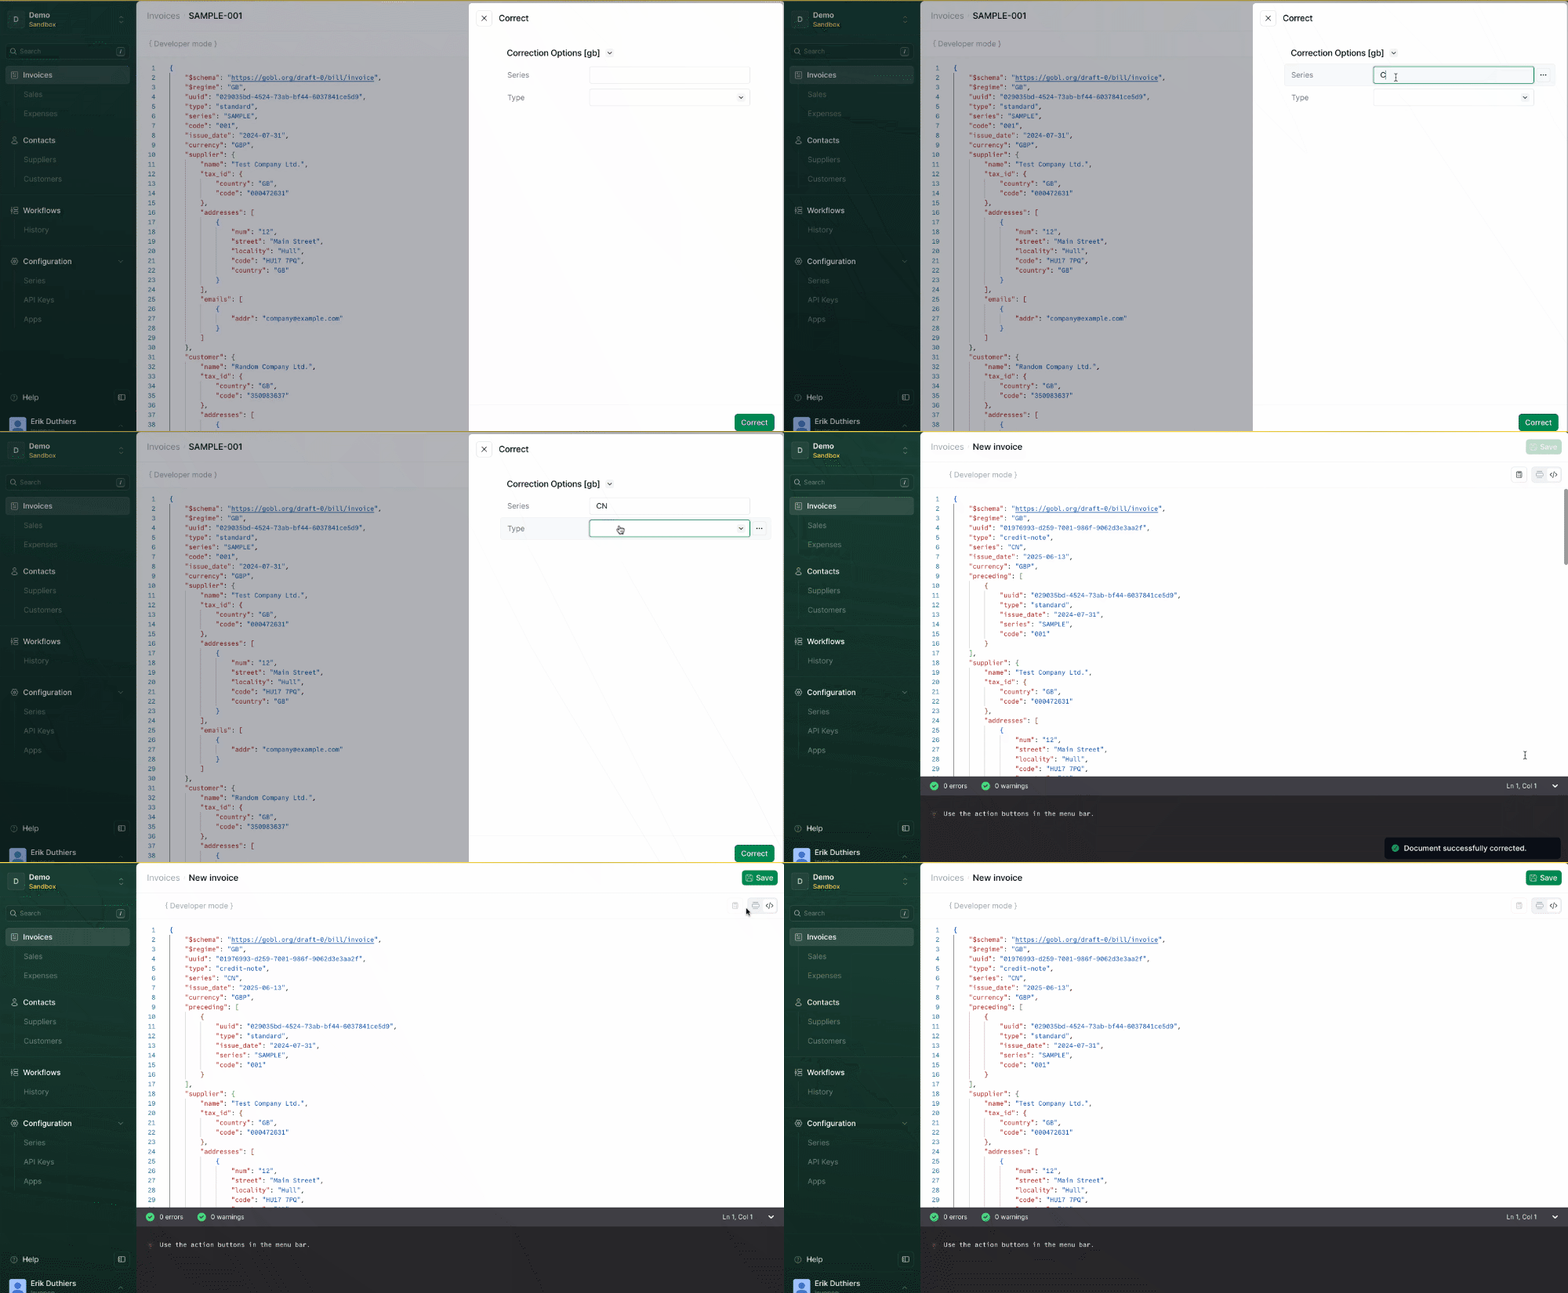 Click the **Save** button in the top-right corner to store the credit note. You'll be redirected to the *invoice detail* view.
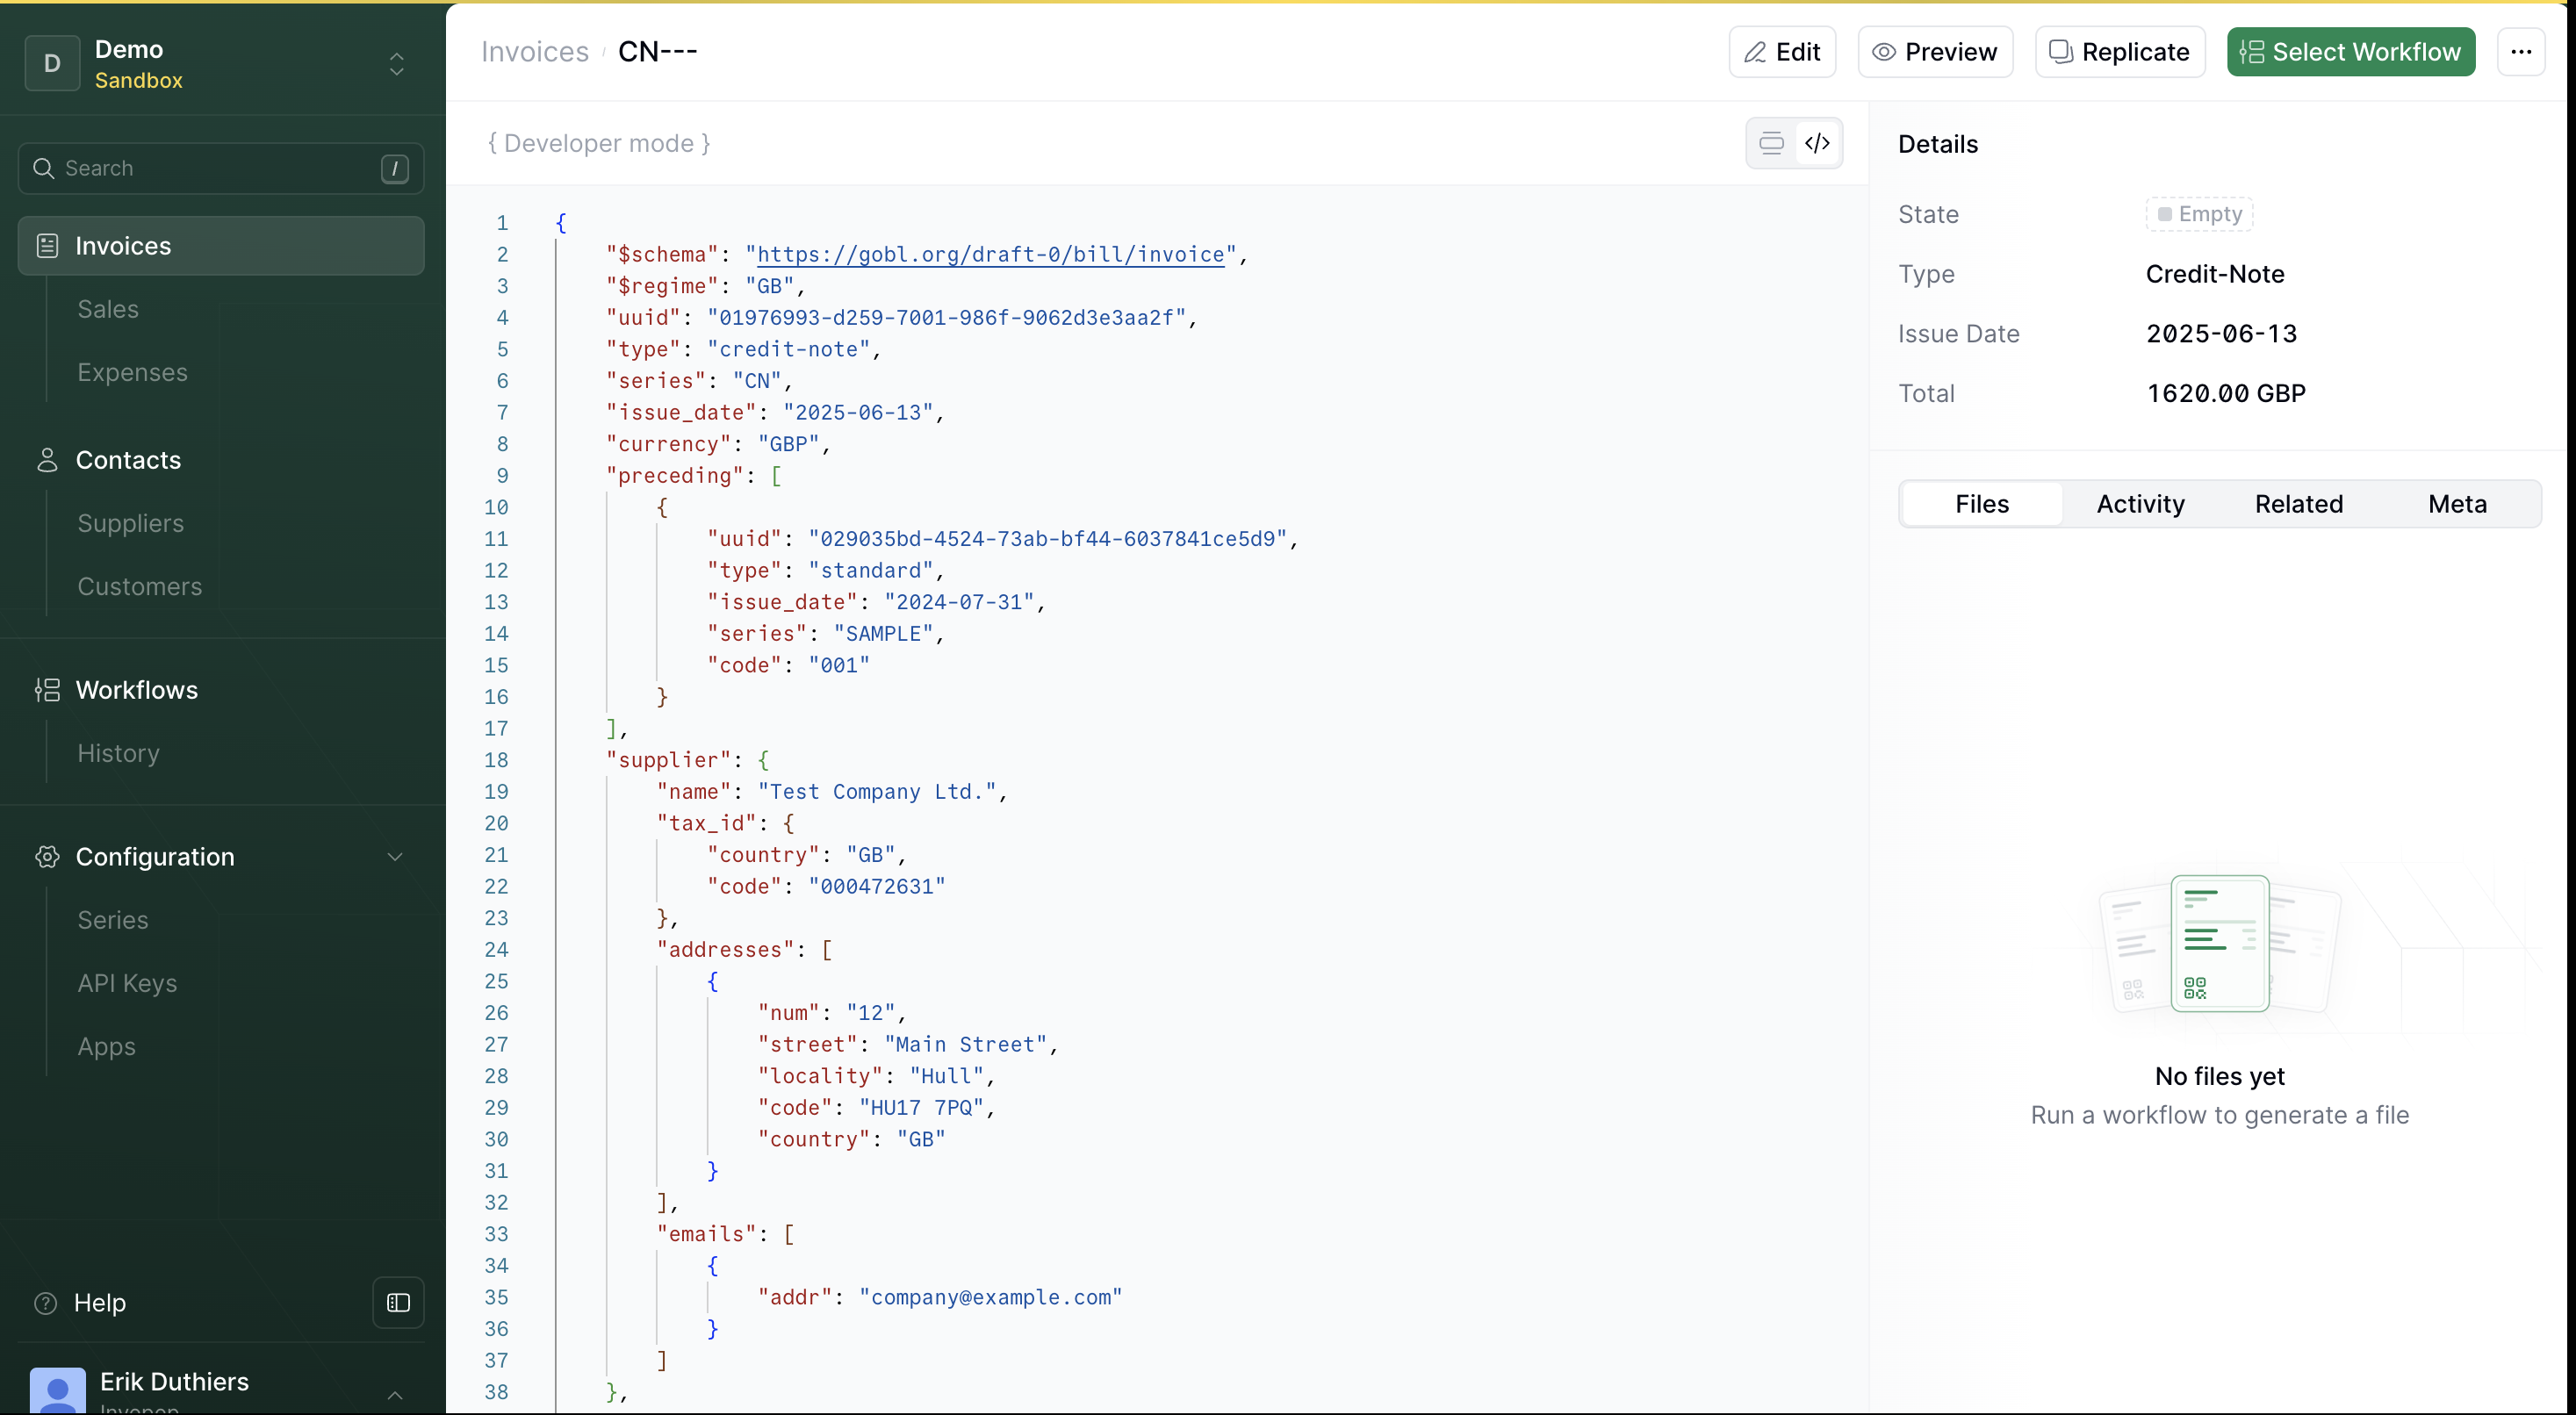 You've just created your first credit note! You can click on Preview to see how it'd look like in a PDF format.
## Using the API
There are two ways to submit a credit note using the API:
* **Upload a fully defined credit note**: You provide the complete document, including all fields.
* **Auto-generate a credit note**: You reference an existing invoice, and Invopop builds the credit note for you.
Let's walk through each method:
### Create a complete credit note
This method gives you full control over the credit note. You define everything, from line items and taxes to the original invoice reference.
It's perfect if you already have the credit note prepared, whether you built it manually or generated it somewhere else. Just upload it directly to Invopop and you're good to go.
**How it works**
Use the [Create an Entry](/api-ref/silo/entries/create-an-entry-post) API endpoint with a request body that wraps your credit note in the required structure:
* Set the `$schema` field so that it points to [https://gobl.org/draft-0/bill/invoice](https://gobl.org/draft-0/bill/invoice).
* Set the `type` field accordingly (`credit-note` instead of `standard`).
* Include a reference to the original invoice you're correcting (known as a *preceding block* in GOBL).
Your request body should look something like this:
```json theme={"system"}
{
"content_type": "application/json",
"data": {
"$schema": "https://gobl.org/draft-0/bill/invoice",
"type": "credit-note",
"preceding": [
{
"uuid": "019035bd-4524-73ab-bf44-6037841ce5d9",
"type": "standard",
"issue_date": "2024-07-31",
"series": "SAMPLE",
"code": "001"
}
]
...
}
}
```
Here's a complete example based on the PDF invoice we used earlier. Notice how it differs from the previous invoice example: the type is set to `credit_note`, a preceding block is included to reference the original invoice, and the `$schema` points to the credit note schema.
```json expandable theme={"system"}
{
"$schema": "https://gobl.org/draft-0/bill/invoice",
"$regime": "GB",
"uuid": "01975e35-426f-760e-aab8-a30b942fee07",
"type": "credit-note",
"series": "SAMPLE",
"issue_date": "2025-06-11",
"currency": "GBP",
"preceding": [
{
"uuid": "019035bd-4524-73ab-bf44-6037841ce5d9",
"type": "standard",
"issue_date": "2024-07-31",
"series": "SAMPLE",
"code": "001"
}
],
"supplier": {
"name": "Test Company Ltd.",
"tax_id": {
"country": "GB",
"code": "000472631"
},
"addresses": [
{
"num": "12",
"street": "Main Street",
"locality": "Hull",
"code": "HU17 7PQ",
"country": "GB"
}
],
"emails": [
{
"addr": "company@example.com"
}
]
},
"customer": {
"name": "Random Company Ltd.",
"tax_id": {
"country": "GB",
"code": "350983637"
},
"addresses": [
{
"num": "45",
"street": "Some Street",
"locality": "London",
"code": "SW1A 1AA",
"country": "GB"
}
],
"emails": [
{
"addr": "random@example.com"
}
]
},
"lines": [
{
"i": 1,
"quantity": "20",
"item": {
"name": "Development services",
"price": "90.00",
"unit": "h"
},
"sum": "1800.00",
"discounts": [
{
"reason": "Special discount",
"percent": "10%",
"amount": "180.00"
}
],
"taxes": [
{
"cat": "VAT",
"rate": "standard",
"percent": "20.0%"
}
],
"total": "1620.00"
}
],
"totals": {
"sum": "1620.00",
"total": "1620.00",
"taxes": {
"categories": [
{
"code": "VAT",
"rates": [
{
"key": "standard",
"base": "1620.00",
"percent": "20.0%",
"amount": "324.00"
}
],
"amount": "324.00"
}
],
"sum": "324.00"
},
"tax": "324.00",
"total_with_tax": "1944.00",
"payable": "1944.00"
}
}
```
If everything goes well, you'll get a `200 OK` response along with the JSON for your newly registered credit note.
### Auto-generate a credit note from an invoice
Sending a complete credit note to Invopop is straightforward, as long as you already have the full document ready to go.
That said, building one from scratch can be complex, not just because of the structure, but because certain regimes require very specific references to the original invoice. For example, in Colombia, you need to include the original CUFE code, and in VERI\*FACTU, the credit note must reproduce a detailed breakdown of the original taxes. That's why it helps to have the system handle this automatically when possible.
This is where Invopop really shines. Instead of defining everything yourself, you can simply reference the invoice you want to correct. Just pass the **Silo Entry ID** and the type of correction, and Invopop will take care of the rest.
**How it works**
Use the [Create an Entry](/api-ref/silo/entries/create-an-entry-post) API endpoint, but this time, skip the `data` field. Instead, you'll send a request body that tells Invopop to generate the credit note for you:
```json theme={"system"}
{
"correct": { "type": "credit-note" },
"previous_id": "silo_entry_id"
}
```
* `previous_id` should point to the Silo Entry ID of the original invoice.
* `correct.type` should be `credit-note` to indicate the correction type.
If everything goes well, you'll get a `200 OK` response along with the JSON for your newly registered credit note.
You've just created your first credit note! You can click on Preview to see how it'd look like in a PDF format.
## Using the API
There are two ways to submit a credit note using the API:
* **Upload a fully defined credit note**: You provide the complete document, including all fields.
* **Auto-generate a credit note**: You reference an existing invoice, and Invopop builds the credit note for you.
Let's walk through each method:
### Create a complete credit note
This method gives you full control over the credit note. You define everything, from line items and taxes to the original invoice reference.
It's perfect if you already have the credit note prepared, whether you built it manually or generated it somewhere else. Just upload it directly to Invopop and you're good to go.
**How it works**
Use the [Create an Entry](/api-ref/silo/entries/create-an-entry-post) API endpoint with a request body that wraps your credit note in the required structure:
* Set the `$schema` field so that it points to [https://gobl.org/draft-0/bill/invoice](https://gobl.org/draft-0/bill/invoice).
* Set the `type` field accordingly (`credit-note` instead of `standard`).
* Include a reference to the original invoice you're correcting (known as a *preceding block* in GOBL).
Your request body should look something like this:
```json theme={"system"}
{
"content_type": "application/json",
"data": {
"$schema": "https://gobl.org/draft-0/bill/invoice",
"type": "credit-note",
"preceding": [
{
"uuid": "019035bd-4524-73ab-bf44-6037841ce5d9",
"type": "standard",
"issue_date": "2024-07-31",
"series": "SAMPLE",
"code": "001"
}
]
...
}
}
```
Here's a complete example based on the PDF invoice we used earlier. Notice how it differs from the previous invoice example: the type is set to `credit_note`, a preceding block is included to reference the original invoice, and the `$schema` points to the credit note schema.
```json expandable theme={"system"}
{
"$schema": "https://gobl.org/draft-0/bill/invoice",
"$regime": "GB",
"uuid": "01975e35-426f-760e-aab8-a30b942fee07",
"type": "credit-note",
"series": "SAMPLE",
"issue_date": "2025-06-11",
"currency": "GBP",
"preceding": [
{
"uuid": "019035bd-4524-73ab-bf44-6037841ce5d9",
"type": "standard",
"issue_date": "2024-07-31",
"series": "SAMPLE",
"code": "001"
}
],
"supplier": {
"name": "Test Company Ltd.",
"tax_id": {
"country": "GB",
"code": "000472631"
},
"addresses": [
{
"num": "12",
"street": "Main Street",
"locality": "Hull",
"code": "HU17 7PQ",
"country": "GB"
}
],
"emails": [
{
"addr": "company@example.com"
}
]
},
"customer": {
"name": "Random Company Ltd.",
"tax_id": {
"country": "GB",
"code": "350983637"
},
"addresses": [
{
"num": "45",
"street": "Some Street",
"locality": "London",
"code": "SW1A 1AA",
"country": "GB"
}
],
"emails": [
{
"addr": "random@example.com"
}
]
},
"lines": [
{
"i": 1,
"quantity": "20",
"item": {
"name": "Development services",
"price": "90.00",
"unit": "h"
},
"sum": "1800.00",
"discounts": [
{
"reason": "Special discount",
"percent": "10%",
"amount": "180.00"
}
],
"taxes": [
{
"cat": "VAT",
"rate": "standard",
"percent": "20.0%"
}
],
"total": "1620.00"
}
],
"totals": {
"sum": "1620.00",
"total": "1620.00",
"taxes": {
"categories": [
{
"code": "VAT",
"rates": [
{
"key": "standard",
"base": "1620.00",
"percent": "20.0%",
"amount": "324.00"
}
],
"amount": "324.00"
}
],
"sum": "324.00"
},
"tax": "324.00",
"total_with_tax": "1944.00",
"payable": "1944.00"
}
}
```
If everything goes well, you'll get a `200 OK` response along with the JSON for your newly registered credit note.
### Auto-generate a credit note from an invoice
Sending a complete credit note to Invopop is straightforward, as long as you already have the full document ready to go.
That said, building one from scratch can be complex, not just because of the structure, but because certain regimes require very specific references to the original invoice. For example, in Colombia, you need to include the original CUFE code, and in VERI\*FACTU, the credit note must reproduce a detailed breakdown of the original taxes. That's why it helps to have the system handle this automatically when possible.
This is where Invopop really shines. Instead of defining everything yourself, you can simply reference the invoice you want to correct. Just pass the **Silo Entry ID** and the type of correction, and Invopop will take care of the rest.
**How it works**
Use the [Create an Entry](/api-ref/silo/entries/create-an-entry-post) API endpoint, but this time, skip the `data` field. Instead, you'll send a request body that tells Invopop to generate the credit note for you:
```json theme={"system"}
{
"correct": { "type": "credit-note" },
"previous_id": "silo_entry_id"
}
```
* `previous_id` should point to the Silo Entry ID of the original invoice.
* `correct.type` should be `credit-note` to indicate the correction type.
If everything goes well, you'll get a `200 OK` response along with the JSON for your newly registered credit note.