> ## Documentation Index
> Fetch the complete documentation index at: https://docs.invopop.com/llms.txt
> Use this file to discover all available pages before exploring further.
# Stripe Guide
> Import and process invoices and credit notes from Stripe
## Introduction
In this guide, you'll learn how to connect [Stripe](https://stripe.com/) with Invopop to automatically generate tax-compliant invoices and credit notes, from your Stripe dashboard.
The Stripe integration consists of two components:
1. An Invopop app within your Stripe dashboard
2. An app in your Invopop console
When a Stripe invoice or credit note reaches the [finalized status](https://support.stripe.com/questions/invoice-states), our integration will automatically create a new job in your selected Invopop workflow.
 The job will extract the invoice data from Stripe and execute the actions, such as converting it to any e-invoice format and submitting it to your local tax authority.
 ## Setup
Before you begin, ensure you have an active Stripe account.
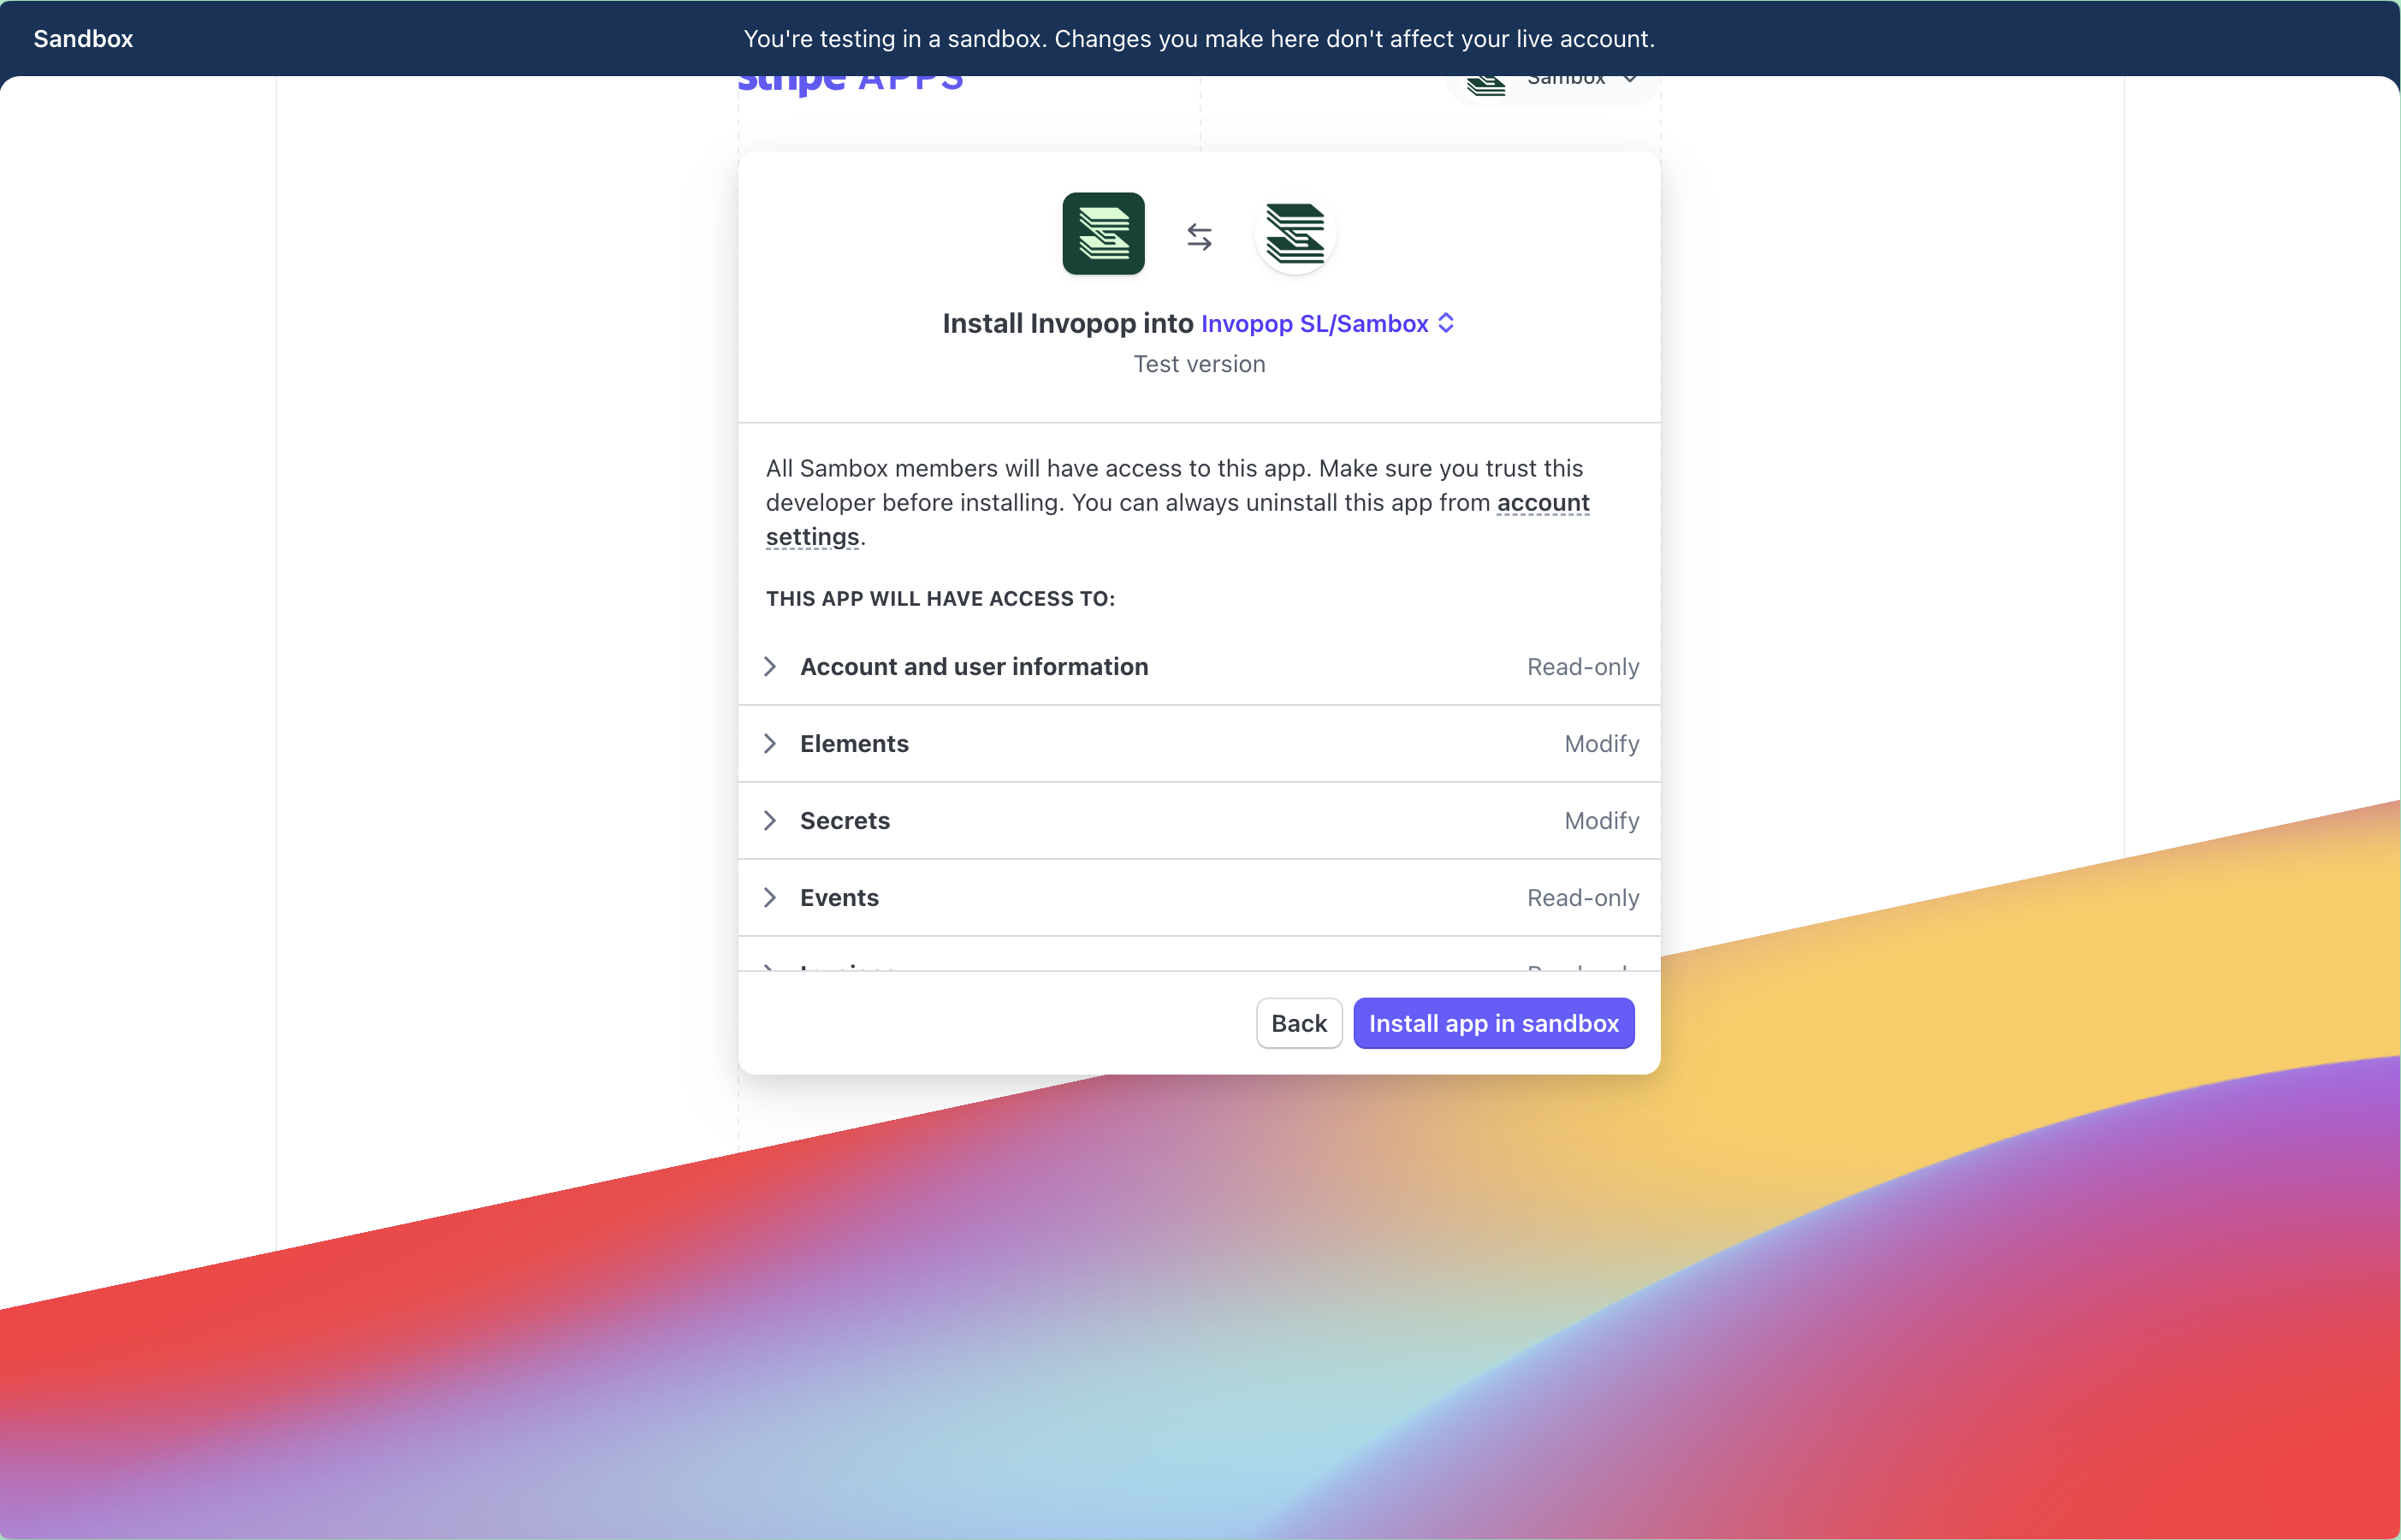
Navigate to the [Invopop app](https://marketplace.stripe.com/apps/invopop) in Stripe's App Marketplace and click **Install**.
Next, Stripe will prompt you to select the Stripe environment you'd like to connect to, you can start with test mode or sandbox and switch to live later.
## Setup
Before you begin, ensure you have an active Stripe account.
Navigate to the [Invopop app](https://marketplace.stripe.com/apps/invopop) in Stripe's App Marketplace and click **Install**.
Next, Stripe will prompt you to select the Stripe environment you'd like to connect to, you can start with test mode or sandbox and switch to live later.
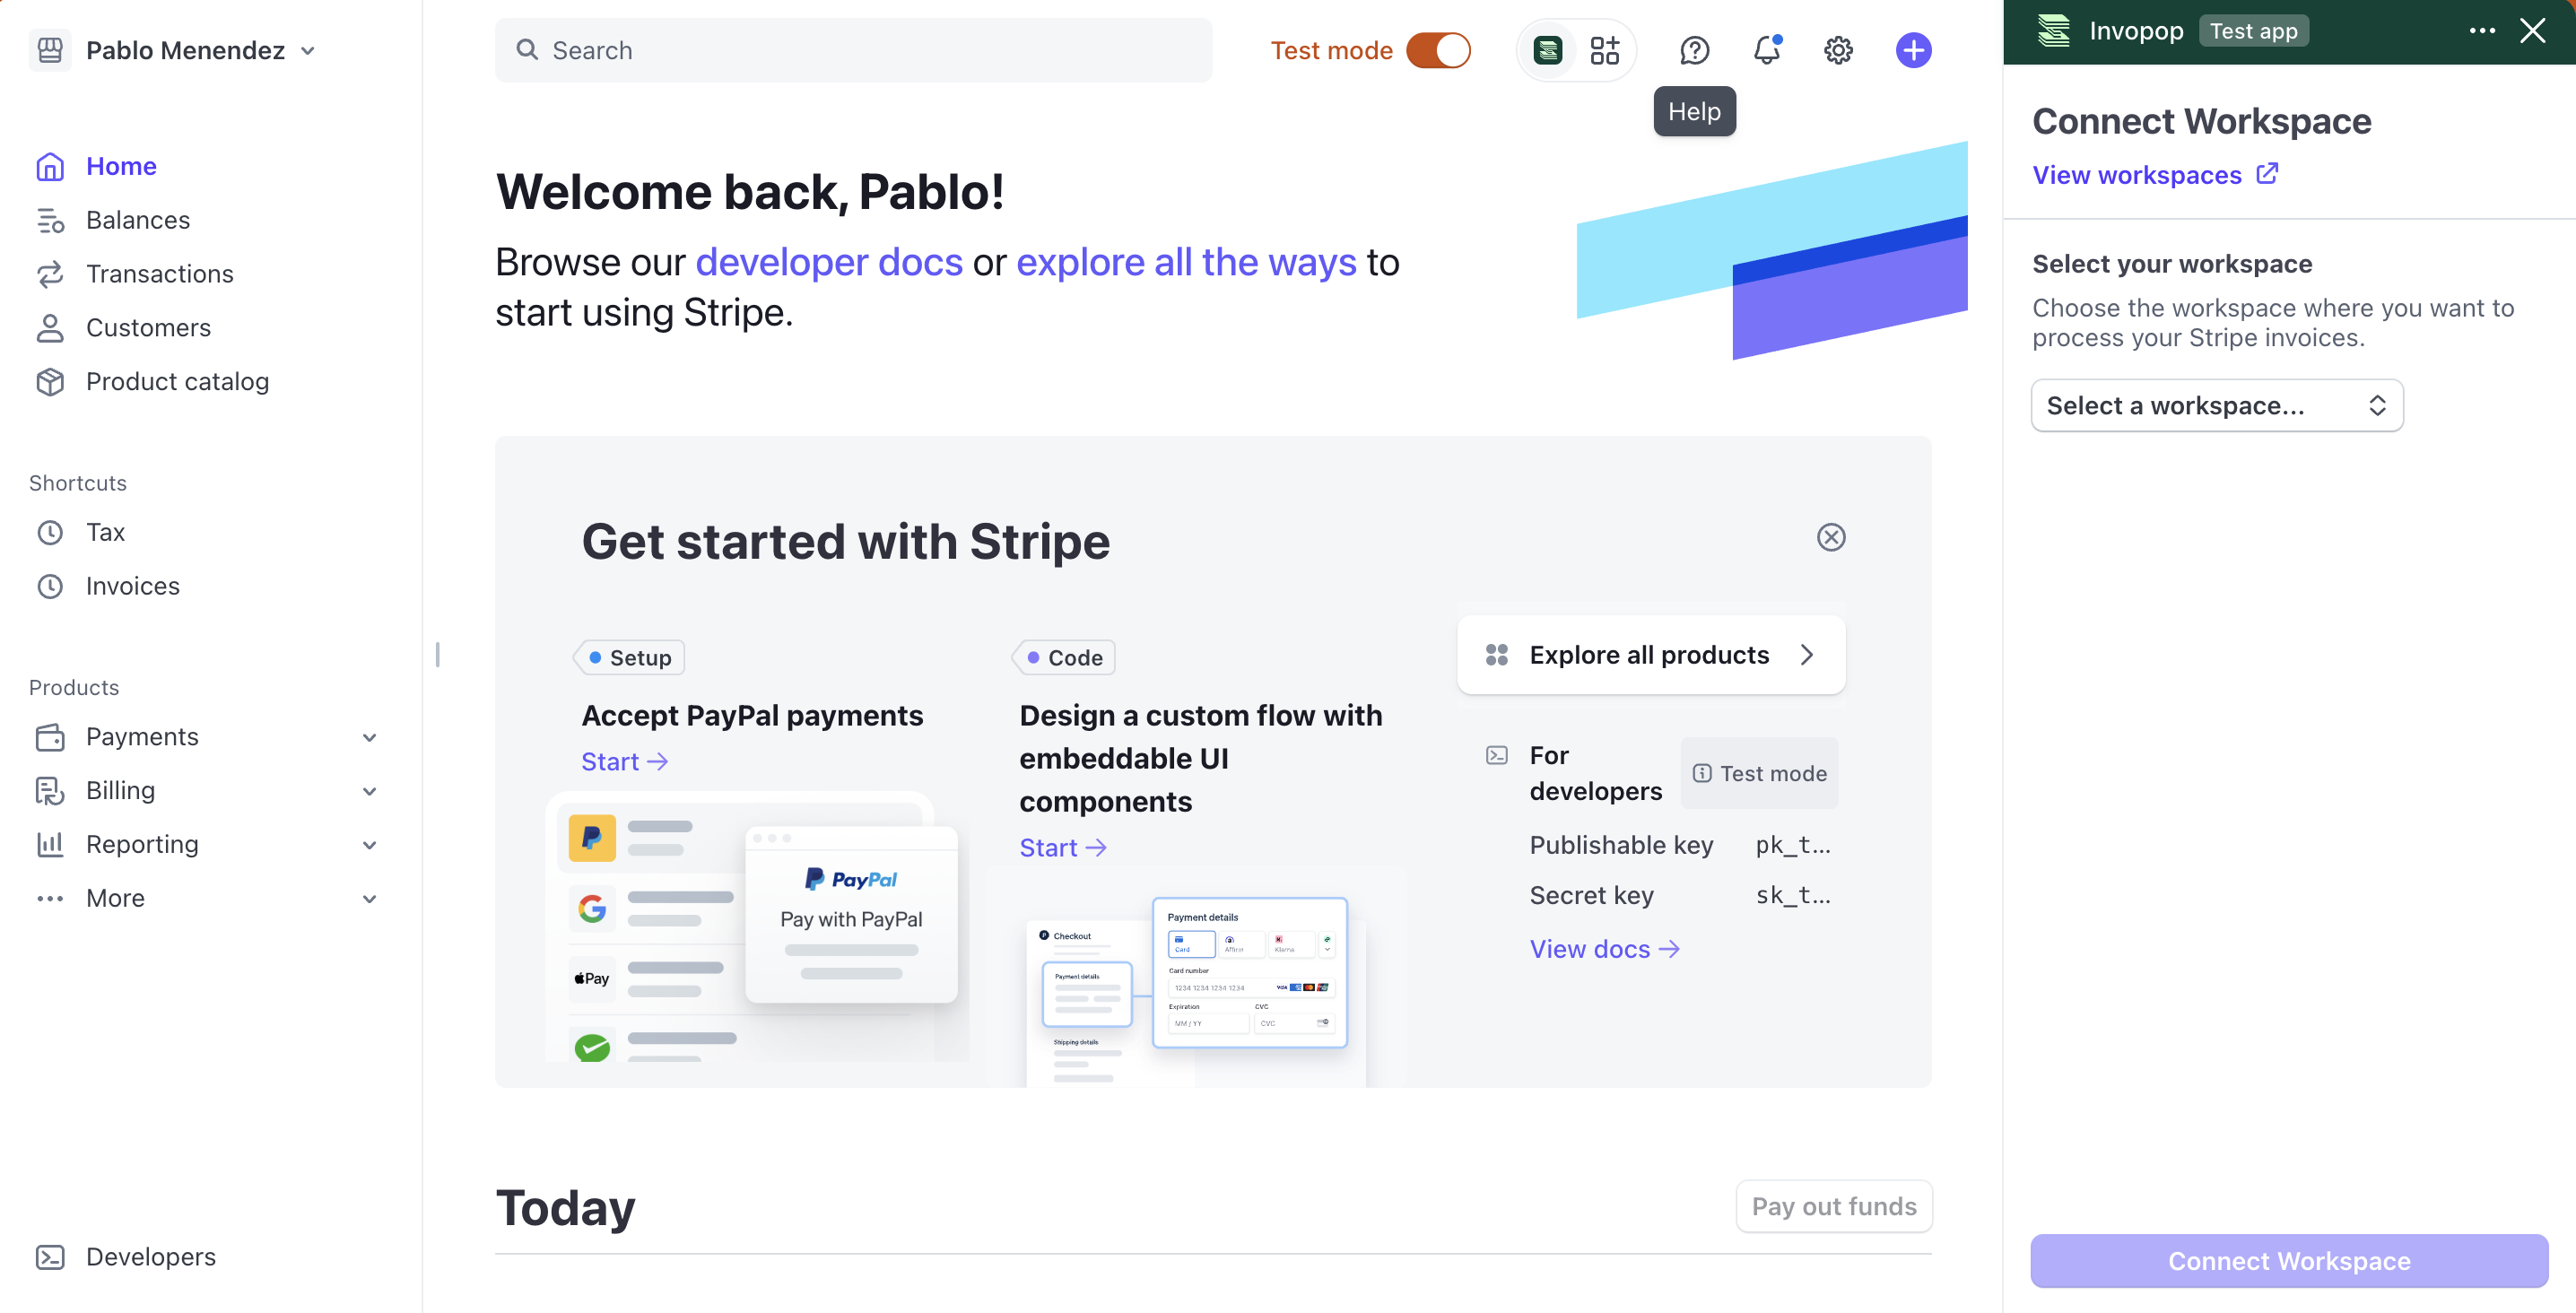
 After installation, you should be redirected to your Stripe dashboard and see the Invopop app in the right sidebar. Alternatively, just open the Invopop app in your [Stripe dashboard](https://dashboard.stripe.com/apps/invopop).
Click **Connect Invopop**. The next page will ask you to login to your Invopop account. If you're new to Invopop, the connection process will guide you through creating your Invopop account and setting up your first workspace.
When connecting a test or sandbox environment in Stripe, select a sandbox workspace in Invopop. For live environments, select a live workspace.
After installation, you should be redirected to your Stripe dashboard and see the Invopop app in the right sidebar. Alternatively, just open the Invopop app in your [Stripe dashboard](https://dashboard.stripe.com/apps/invopop).
Click **Connect Invopop**. The next page will ask you to login to your Invopop account. If you're new to Invopop, the connection process will guide you through creating your Invopop account and setting up your first workspace.
When connecting a test or sandbox environment in Stripe, select a sandbox workspace in Invopop. For live environments, select a live workspace.
 After connecting your Invopop account to Stripe, you'll be redirected back to Stripe to choose the workspace where you want to process your invoices.
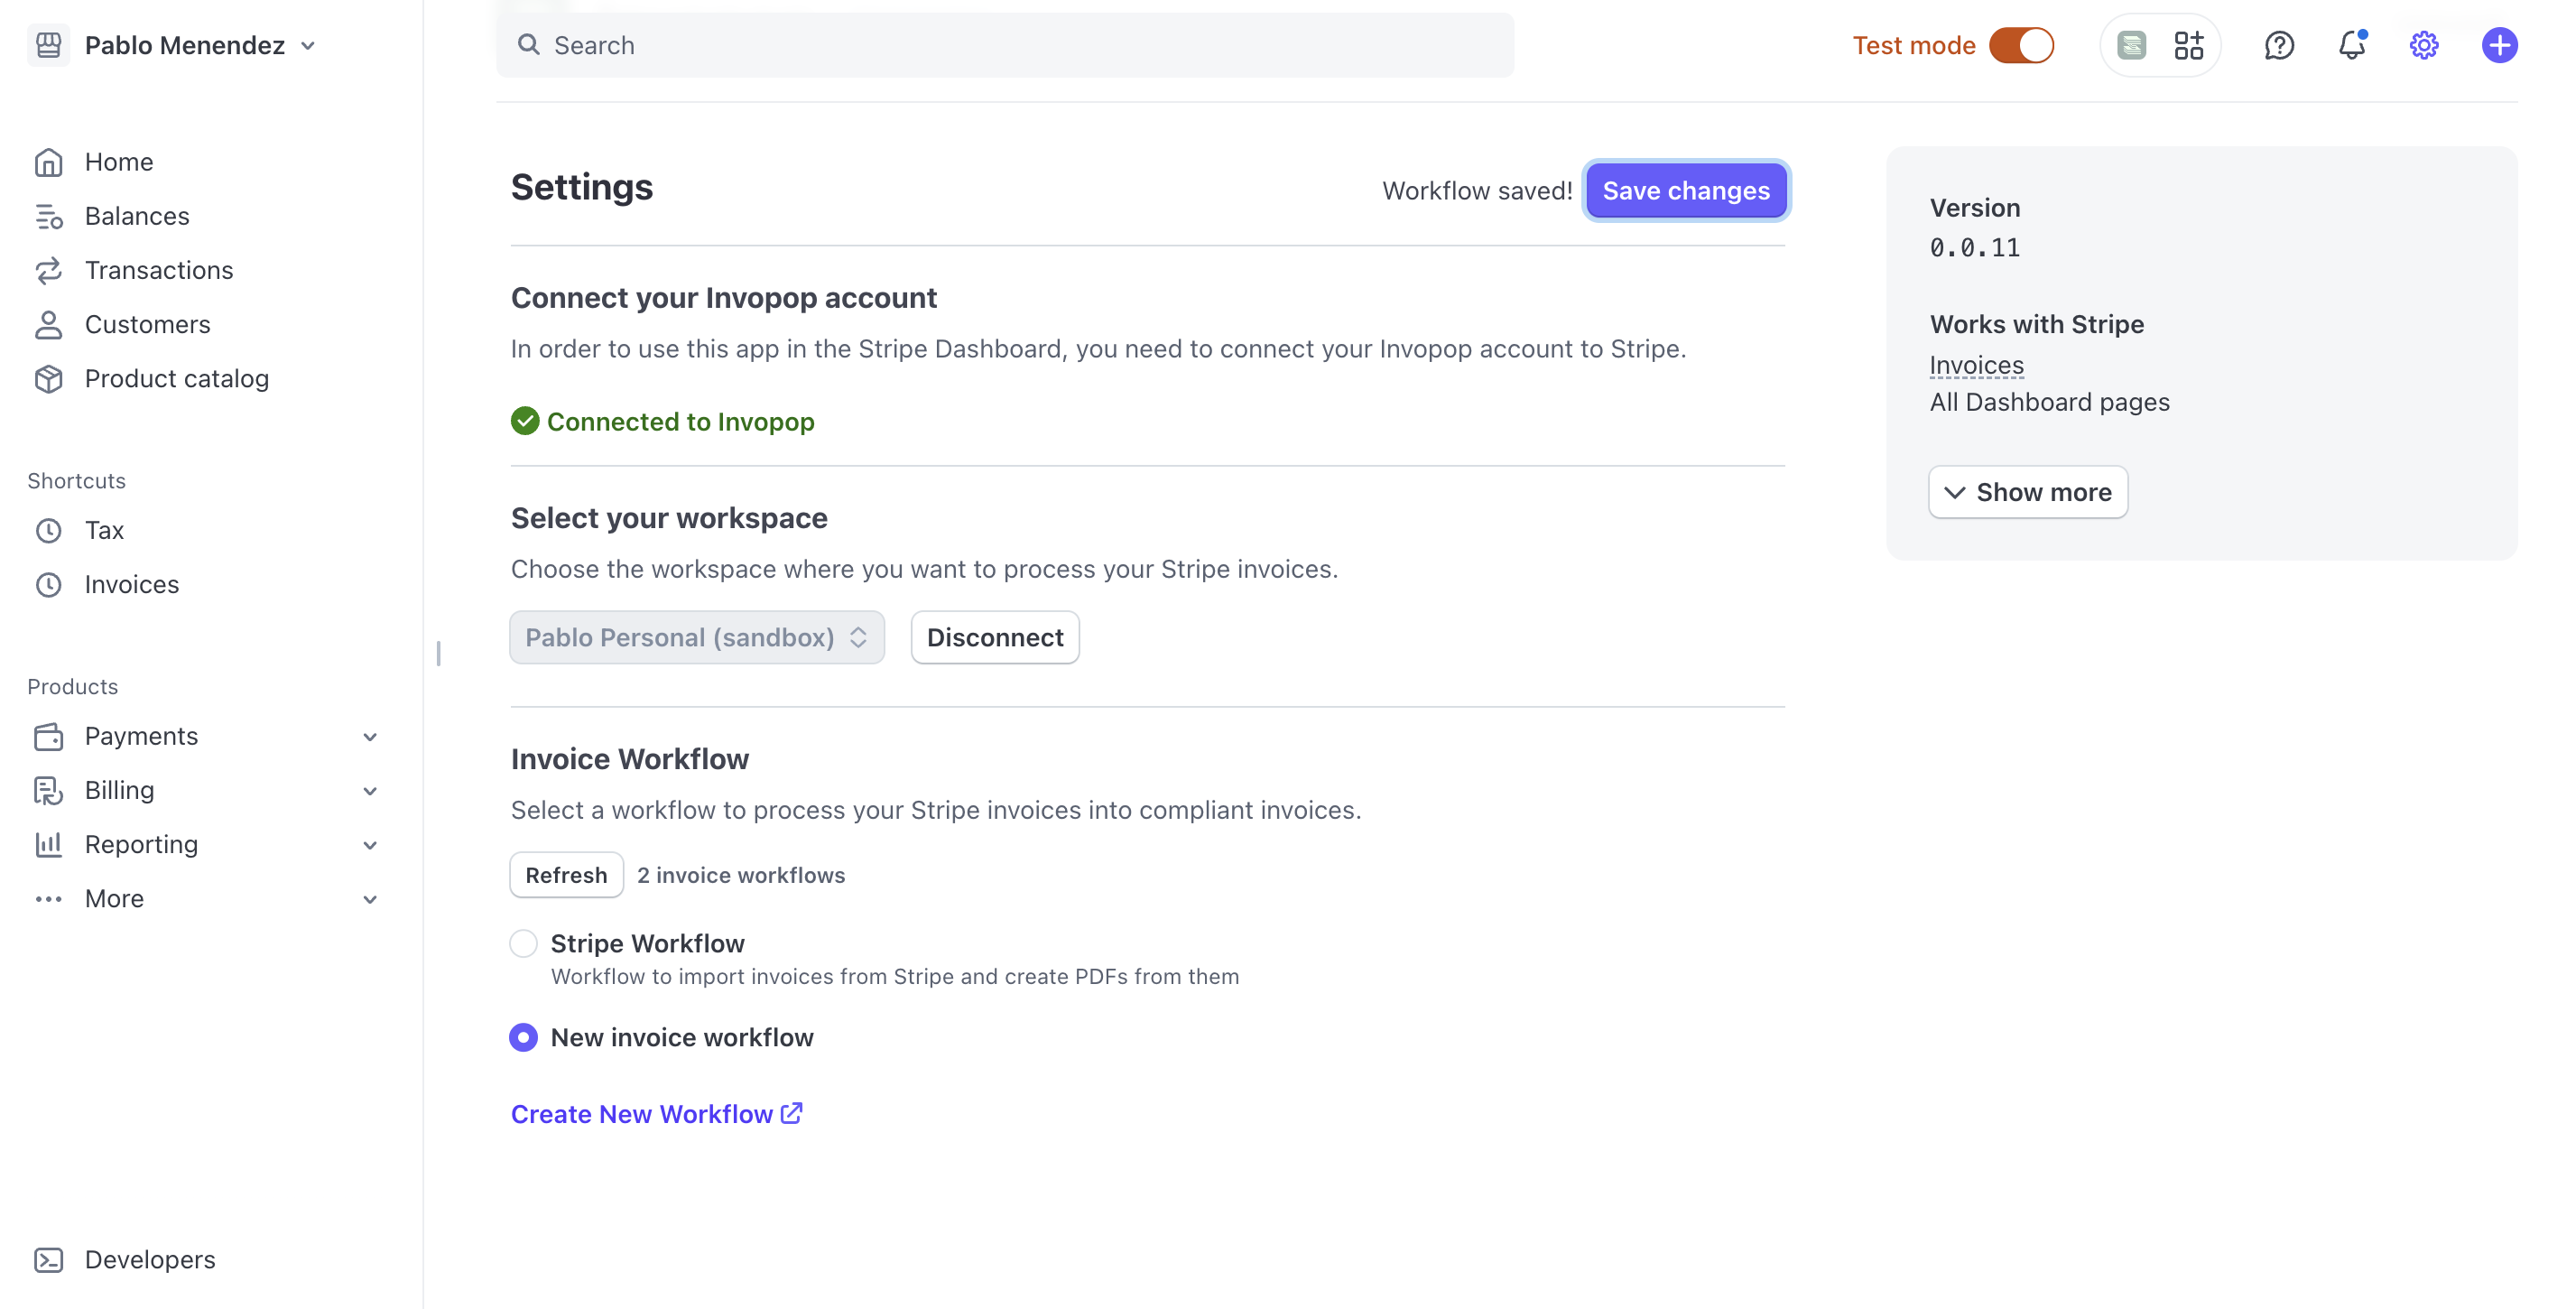
 Select or create a workflow to process your invoices and credit notes.
To use an existing workflow select it from the Stripe's sidebar menu and click **Save Workflow**
To create a new workflow click on **Create New Workflow** in the sidebar menu. You'll be redirected to Invopop.
Select one of the following workflow templates:
This workflow will sync with Stripe to issue a VERI\*\FACTU invoice on finalized sales.
This workflow will sync with Stripe to generate a PDF invoice on finalized sales.
Copy and paste into a new [Empty Invoice workflow](https://console.invopop.com/redirect/workflows/new?template=empty-invoice) code view.
This workflow demonstrates the Stripe integration with a basic PDF workflow.
```json Example Stripe to VERI*FACTU Workflow theme={"system"}
{
"name": "Stripe VERI*FACTU invoice",
"description": "Sync from Stripe and issue a VERI*FACTU invoice",
"schema": "bill/invoice",
"steps": [
{
"id": "7dd8e370-139b-11f0-b939-af2e8ae705ac",
"name": "Import invoice from Stripe",
"provider": "stripe.import"
},
{
"id": "95a82a10-139b-11f0-b939-af2e8ae705ac",
"name": "Set state",
"provider": "silo.state",
"summary": "Set state to `processing`{.state .processing}",
"config": {
"state": "processing"
}
},
{
"id": "794f78d0-139d-11f0-9ab7-c391120166e0",
"name": "Modify silo entry",
"provider": "silo.modify",
"summary": "Add `es-verifactu-v1` addon and \"Factura\" note",
"config": {
"addons": [
"es-verifactu-v1"
],
"allow_invalid_json": false,
"data": {
"doc": {
"notes": [
{
"key": "general",
"text": "Factura"
}
]
}
},
"expr": "",
"merge_type": "application/merge-patch+json",
"sign": false,
"tags": []
}
},
{
"id": "84cf92a0-139b-11f0-b939-af2e8ae705ac",
"name": "Sign envelope",
"provider": "silo.close"
},
{
"id": "fc307c60-139b-11f0-b939-af2e8ae705ac",
"name": "Generate VERI*FACTU",
"provider": "verifactu.generate"
},
{
"id": "fe479c90-139b-11f0-b939-af2e8ae705ac",
"name": "Send invoice to VERI*FACTU",
"provider": "verifactu.send"
},
{
"id": "86a5b230-139b-11f0-b939-af2e8ae705ac",
"name": "Generate PDF",
"provider": "pdf",
"summary": "Spanish · A4",
"config": {
"date_format": "%Y-%m-%d",
"layout": "A4",
"locale": "es",
"logo_height": 40
}
},
{
"id": "8b321820-139b-11f0-b939-af2e8ae705ac",
"name": "Set state",
"provider": "silo.state",
"summary": "Set state to `sent`{.state .sent}",
"config": {
"state": "sent"
}
}
],
"rescue": [
{
"id": "90f4b420-139b-11f0-b939-af2e8ae705ac",
"name": "Set state",
"provider": "silo.state",
"summary": "Set state to `error`{.state .error}",
"config": {
"state": "error"
}
}
]
}
```
This workflow demonstrates the Stripe integration with country-specific functionality.
```json Example Stripe PDF workflow theme={"system"}
{
"name": "Stripe PDF invoice",
"description": "Sync from Stripe and generate a PDF",
"schema": "bill/invoice",
"steps": [
{
"id": "7dd8e370-139b-11f0-b939-af2e8ae705ac",
"name": "Import invoice from Stripe",
"provider": "stripe.import"
},
{
"id": "95a82a10-139b-11f0-b939-af2e8ae705ac",
"name": "Set state",
"provider": "silo.state",
"summary": "Set state to `processing`{.state .processing}",
"config": {
"state": "processing"
}
},
{
"id": "84cf92a0-139b-11f0-b939-af2e8ae705ac",
"name": "Sign envelope",
"provider": "silo.close"
},
{
"id": "86a5b230-139b-11f0-b939-af2e8ae705ac",
"name": "Generate PDF",
"provider": "pdf",
"summary": "Spanish · A4",
"config": {
"date_format": "%Y-%m-%d",
"layout": "A4",
"locale": "es",
"logo_height": 40
}
},
{
"id": "8b321820-139b-11f0-b939-af2e8ae705ac",
"name": "Set state",
"provider": "silo.state",
"summary": "Set state to `sent`{.state .sent}",
"config": {
"state": "sent"
}
}
],
"rescue": [
{
"id": "90f4b420-139b-11f0-b939-af2e8ae705ac",
"name": "Set state",
"provider": "silo.state",
"summary": "Set state to `error`{.state .error}",
"config": {
"state": "error"
}
}
]
}
```
In [Console](https://console.invopop.com) create a new workflow and select [Empty Invoice workflow](https://console.invopop.com/redirect/workflows/new?template=empty-invoice) in the template selector, then add the following steps:
Select or create a workflow to process your invoices and credit notes.
To use an existing workflow select it from the Stripe's sidebar menu and click **Save Workflow**
To create a new workflow click on **Create New Workflow** in the sidebar menu. You'll be redirected to Invopop.
Select one of the following workflow templates:
This workflow will sync with Stripe to issue a VERI\*\FACTU invoice on finalized sales.
This workflow will sync with Stripe to generate a PDF invoice on finalized sales.
Copy and paste into a new [Empty Invoice workflow](https://console.invopop.com/redirect/workflows/new?template=empty-invoice) code view.
This workflow demonstrates the Stripe integration with a basic PDF workflow.
```json Example Stripe to VERI*FACTU Workflow theme={"system"}
{
"name": "Stripe VERI*FACTU invoice",
"description": "Sync from Stripe and issue a VERI*FACTU invoice",
"schema": "bill/invoice",
"steps": [
{
"id": "7dd8e370-139b-11f0-b939-af2e8ae705ac",
"name": "Import invoice from Stripe",
"provider": "stripe.import"
},
{
"id": "95a82a10-139b-11f0-b939-af2e8ae705ac",
"name": "Set state",
"provider": "silo.state",
"summary": "Set state to `processing`{.state .processing}",
"config": {
"state": "processing"
}
},
{
"id": "794f78d0-139d-11f0-9ab7-c391120166e0",
"name": "Modify silo entry",
"provider": "silo.modify",
"summary": "Add `es-verifactu-v1` addon and \"Factura\" note",
"config": {
"addons": [
"es-verifactu-v1"
],
"allow_invalid_json": false,
"data": {
"doc": {
"notes": [
{
"key": "general",
"text": "Factura"
}
]
}
},
"expr": "",
"merge_type": "application/merge-patch+json",
"sign": false,
"tags": []
}
},
{
"id": "84cf92a0-139b-11f0-b939-af2e8ae705ac",
"name": "Sign envelope",
"provider": "silo.close"
},
{
"id": "fc307c60-139b-11f0-b939-af2e8ae705ac",
"name": "Generate VERI*FACTU",
"provider": "verifactu.generate"
},
{
"id": "fe479c90-139b-11f0-b939-af2e8ae705ac",
"name": "Send invoice to VERI*FACTU",
"provider": "verifactu.send"
},
{
"id": "86a5b230-139b-11f0-b939-af2e8ae705ac",
"name": "Generate PDF",
"provider": "pdf",
"summary": "Spanish · A4",
"config": {
"date_format": "%Y-%m-%d",
"layout": "A4",
"locale": "es",
"logo_height": 40
}
},
{
"id": "8b321820-139b-11f0-b939-af2e8ae705ac",
"name": "Set state",
"provider": "silo.state",
"summary": "Set state to `sent`{.state .sent}",
"config": {
"state": "sent"
}
}
],
"rescue": [
{
"id": "90f4b420-139b-11f0-b939-af2e8ae705ac",
"name": "Set state",
"provider": "silo.state",
"summary": "Set state to `error`{.state .error}",
"config": {
"state": "error"
}
}
]
}
```
This workflow demonstrates the Stripe integration with country-specific functionality.
```json Example Stripe PDF workflow theme={"system"}
{
"name": "Stripe PDF invoice",
"description": "Sync from Stripe and generate a PDF",
"schema": "bill/invoice",
"steps": [
{
"id": "7dd8e370-139b-11f0-b939-af2e8ae705ac",
"name": "Import invoice from Stripe",
"provider": "stripe.import"
},
{
"id": "95a82a10-139b-11f0-b939-af2e8ae705ac",
"name": "Set state",
"provider": "silo.state",
"summary": "Set state to `processing`{.state .processing}",
"config": {
"state": "processing"
}
},
{
"id": "84cf92a0-139b-11f0-b939-af2e8ae705ac",
"name": "Sign envelope",
"provider": "silo.close"
},
{
"id": "86a5b230-139b-11f0-b939-af2e8ae705ac",
"name": "Generate PDF",
"provider": "pdf",
"summary": "Spanish · A4",
"config": {
"date_format": "%Y-%m-%d",
"layout": "A4",
"locale": "es",
"logo_height": 40
}
},
{
"id": "8b321820-139b-11f0-b939-af2e8ae705ac",
"name": "Set state",
"provider": "silo.state",
"summary": "Set state to `sent`{.state .sent}",
"config": {
"state": "sent"
}
}
],
"rescue": [
{
"id": "90f4b420-139b-11f0-b939-af2e8ae705ac",
"name": "Set state",
"provider": "silo.state",
"summary": "Set state to `error`{.state .error}",
"config": {
"state": "error"
}
}
]
}
```
In [Console](https://console.invopop.com) create a new workflow and select [Empty Invoice workflow](https://console.invopop.com/redirect/workflows/new?template=empty-invoice) in the template selector, then add the following steps:
 1. Add the **Import invoice from Stripe** step as the first step of the workflow.
2. Configure the workflow according to your local regulations. You can copy *the Basic PDF workflow* example below and modify it later for your local needs.
Finally, in the Error Handling area, add the **Set state** action and select "Error" in the State dropdown.
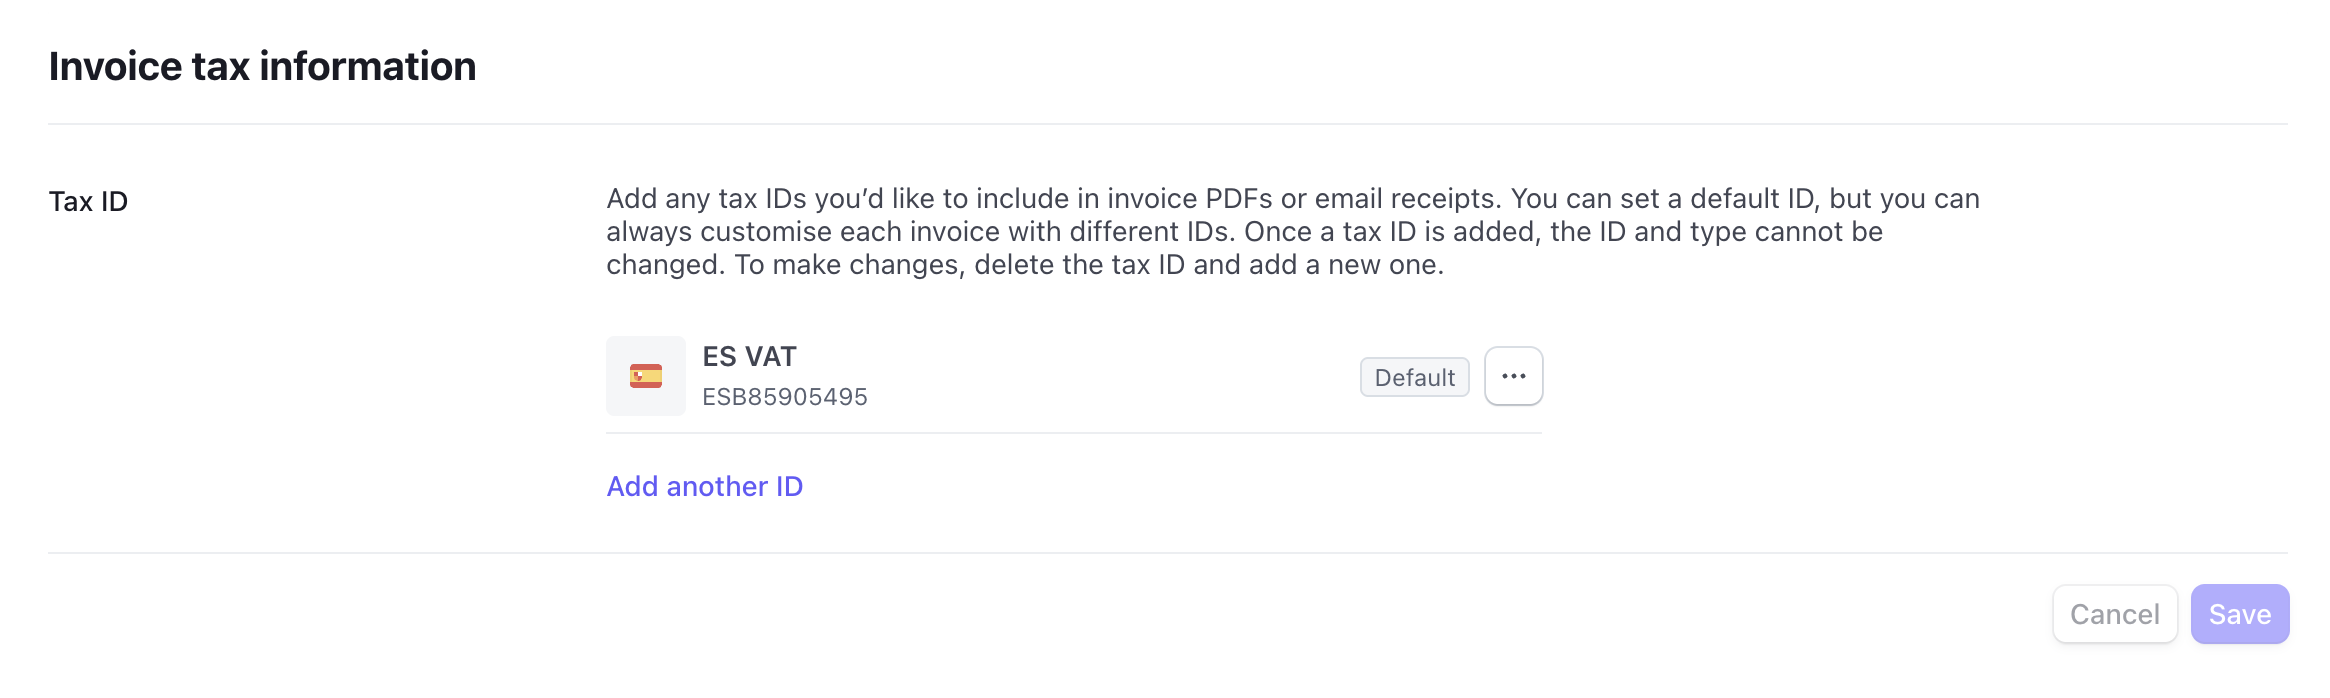
By default, Stripe does not display your tax ID on invoices. To enable it, go to Settings > Billing > Invoices. In the `Invoice Tax Information` section, enter your tax ID, set it as the default, and click **Save**.
1. Add the **Import invoice from Stripe** step as the first step of the workflow.
2. Configure the workflow according to your local regulations. You can copy *the Basic PDF workflow* example below and modify it later for your local needs.
Finally, in the Error Handling area, add the **Set state** action and select "Error" in the State dropdown.
By default, Stripe does not display your tax ID on invoices. To enable it, go to Settings > Billing > Invoices. In the `Invoice Tax Information` section, enter your tax ID, set it as the default, and click **Save**.
 1. Navigate to [Stripe app settings](https://dashboard.stripe.com/settings/apps/com.invoicing.invopop)
2. Confirm your workflow configuration is correct
1. Navigate to [Stripe app settings](https://dashboard.stripe.com/settings/apps/com.invoicing.invopop)
2. Confirm your workflow configuration is correct
 ## Monitor invoice processing
After setup, finalized Stripe invoices are imported into Invopop automatically and saved to the `Sales` folder. Use the steps below to verify status, review details, retry processing, and import historical invoices.
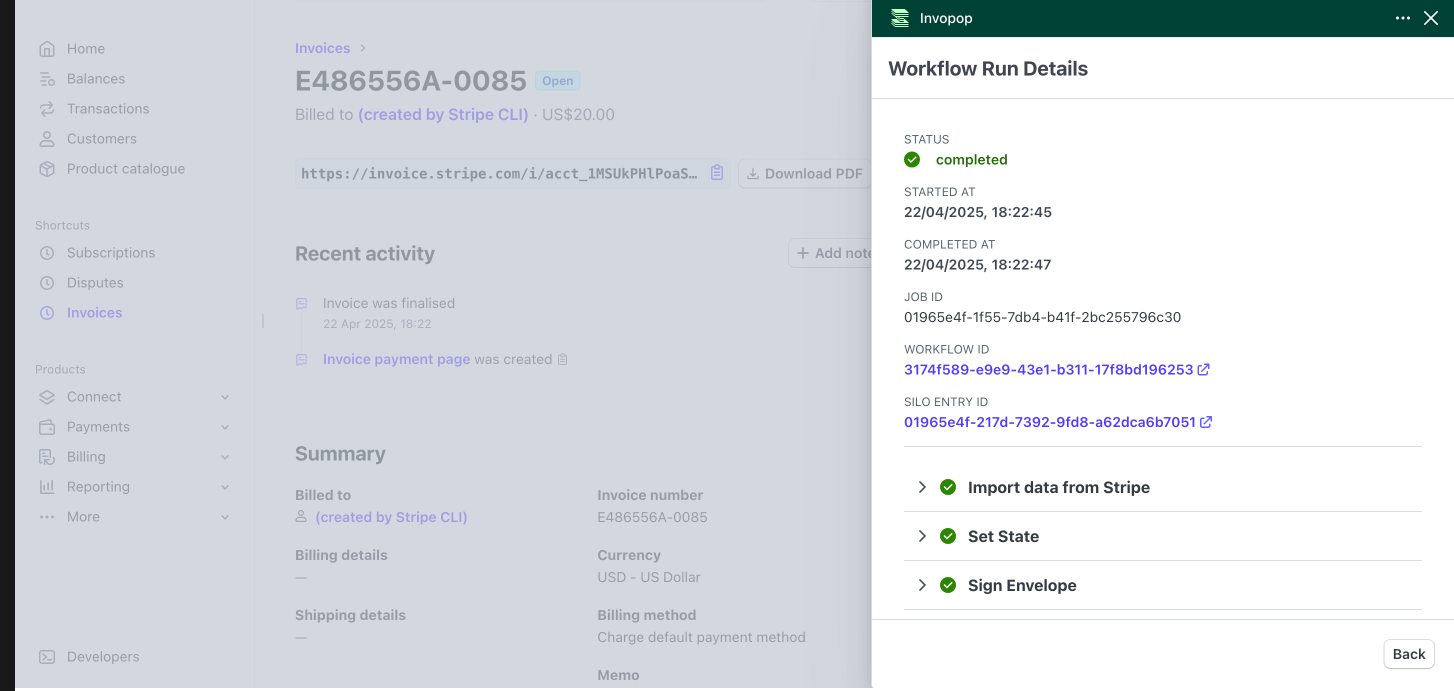
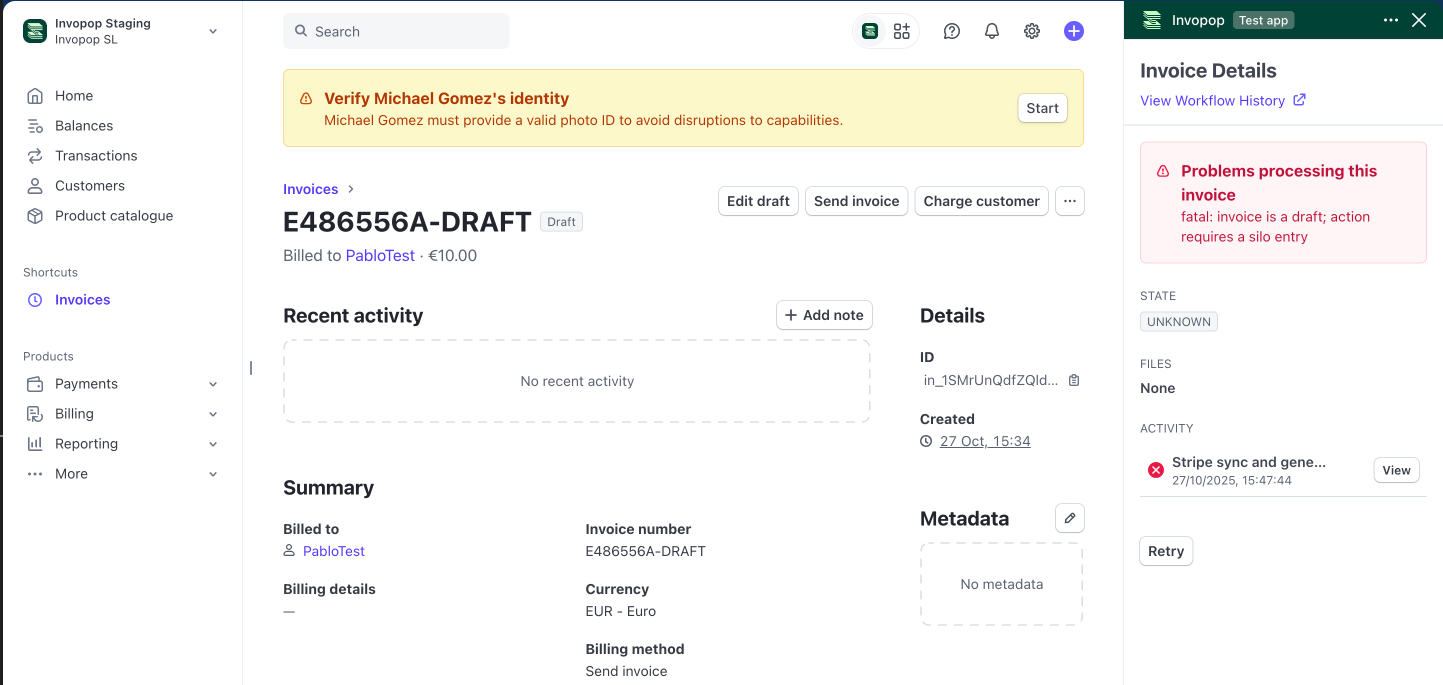
Open the invoice in Stripe and check the Invopop panel in the right sidebar to confirm whether processing succeeded.
## Monitor invoice processing
After setup, finalized Stripe invoices are imported into Invopop automatically and saved to the `Sales` folder. Use the steps below to verify status, review details, retry processing, and import historical invoices.
Open the invoice in Stripe and check the Invopop panel in the right sidebar to confirm whether processing succeeded.
 In the Invopop console, go to `Sales` and open the invoice to view its status. To review the underlying processing job, go to `Workflows` > `History` and open the job details.
 If an invoice fails, it is usually one of two cases:
1. The invoice was not imported into Invopop because converting from Stripe to Invopop failed. Update the data in Stripe and click **Retry** in the Invopop panel.
If an invoice fails, it is usually one of two cases:
1. The invoice was not imported into Invopop because converting from Stripe to Invopop failed. Update the data in Stripe and click **Retry** in the Invopop panel.
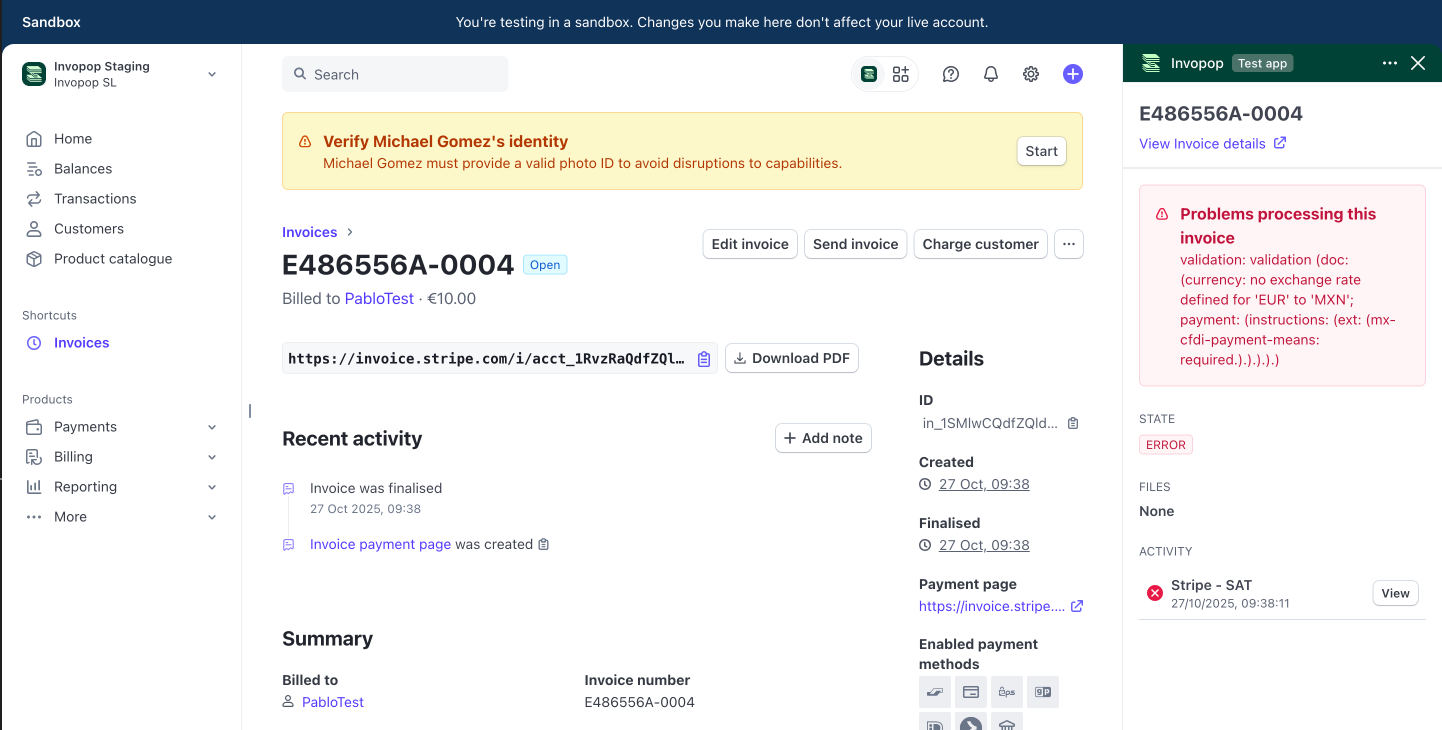
 2. The invoice was imported into Invopop but submission to the tax authority failed. Correct the invoice in Invopop and re-run a workflow that omits the **Import invoice from Stripe** step to avoid reimporting the original data. Typical causes include missing required fields or invalid field formats.
 Add a notification action in your workflow's Error Handling section—Slack, email, or webhook—so you're alerted when an import fails.
If you need help tailoring a workflow to your use case, contact us at [support@invopop.com](mailto:support@invopop.com).
## FAQ
Yes, you can, at any time select a different workflow to sync your Stripe invoices. You can do this both from Stripe or Invopop.
Option 1: From Stripe
1. Go to [Stripe app settings](https://dashboard.stripe.com/settings/apps/com.invoicing.invopop)
2. Select a different workflow
3. Click **Save changes**
Option 2: Through Invopop
1. Navigate to the **Apps** section in your [Invopop console](https://console.invopop.com/)
2. Locate the Stripe app settings
3. Select your new workflow
Add a notification action in your workflow's Error Handling section—Slack, email, or webhook—so you're alerted when an import fails.
If you need help tailoring a workflow to your use case, contact us at [support@invopop.com](mailto:support@invopop.com).
## FAQ
Yes, you can, at any time select a different workflow to sync your Stripe invoices. You can do this both from Stripe or Invopop.
Option 1: From Stripe
1. Go to [Stripe app settings](https://dashboard.stripe.com/settings/apps/com.invoicing.invopop)
2. Select a different workflow
3. Click **Save changes**
Option 2: Through Invopop
1. Navigate to the **Apps** section in your [Invopop console](https://console.invopop.com/)
2. Locate the Stripe app settings
3. Select your new workflow
 You can switch to the Stripe connection to a different workspace by disconnecting and reconnecting the app.
1. Go to [Stripe app settings](https://dashboard.stripe.com/settings/apps/com.invoicing.invopop)
2. Click the **Disconnect** button
3. Reconnect the app and select your new workspace
Stripe does not include a dedicated Purchase Order field on invoices. Add it as a custom field named `PO Number`.
You can add the custom field in any of these places:
* The specific invoice
* The subscription
* An invoice template
Yes. Open the invoice in Stripe and click **Process this invoice** in the Invopop panel (right sidebar).
Note: The invoice issue date will be set to the sync date (today), as required by tax agencies. The operation date remains the original date of the transaction.
You can switch to the Stripe connection to a different workspace by disconnecting and reconnecting the app.
1. Go to [Stripe app settings](https://dashboard.stripe.com/settings/apps/com.invoicing.invopop)
2. Click the **Disconnect** button
3. Reconnect the app and select your new workspace
Stripe does not include a dedicated Purchase Order field on invoices. Add it as a custom field named `PO Number`.
You can add the custom field in any of these places:
* The specific invoice
* The subscription
* An invoice template
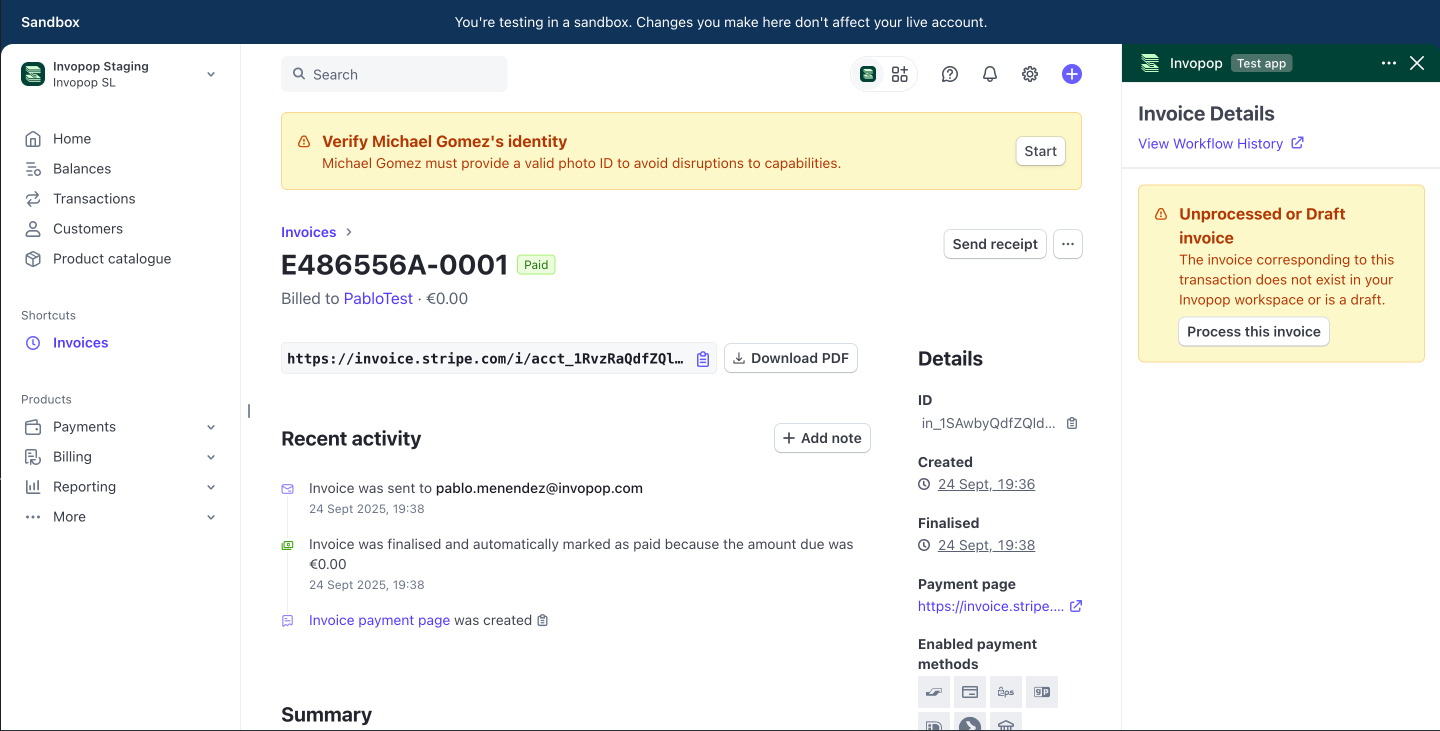
Yes. Open the invoice in Stripe and click **Process this invoice** in the Invopop panel (right sidebar).
Note: The invoice issue date will be set to the sync date (today), as required by tax agencies. The operation date remains the original date of the transaction.
 Yes. You can import on payment instead of on finalization. Update the invoice import trigger in either Stripe or Invopop:
Option 1: In Stripe
1. Go to [Stripe app settings](https://dashboard.stripe.com/settings/apps/com.invoicing.invopop)
2. In "Invoice Import Trigger", select "When Paid" (instead of "When Finalized").
3. Click **Save Changes**.
Yes. You can import on payment instead of on finalization. Update the invoice import trigger in either Stripe or Invopop:
Option 1: In Stripe
1. Go to [Stripe app settings](https://dashboard.stripe.com/settings/apps/com.invoicing.invopop)
2. In "Invoice Import Trigger", select "When Paid" (instead of "When Finalized").
3. Click **Save Changes**.
 Option 2: In Invopop
1. Go to **Configuration** > **Apps** > **Stripe** > **Configure**.
2. Click **Update Settings**.
3. In "Invoice import trigger", select "When Paid" (instead of "When Finalized").
4. Click **Save**.
Option 2: In Invopop
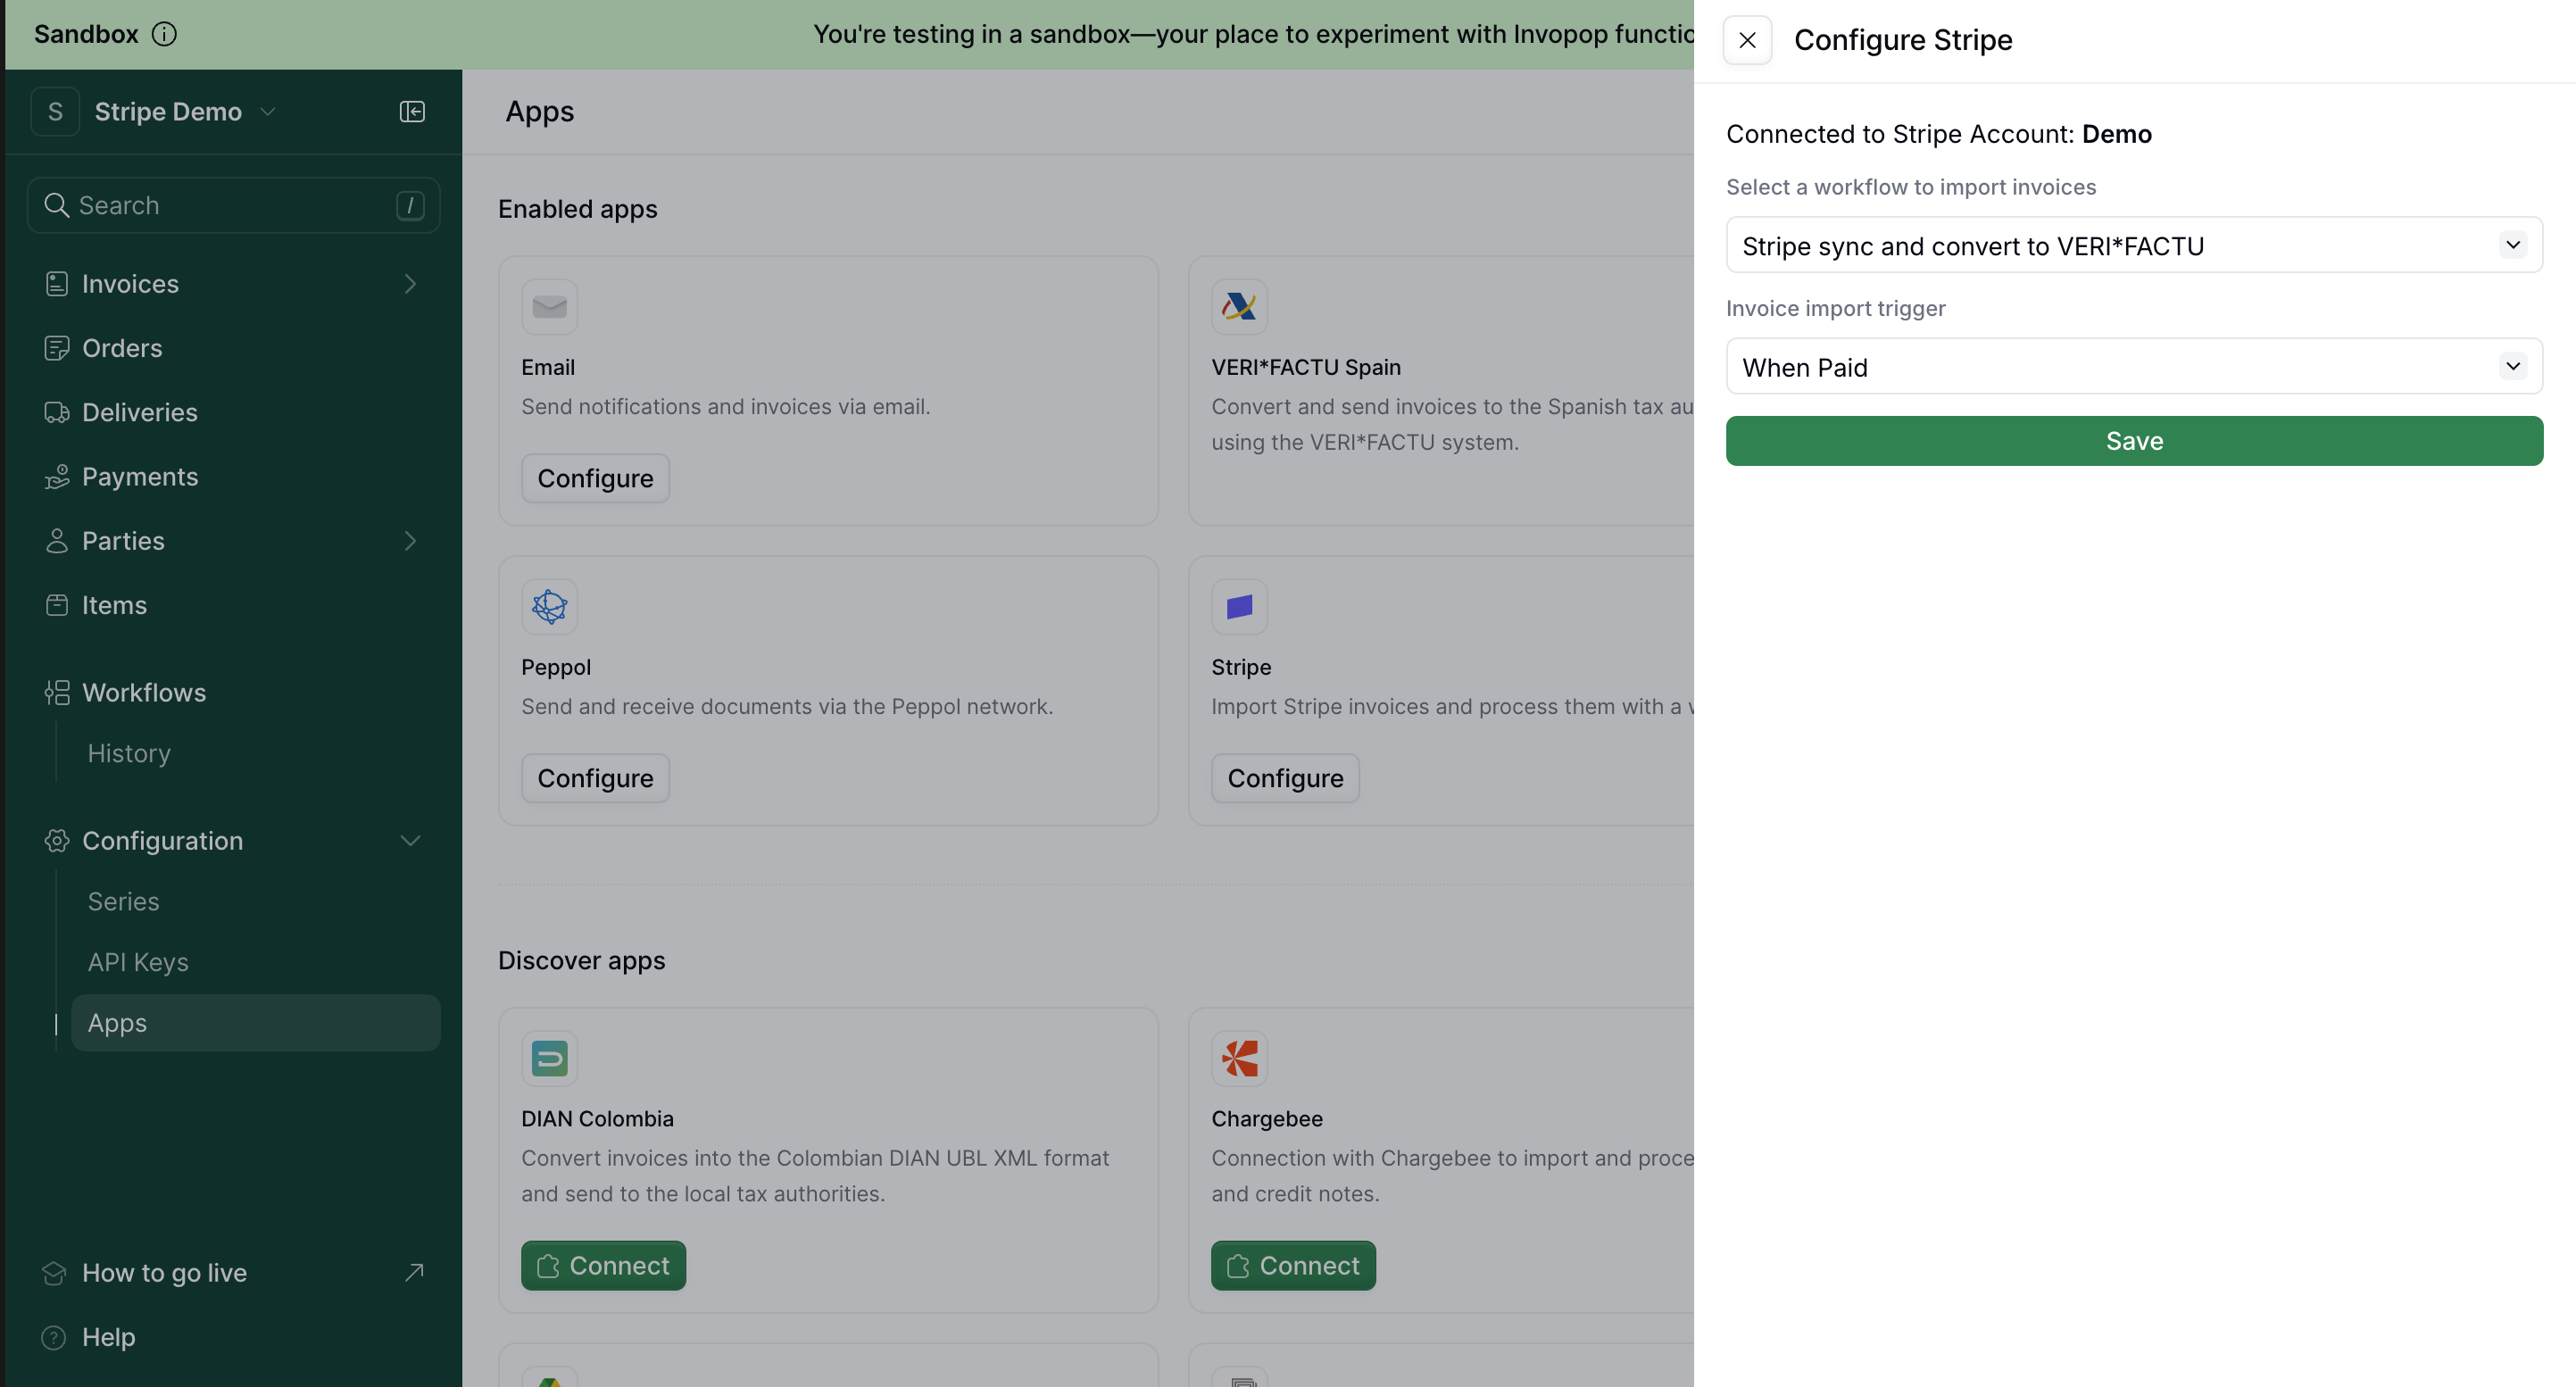
1. Go to **Configuration** > **Apps** > **Stripe** > **Configure**.
2. Click **Update Settings**.
3. In "Invoice import trigger", select "When Paid" (instead of "When Finalized").
4. Click **Save**.
 Note: This applies to invoices from now on; it does not change past imports.
This error means the invoice's tax regime does not match the one expected by the workflow step. For example, Verifactu requires a Spanish regime and KSeF requires a Polish regime. The regime is automatically determined by the supplier's tax ID country.
The most common cause is that the supplier's tax ID is missing from the invoice. To fix this, make sure you have completed Step 5 of the [setup](#setup): go to **Settings** > **Billing** > **Invoices**, enter your tax ID, and set it as the default. Stripe does not automatically include your account tax ID on invoices.
Once the tax ID is set as default, it will appear on new invoices and the error should disappear.
Ask and answer questions about Stripe integration →
Note: This applies to invoices from now on; it does not change past imports.
This error means the invoice's tax regime does not match the one expected by the workflow step. For example, Verifactu requires a Spanish regime and KSeF requires a Polish regime. The regime is automatically determined by the supplier's tax ID country.
The most common cause is that the supplier's tax ID is missing from the invoice. To fix this, make sure you have completed Step 5 of the [setup](#setup): go to **Settings** > **Billing** > **Invoices**, enter your tax ID, and set it as the default. Stripe does not automatically include your account tax ID on invoices.
Once the tax ID is set as default, it will appear on new invoices and the error should disappear.
Ask and answer questions about Stripe integration →