A workspace is created as either Sandbox or Live and its type cannot be changed afterwards. Going live therefore means creating a live workspace and rebuilding its configuration so that it matches the sandbox you tested in. Nothing is copied automatically. This guide lists exactly what differs between the two environments and walks through replicating each piece.
Before you start, you need a billing account with a payment method and a live workspace. See How to go live for those steps. This guide picks up once the live workspace exists.

What changes between sandbox and live

Both workspace types run on the same platform, the same API host and the same Console. The differences are in what each workspace contains and in how government apps behave. The most important consequence for your integration: the only thing that changes in your code is the token, plus the workflow IDs you call, because they are different in the live workspace. There is no separate sandbox host or sandbox header to remove.
You can confirm which environment a token points at with GET /access/v1/workspace. The response includes "sandbox": true or false. Add this check to your deployment so that a live system can never run with a sandbox key by mistake.

What you need to re-create

Go through this list for the sandbox workspace you are replicating. Everything on it lives inside the workspace and does not exist yet in the live one.
  • Apps: every app in the Enabled apps section, with its configuration.
  • Workflows: every published workflow, including supplier registration and cancellation workflows, not only the ones that issue invoices.
  • Series: every numbering series your workflows or your integration refer to.
  • Suppliers: every real company you will issue invoices for, registered with the tax authority.
  • API key: one key per integration, with the same permissions as its sandbox counterpart.

Let your agent diff the two workspaces and hand you the workflow JSON that is still missing in live.

Open in Cursor

Replicate the workspace

Keep two browser tabs open, one on the sandbox workspace and one on the live workspace, and work through the sections in order. Apps come first because a job fails at the first step whose app is not enabled, and the Console does not warn you about it when you paste a workflow.
1

Enable and configure the apps

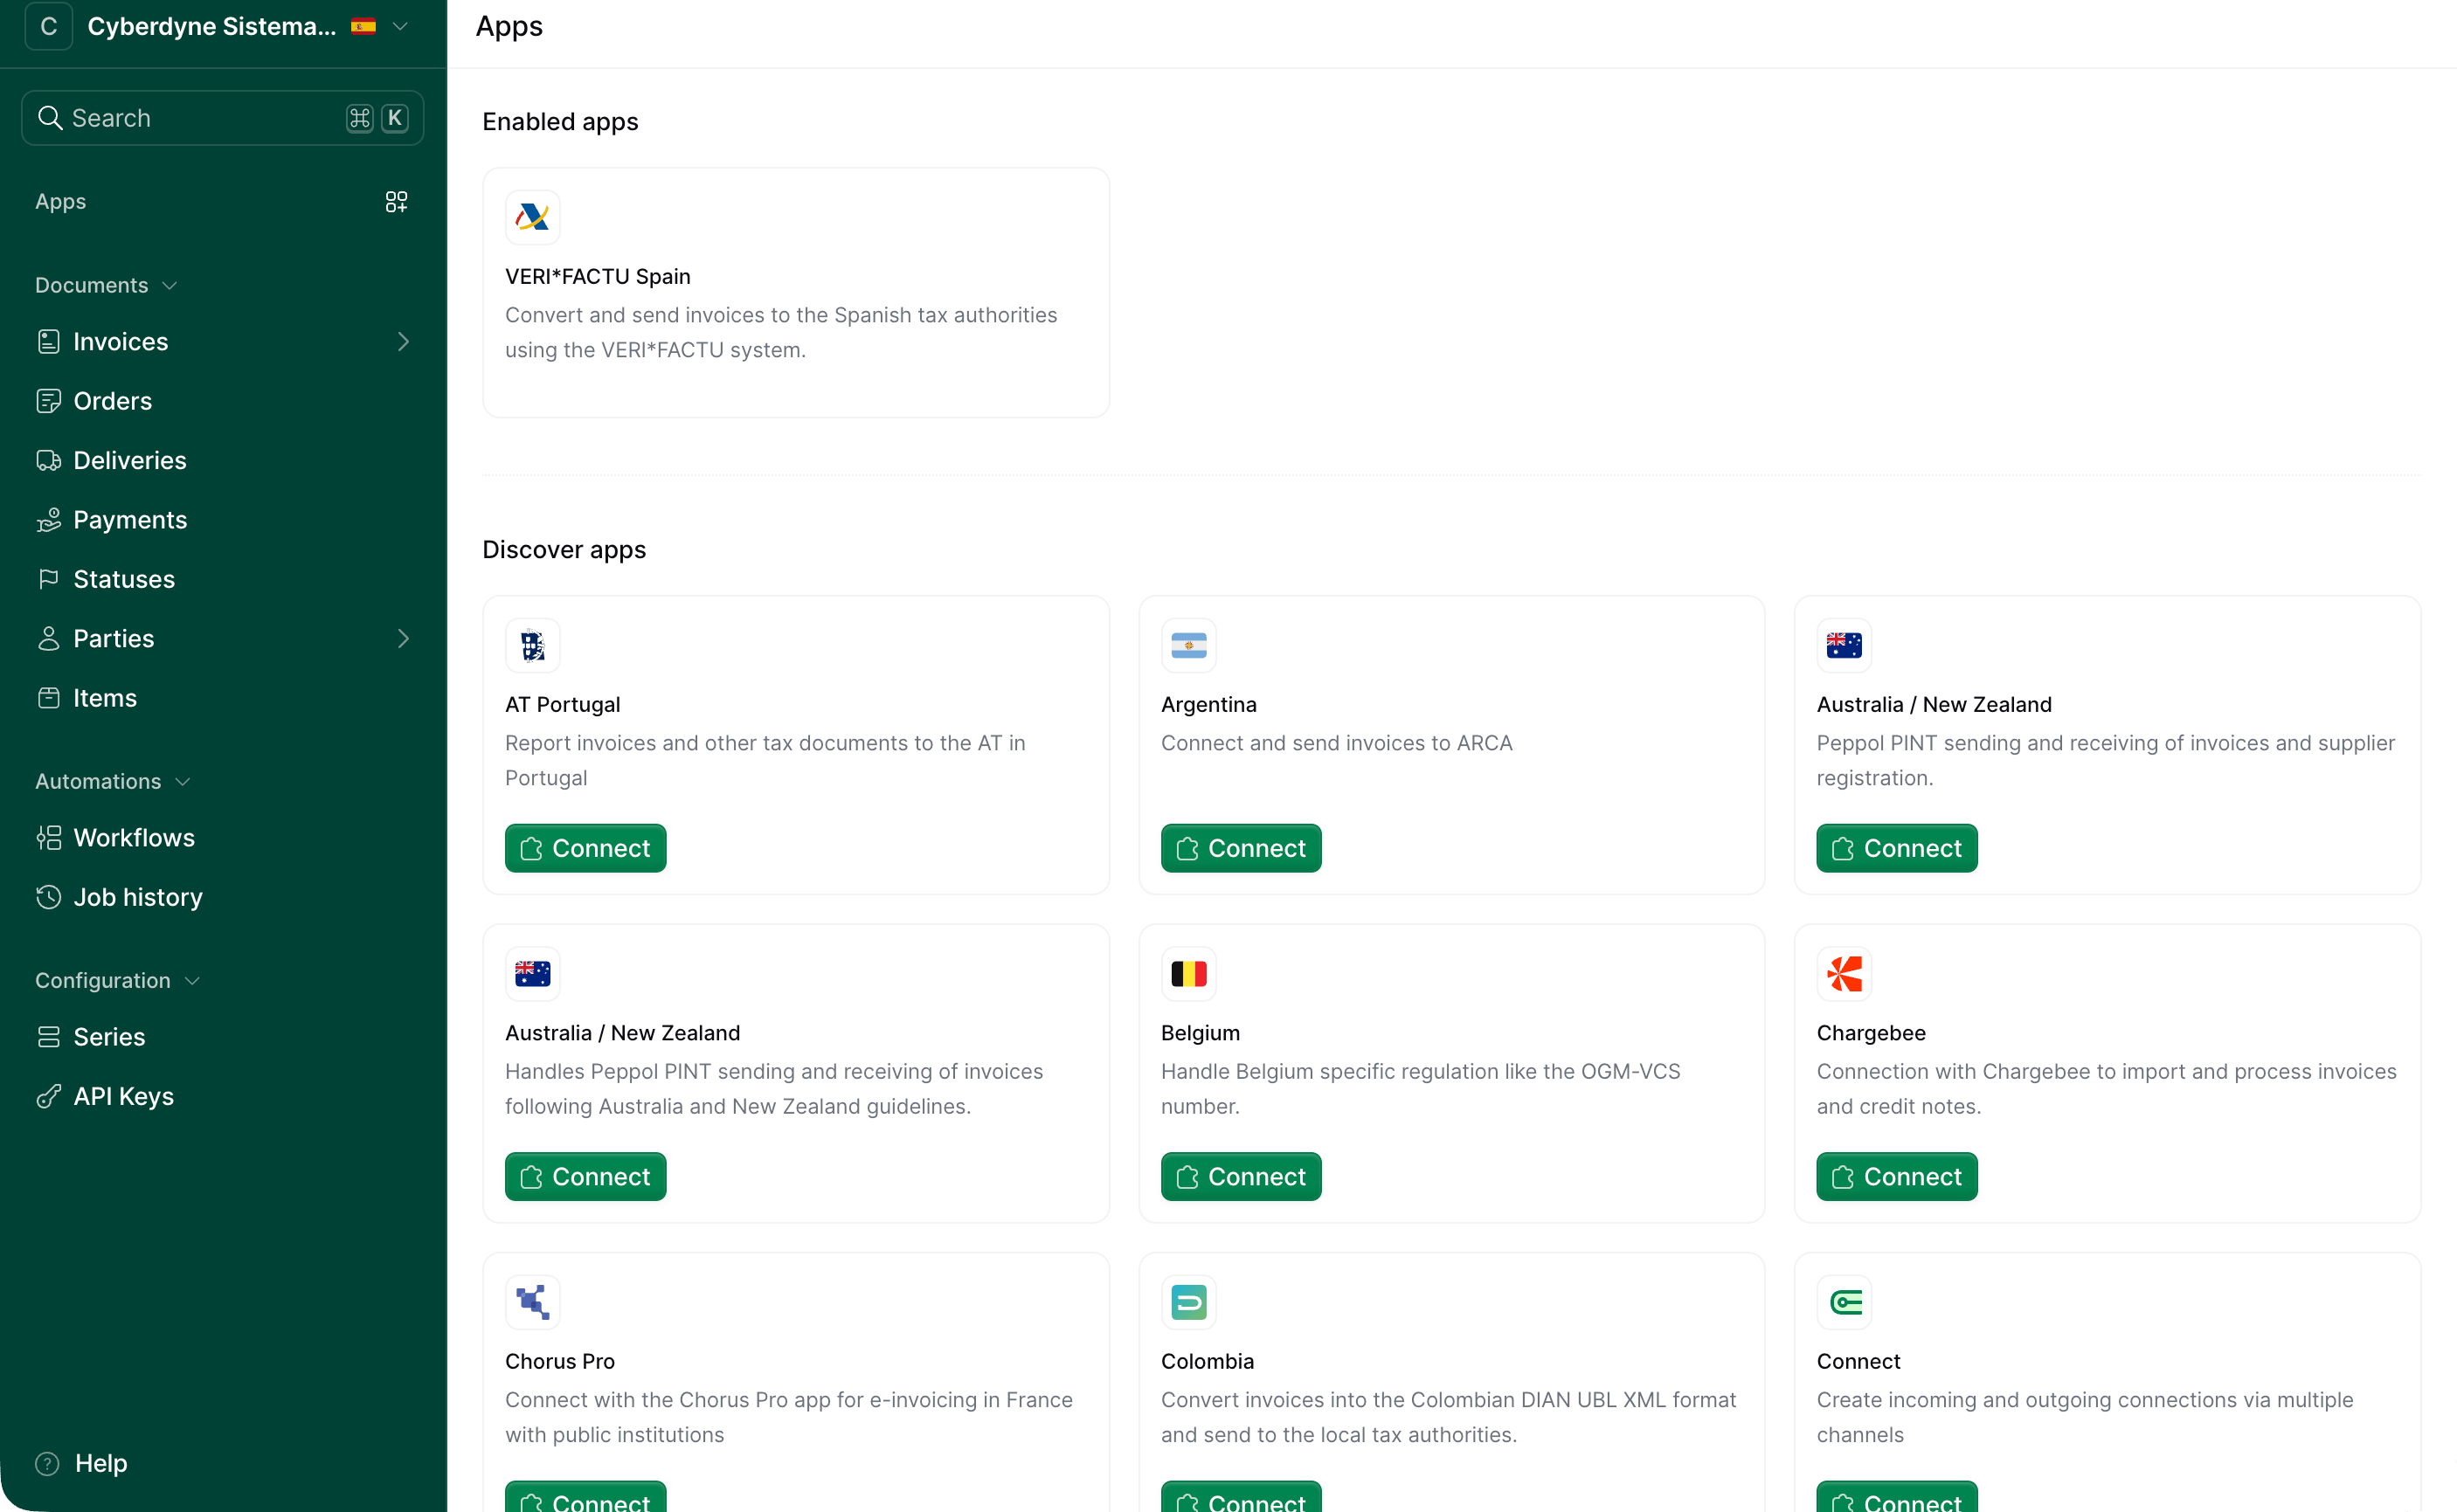
In the sandbox workspace open Apps from the sidebar and note every app under Enabled apps. Switch to the live workspace, open Apps and click Connect on each of them.
Apps page of a live workspace with the VERI*FACTU Spain app under Enabled apps

The live workspace must list the same enabled apps as the sandbox

Then open Configure on each app that has settings and fill them in for production. Configuration never carries over, and the values are usually different:
  • Government apps need production credentials, certificates or agreements, and they are issued by the tax authority for the real company rather than for a test one. Each app page under Apps explains what is required.
  • Integration apps such as Stripe, Chargebee, Slack, Email or Google Drive must be connected to the production account of the third-party service. A Stripe test-mode connection, for example, will not import live Stripe invoices.
  • PDF Generator settings such as the logo and the footer are per workspace too.
2

Copy each workflow with the Code view

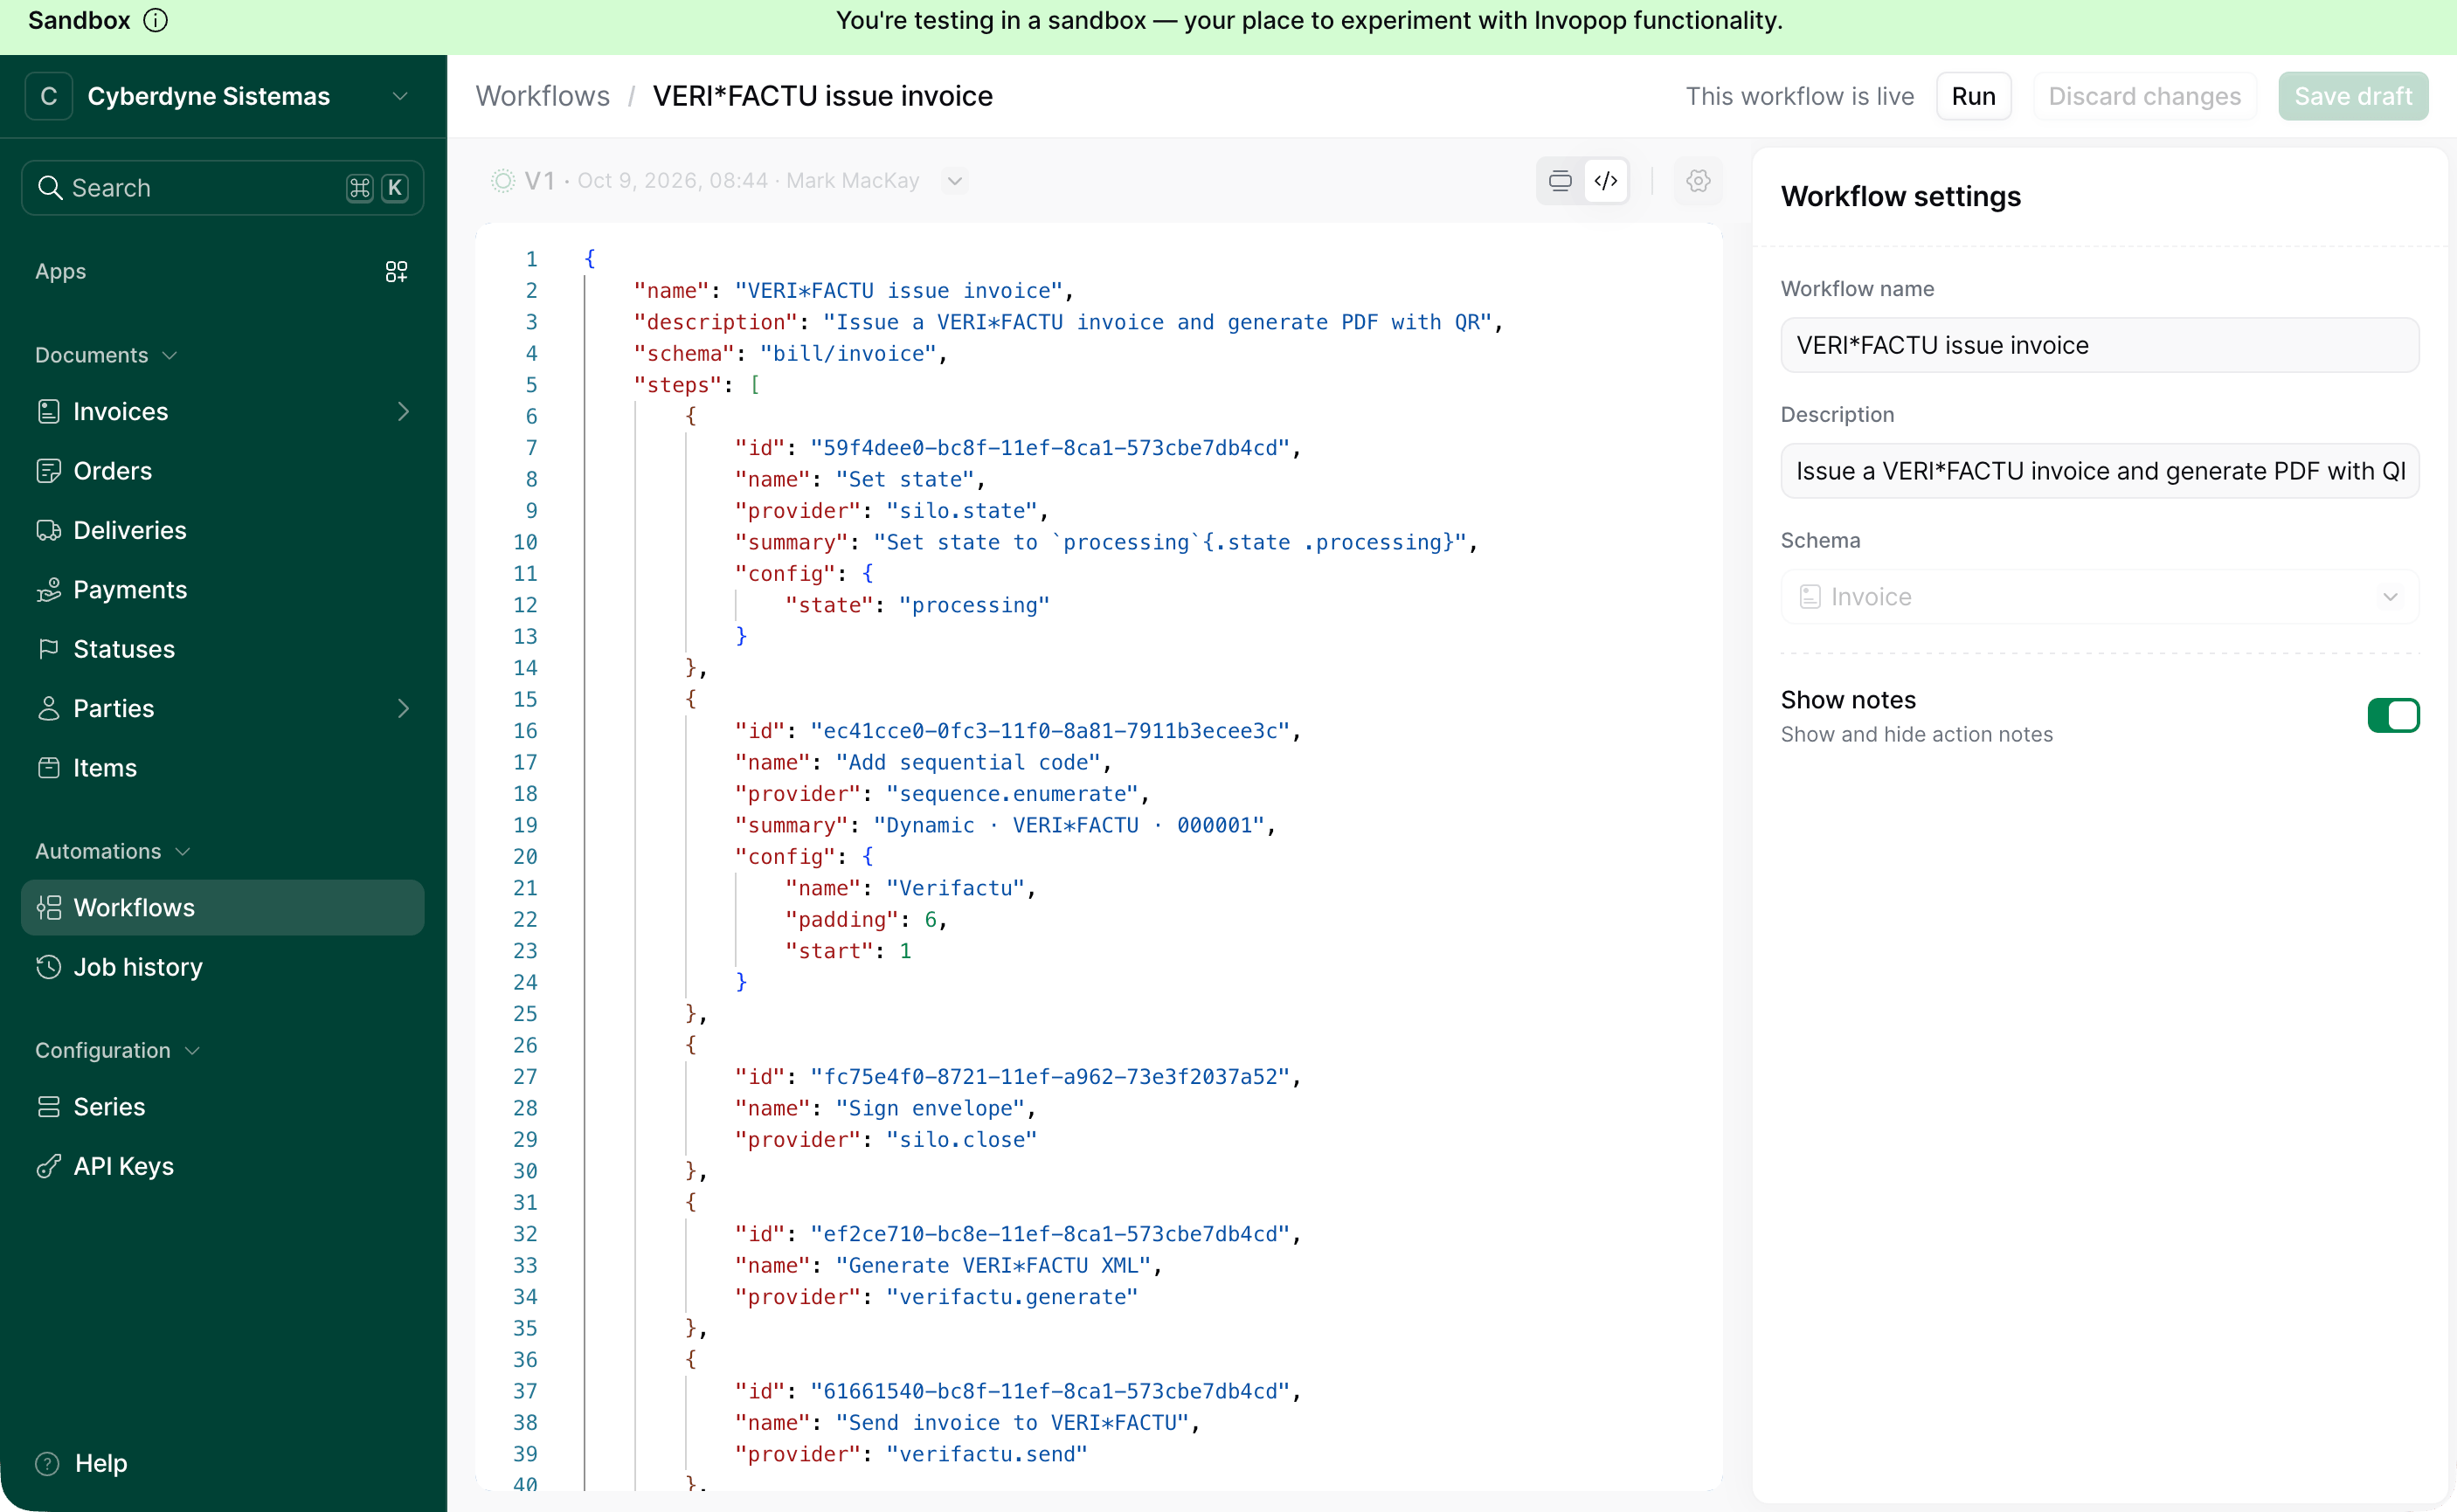
Open the workflow in the sandbox workspace. At the top right of the canvas, switch from the Form view to the Code view. The editor shows the complete JSON definition of the workflow: its name, description, schema, steps, conditions and exception handling. Select all of it and copy it.
Workflow editor in Code view showing the JSON of a VERI*FACTU issue invoice workflow

Code view of a workflow in the sandbox workspace
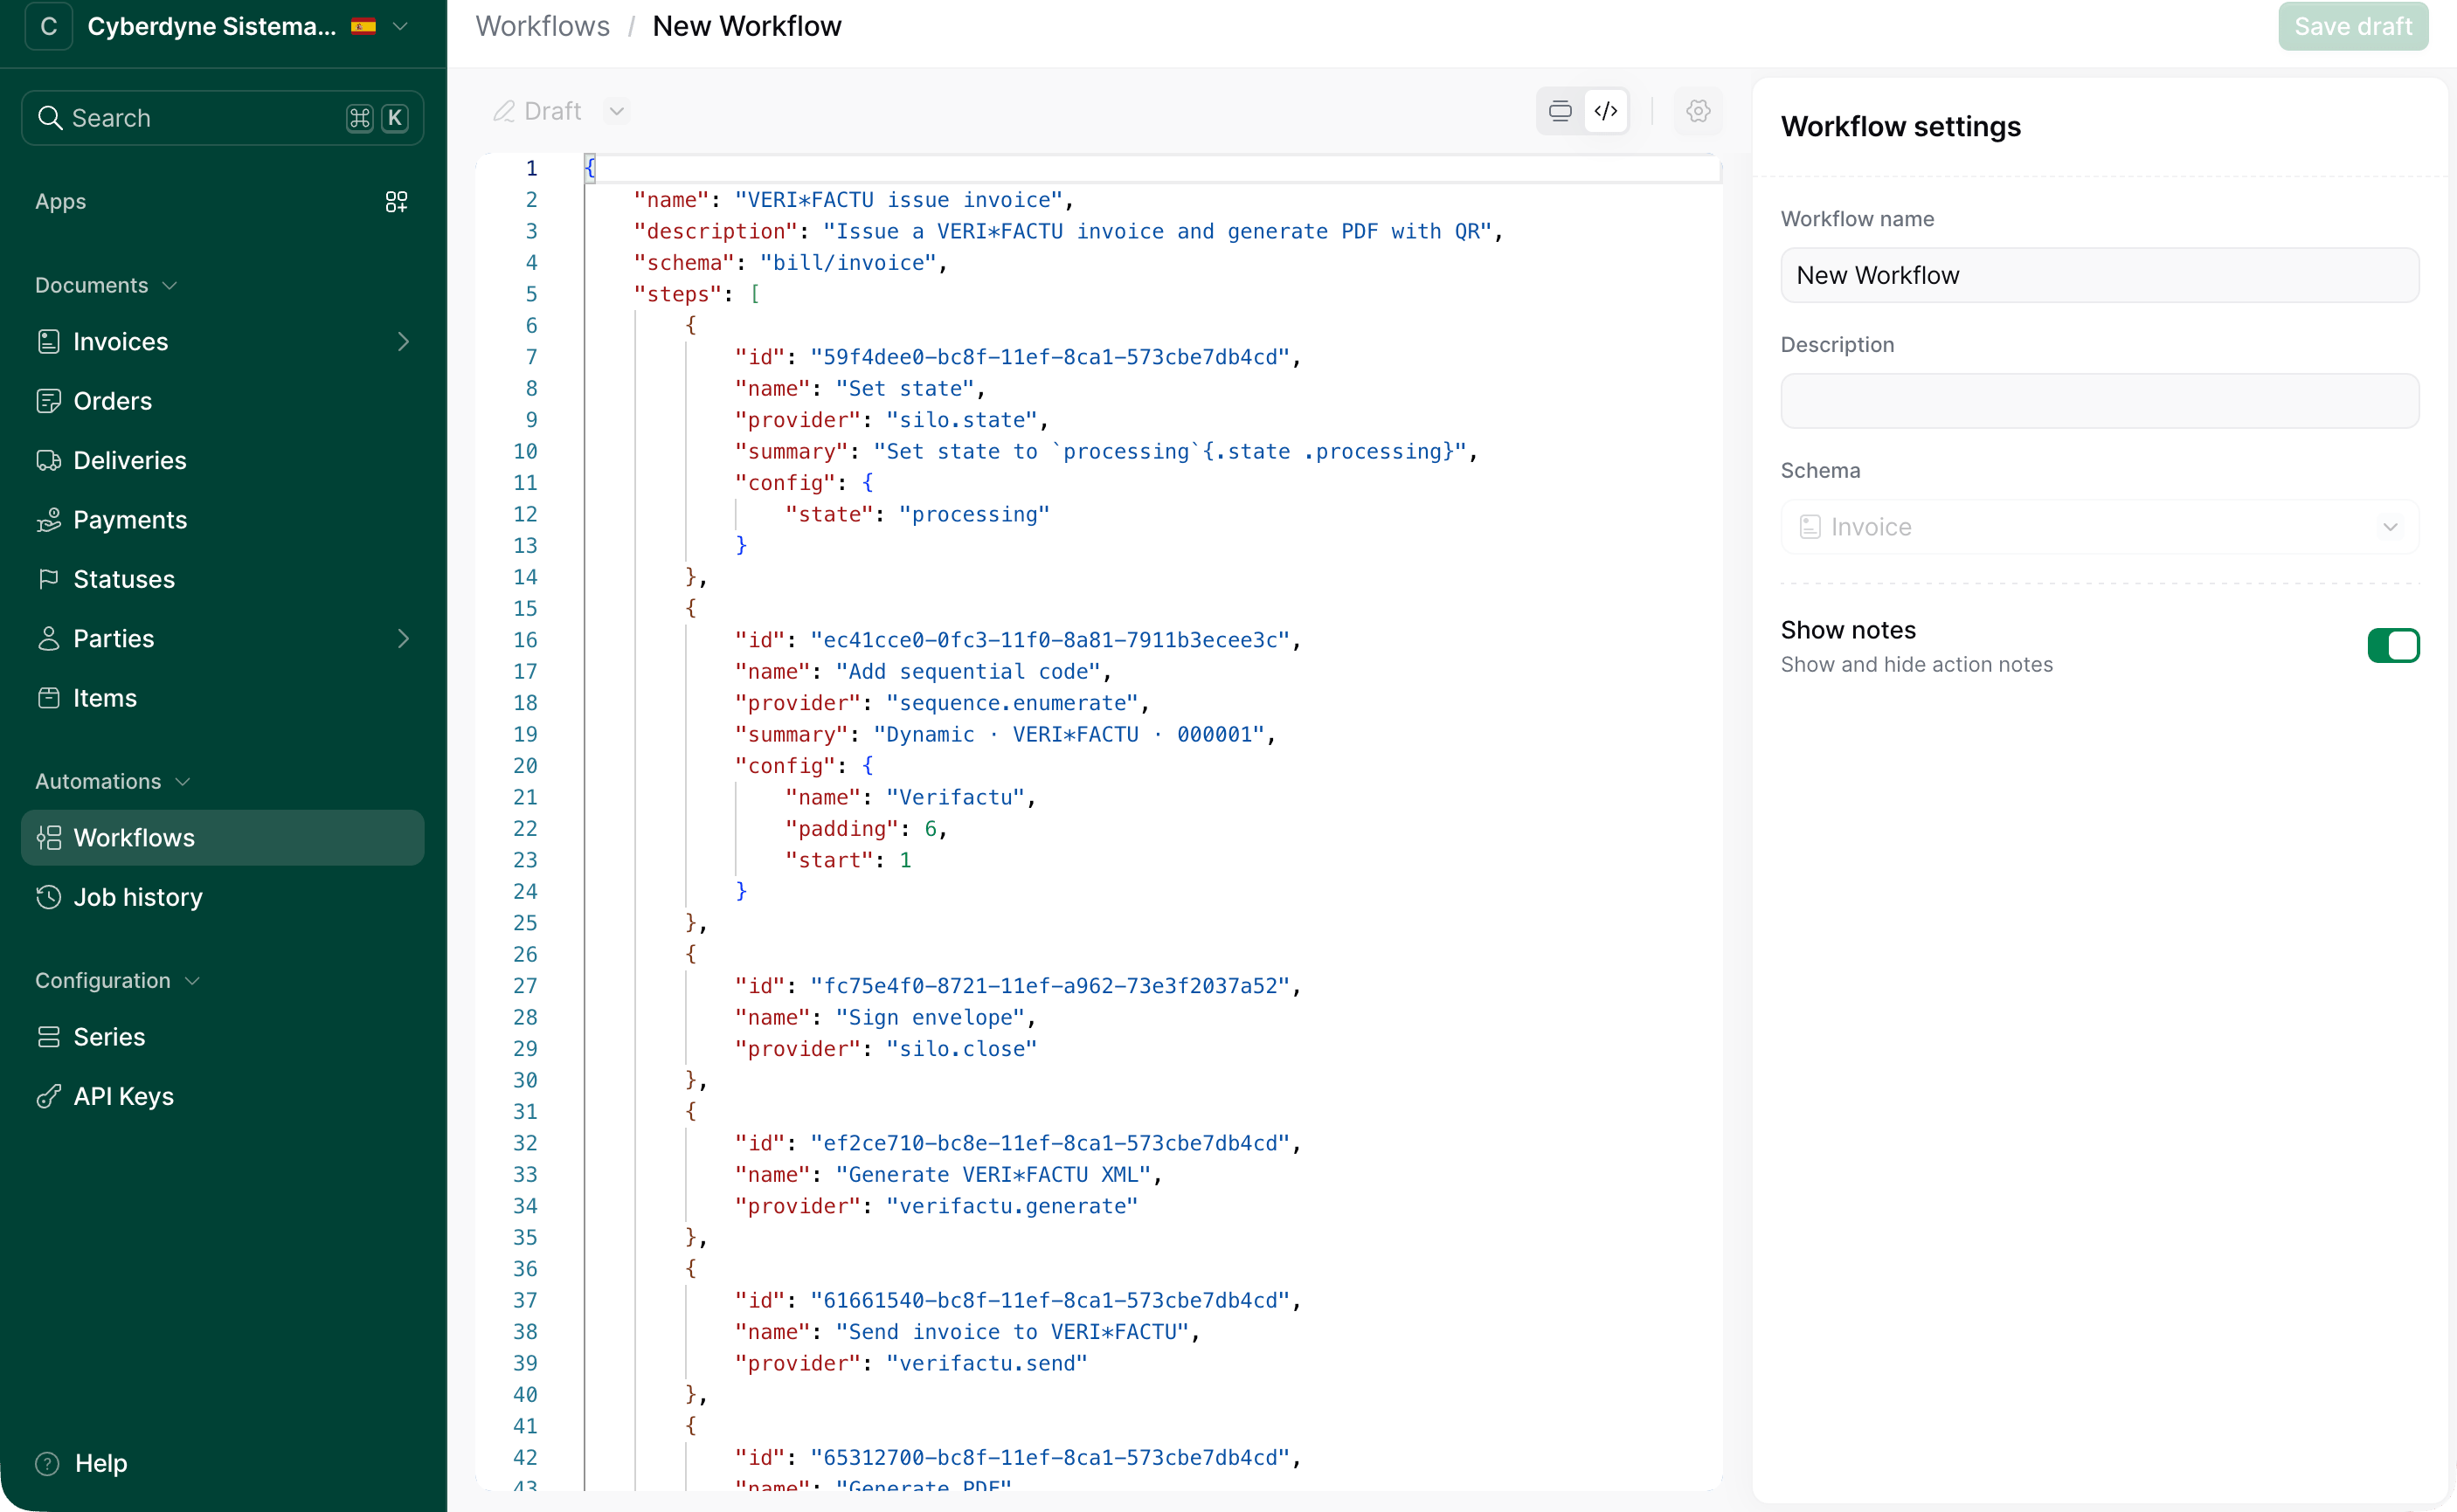
In the live workspace, go to Workflows, click Create workflow, close the template picker if it opens, switch the new empty workflow to the Code view and paste over the empty definition. The step IDs inside the JSON can stay as they are.
New workflow in a live workspace with the pasted JSON in Code view

The same JSON pasted into a new workflow in the live workspace

Switch back to the Form view. The name, description and schema fill in from the JSON and every step renders with its icon and configuration. The Console does not check at this point whether the apps behind the steps are enabled: a workflow pastes and publishes either way, and a job only fails when it reaches a step whose app is missing. That is why apps come first. Review any step that holds workspace-specific values, in particular:
  • Add sequential code steps. A dynamic series is created in the live workspace the first time the step runs, using the start number in its configuration. Set it to continue your real numbering if you are migrating from another system.
  • Email and Slack steps whose recipients or channels were test addresses.
  • Wait for supplier approval style steps that were configured to auto-accept or reject in sandbox.
Click Save draft and then Publish. Repeat for every workflow on your list.
The live workflow has a new workflow ID. Copy it from the workflows list and update every place in your integration that creates jobs for it. Calling a sandbox workflow ID with a live token returns a 404.
3

Re-create the series

Open Series in the sandbox workspace and re-create each one you created by hand in the live workspace under Configuration → Series, with the same name, code, prefix, padding and suffix. Set Start number to the next number your real numbering requires rather than 1 if you are migrating from another invoicing system. Series created dynamically by an Add sequential code step do not need this: they appear in the live workspace on the step’s first run. See Series for the field reference.
4

Register your real suppliers

Sandbox workspaces ship with pre-enabled test suppliers so that you can issue invoices right away. They do not exist in live. For every company you issue invoices for, upload its org/party entry and run the country’s supplier registration workflow, which you copied in the previous step. The supplier ends in the registered state once the tax authority accepts it. Every country has a supplier onboarding guide next to its invoicing guide under Guides, for example VERI*FACTU supplier onboarding.In live, steps that waited for a manual approval in sandbox complete on their own as soon as the required documents are uploaded.
5

Create an API key with the same permissions
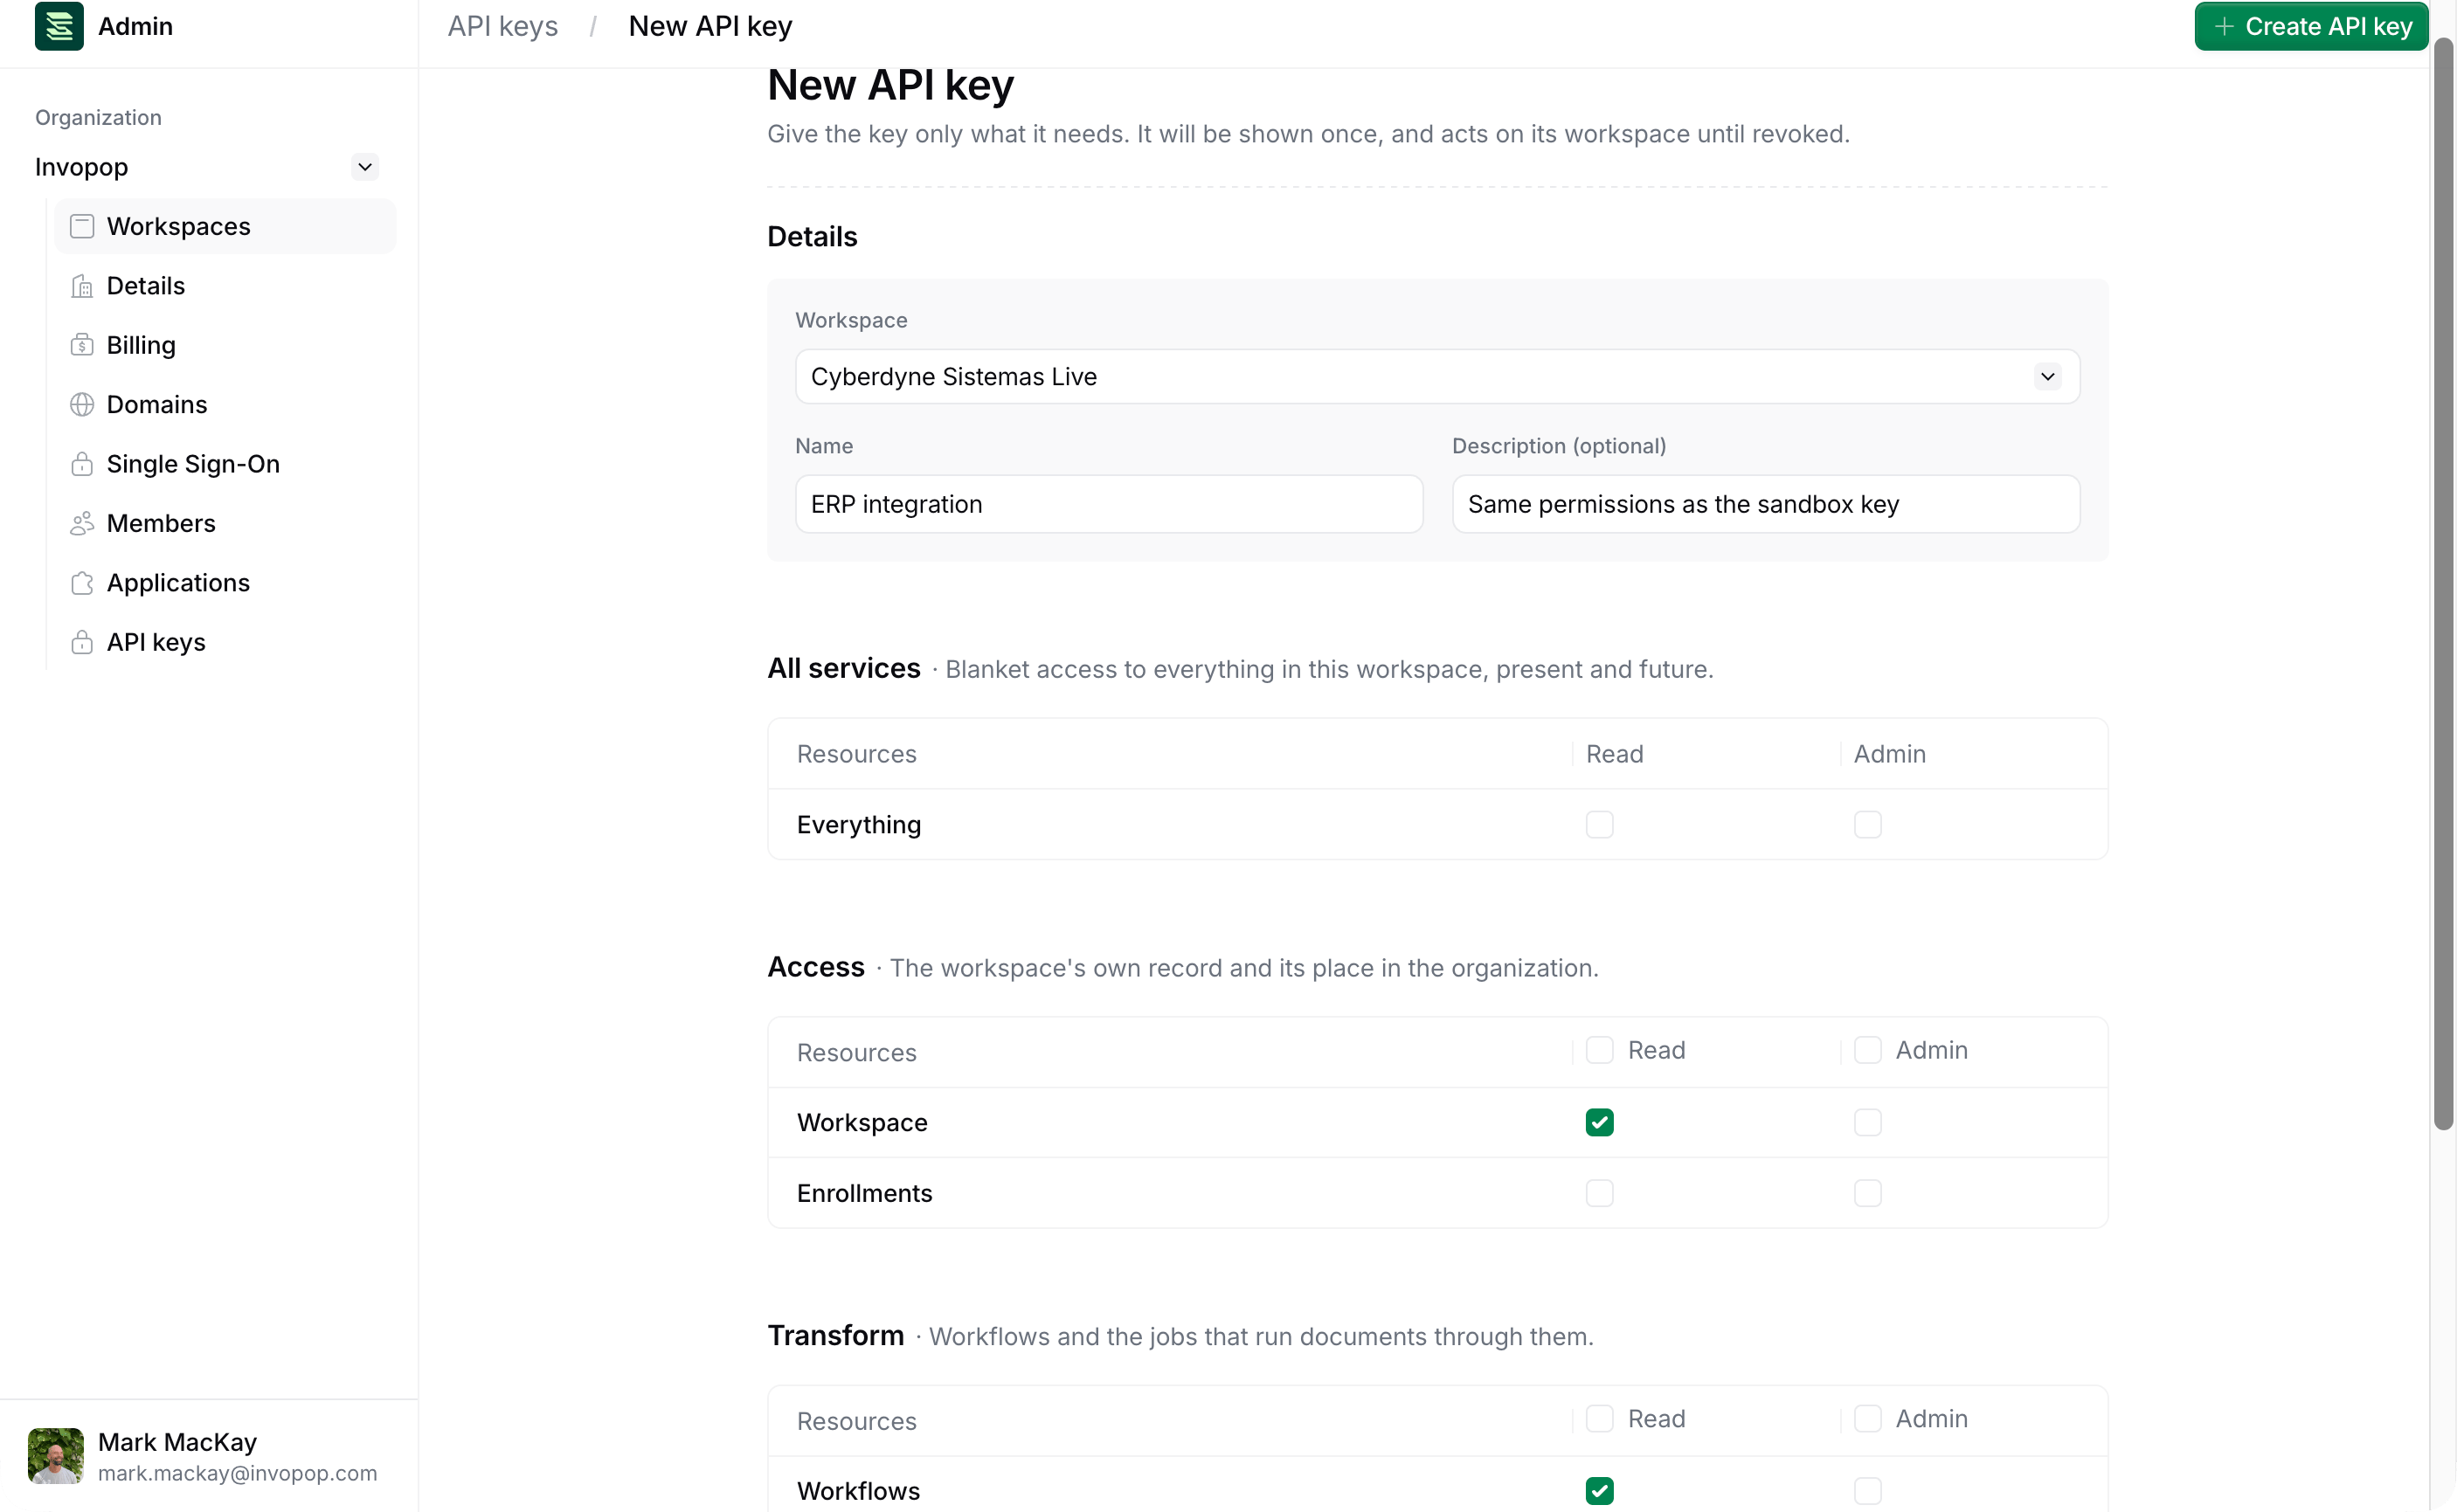
API keys are created from Admin, which is where their permissions are set. From the Console, click your avatar and choose Configure {organization_name}, open API keys in the sidebar and click New API key.Select the live workspace in the Workspace field, then tick exactly the same Read and Admin boxes as the sandbox key your integration uses. The permissions are grouped by service: Access (workspace and enrollments), Transform (workflows and jobs) and Silo (entries). Everything grants blanket access to all current and future services.
New API key form in Admin with the live workspace selected and permissions ticked

Creating the live key in Admin with the same permissions as the sandbox key

The Admin API keys page lists every key in the organisation grouped by workspace with its permission level, so you can compare the sandbox key and the live key side by side. The token is shown once when you click Create API key; copy it into your secrets store now.
Keys are tied to the workspace, not to the person who created them, so they keep working when that person leaves the organisation. Give each integration its own key so that one can be revoked without affecting the others.
6

Point your integration at the live workspace

Two values change in your application’s configuration:
  1. The API key, swapped for the live one.
  2. The workflow IDs, swapped for the IDs of the workflows you published in the live workspace.
Everything else stays the same: the host, the endpoints, the document format and your workflow logic. Before you issue the first real invoice, ping the workspace with the new key and check that it is not a sandbox:
If sandbox is true, you are still holding the sandbox key.

Verify before issuing real invoices

Run one document through the live workspace as the final check. Create an invoice for a registered supplier, run the issuing workflow from the entry’s menu in the Console, and open Job history. Every step should report OK, the entry should end in the state your workflow sets, and the attachments (PDF, XML, government receipt) should be on the entry. From this point on every document is a real, legally binding invoice: use the sandbox workspace for anything experimental.

FAQ

Yes. Fetch the definition with Fetch a workflow using the sandbox key, then send name, description, schema, steps and rescue to Create a workflow using the live key. Workflows created through the API are published immediately, so review the steps in the Console first if you prefer to keep a draft.
No. A workflow ID identifies one workflow inside one workspace. Your integration must store a separate ID per environment, for example in the same place it stores the token for that environment.
We recommend one workspace per regime, in sandbox and in live. See Set up your account for multiple countries. Repeat this guide for each pair.
No. Invoices, parties, jobs and attachments stay in the sandbox workspace. The live workspace starts empty.
No. Members and roles belong to the organisation and apply to every workspace in it.
Keep it. The sandbox is where you test changes to workflows before copying them to live, and where government apps run against test environments at no cost.