

- Roles bundle the scopes (permissions) a member can use. A role says what someone may do, but nothing about where.
- Groups grant one or more roles across one or more workspaces, and members join groups. A group says who gets which roles and where.
A member who belongs to no group keeps full access, which is what keeps existing members working while you roll RBAC out. Access only narrows once you add someone to their first group, so you can introduce access control one member at a time.
The Members section
The Members page has three tabs: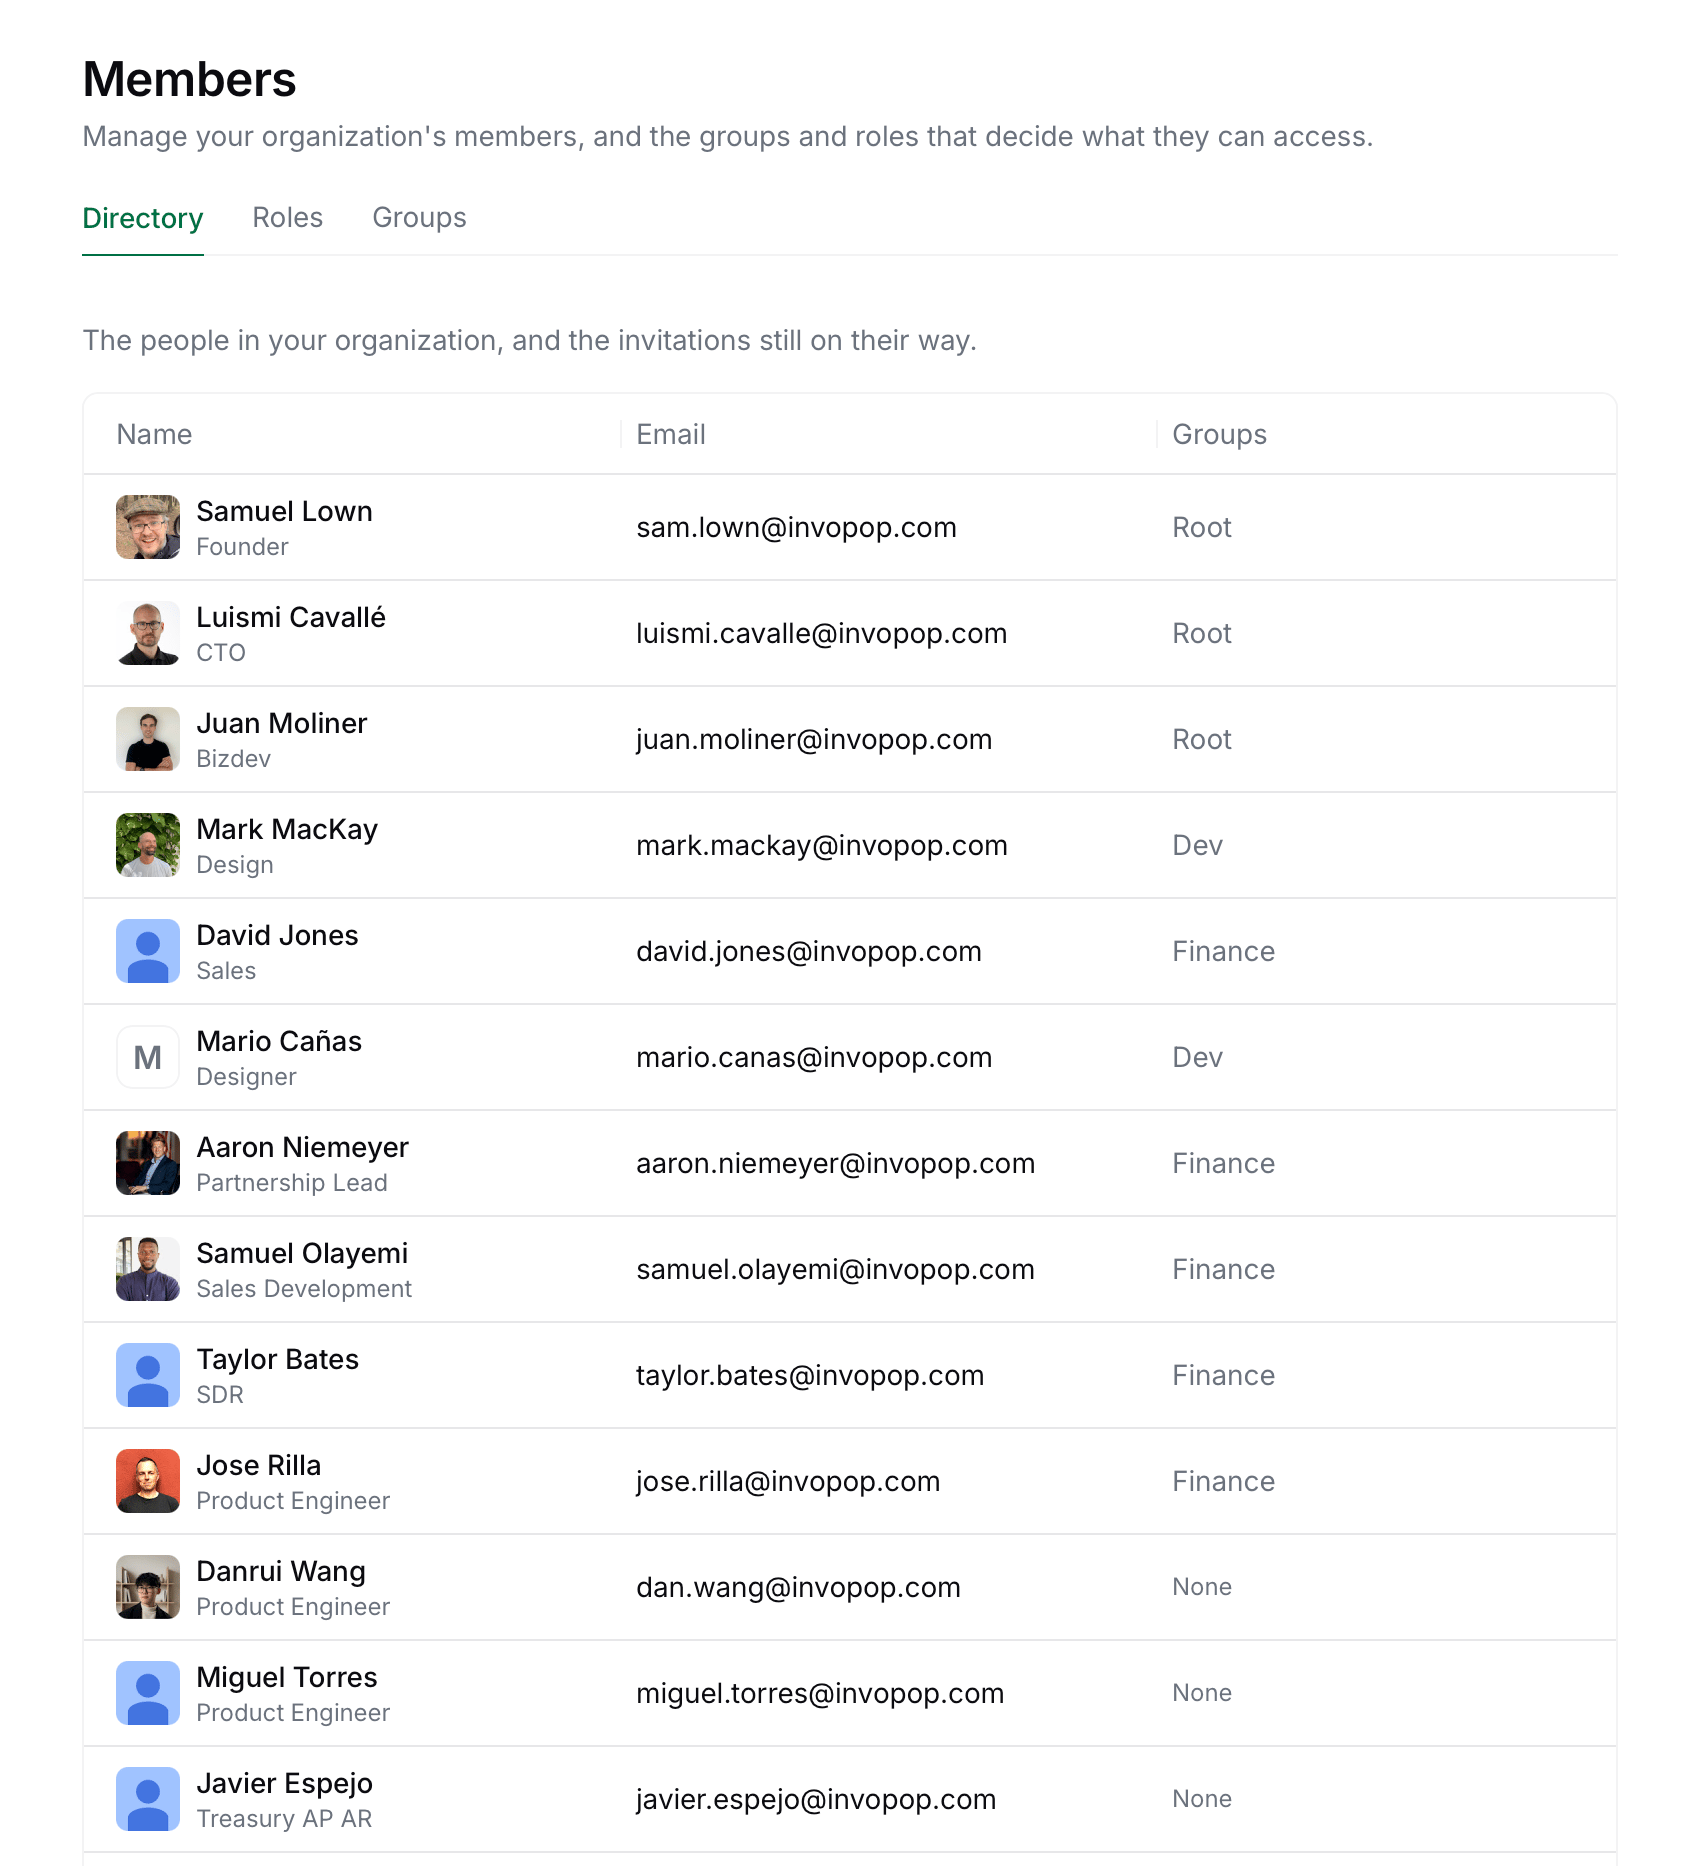
Members directory with the Groups column
Roles
A role is a named set of scopes. Scopes are organised by service, and each resource within a service can be granted at one of two levels:
Ticking the Read or Admin checkbox in a service’s header grants that level for every resource in the service, including resources added to that service in the future. The individual rows are then locked, since the service-wide scope already covers them.
Available scopes
Create a role
- Navigate to Members in admin and open the Roles tab.
- Click New role in the top right corner.
- Enter a Name and, optionally, a Description.
- Tick the Read or Admin checkbox for each resource the role should grant, or use the header checkbox to grant a whole service.
- Click Create role.
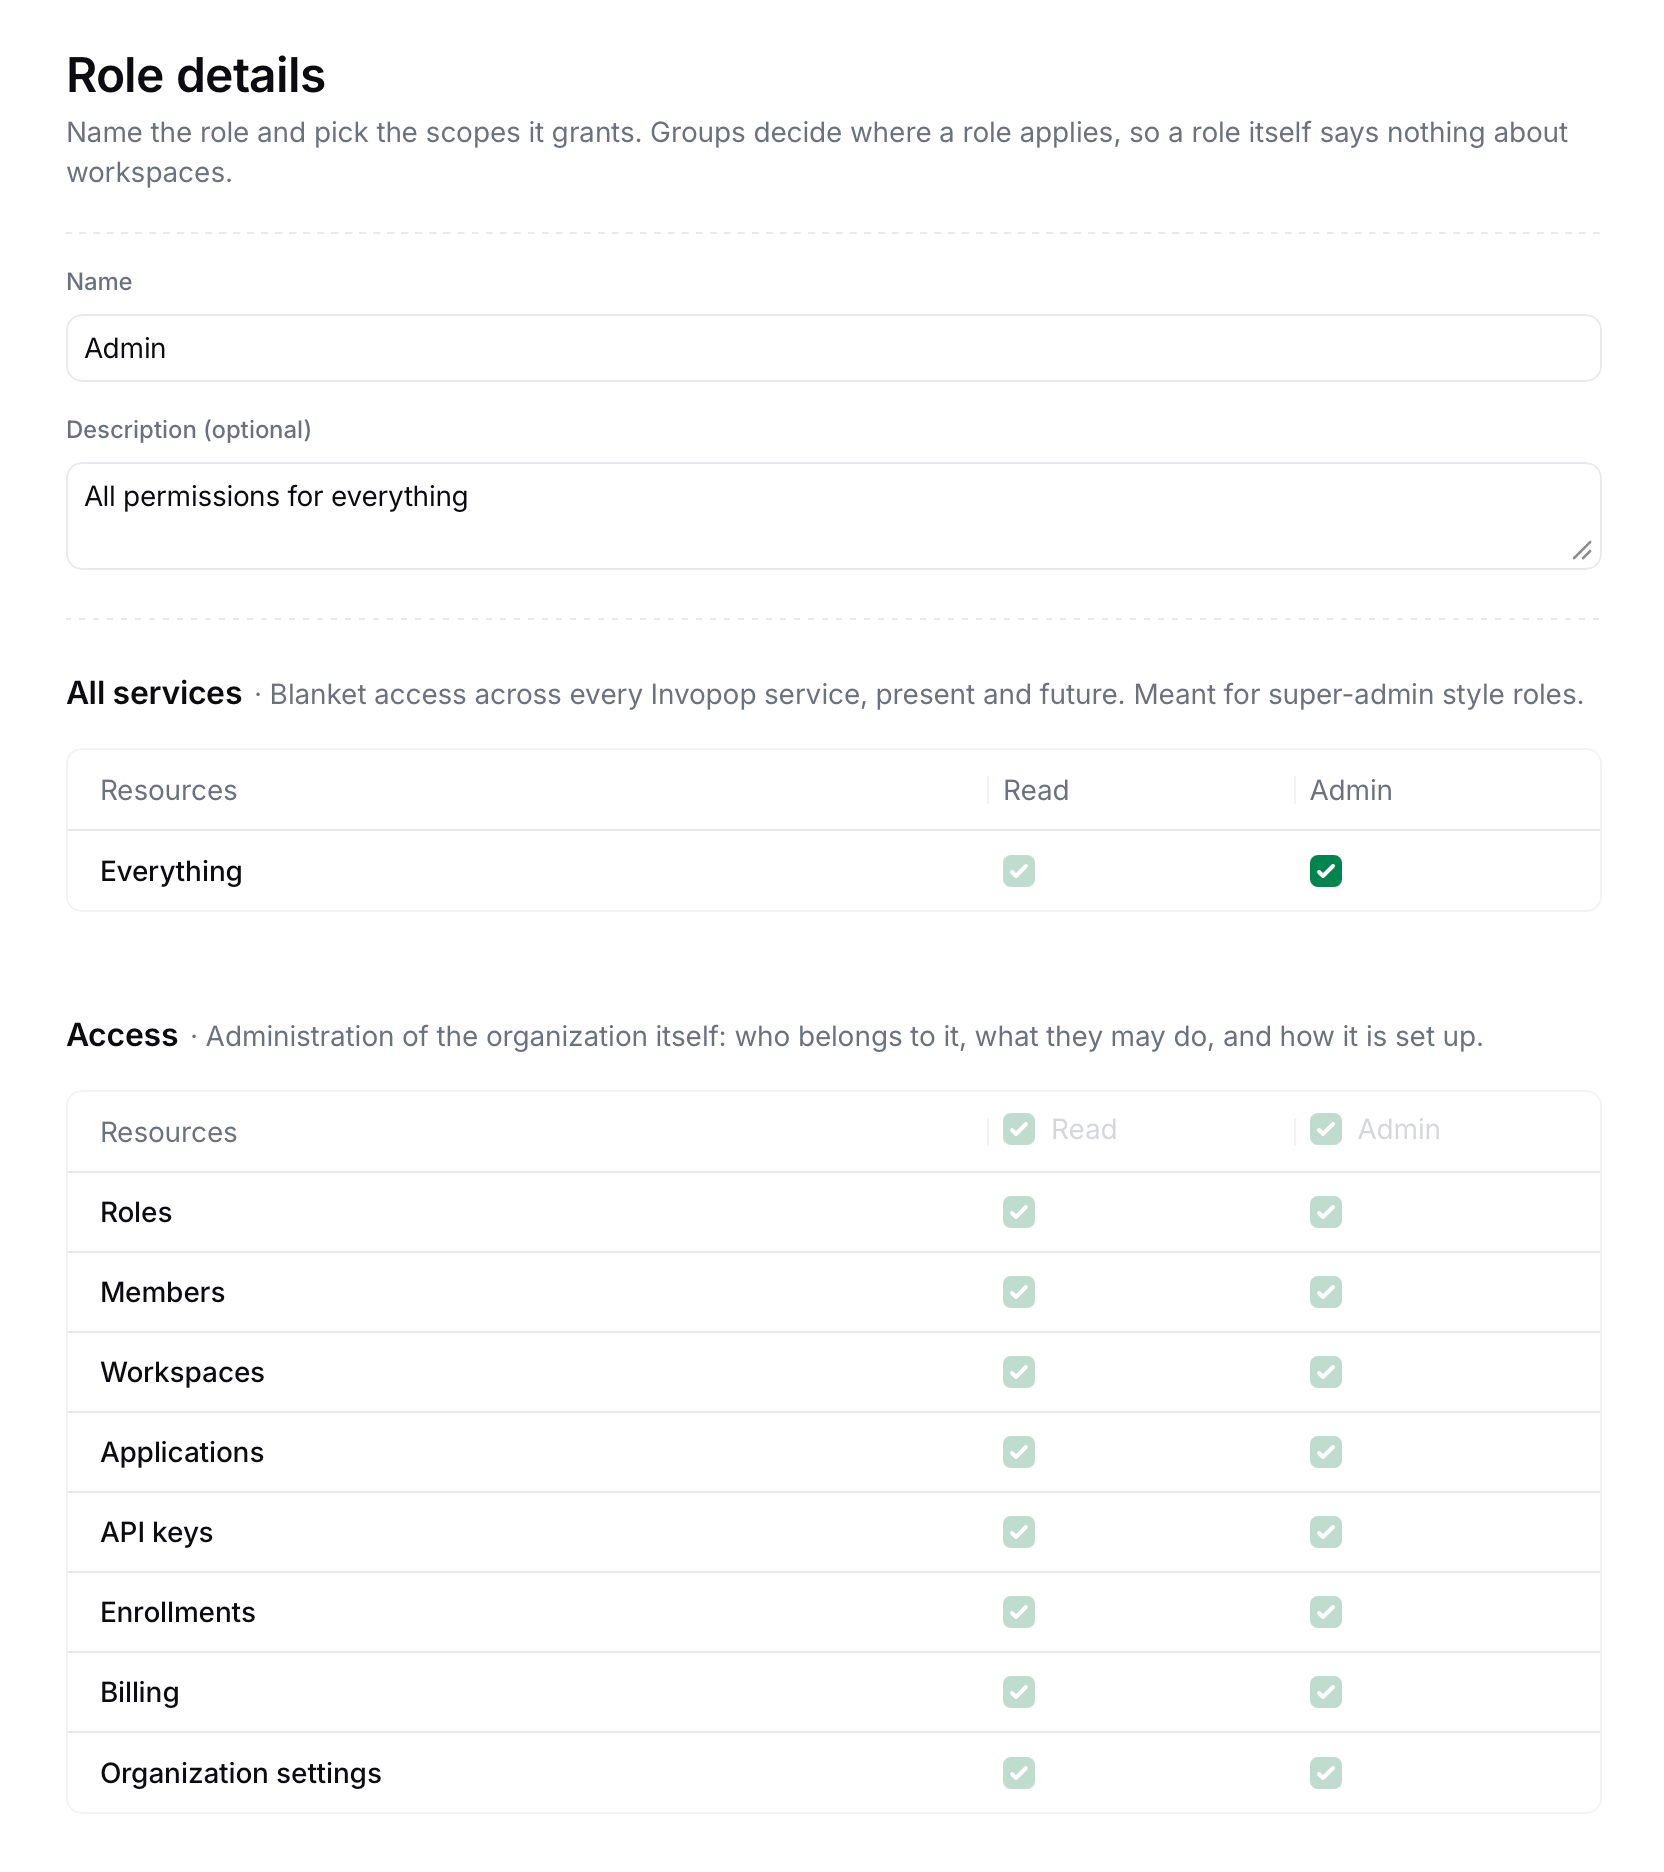
New role form with the scope matrix
Groups
A group connects roles to workspaces and members to the group. When you create a group you pick which roles it grants and where each of them applies. A single group can cover several roles across several workspaces, so you can usually model a team with one group. The Access table in the group form has one row per workspace plus an Entire organization row, each with a dropdown to select one or more roles. Granting a role on the Entire organization row applies it across every workspace and also covers organization-level settings that belong to no single workspace, such as billing, members and domains. Access scopes only take effect when granted on the Entire organization row.Create a group
- Navigate to Members in admin and open the Groups tab.
- Click New group in the top right corner.
- Enter a Name that reflects the team or function the group represents, and optionally a Description.
- In the Access section, select the roles the group grants on each workspace row, or on the Entire organization row for organization-wide access.
- Click Create group.
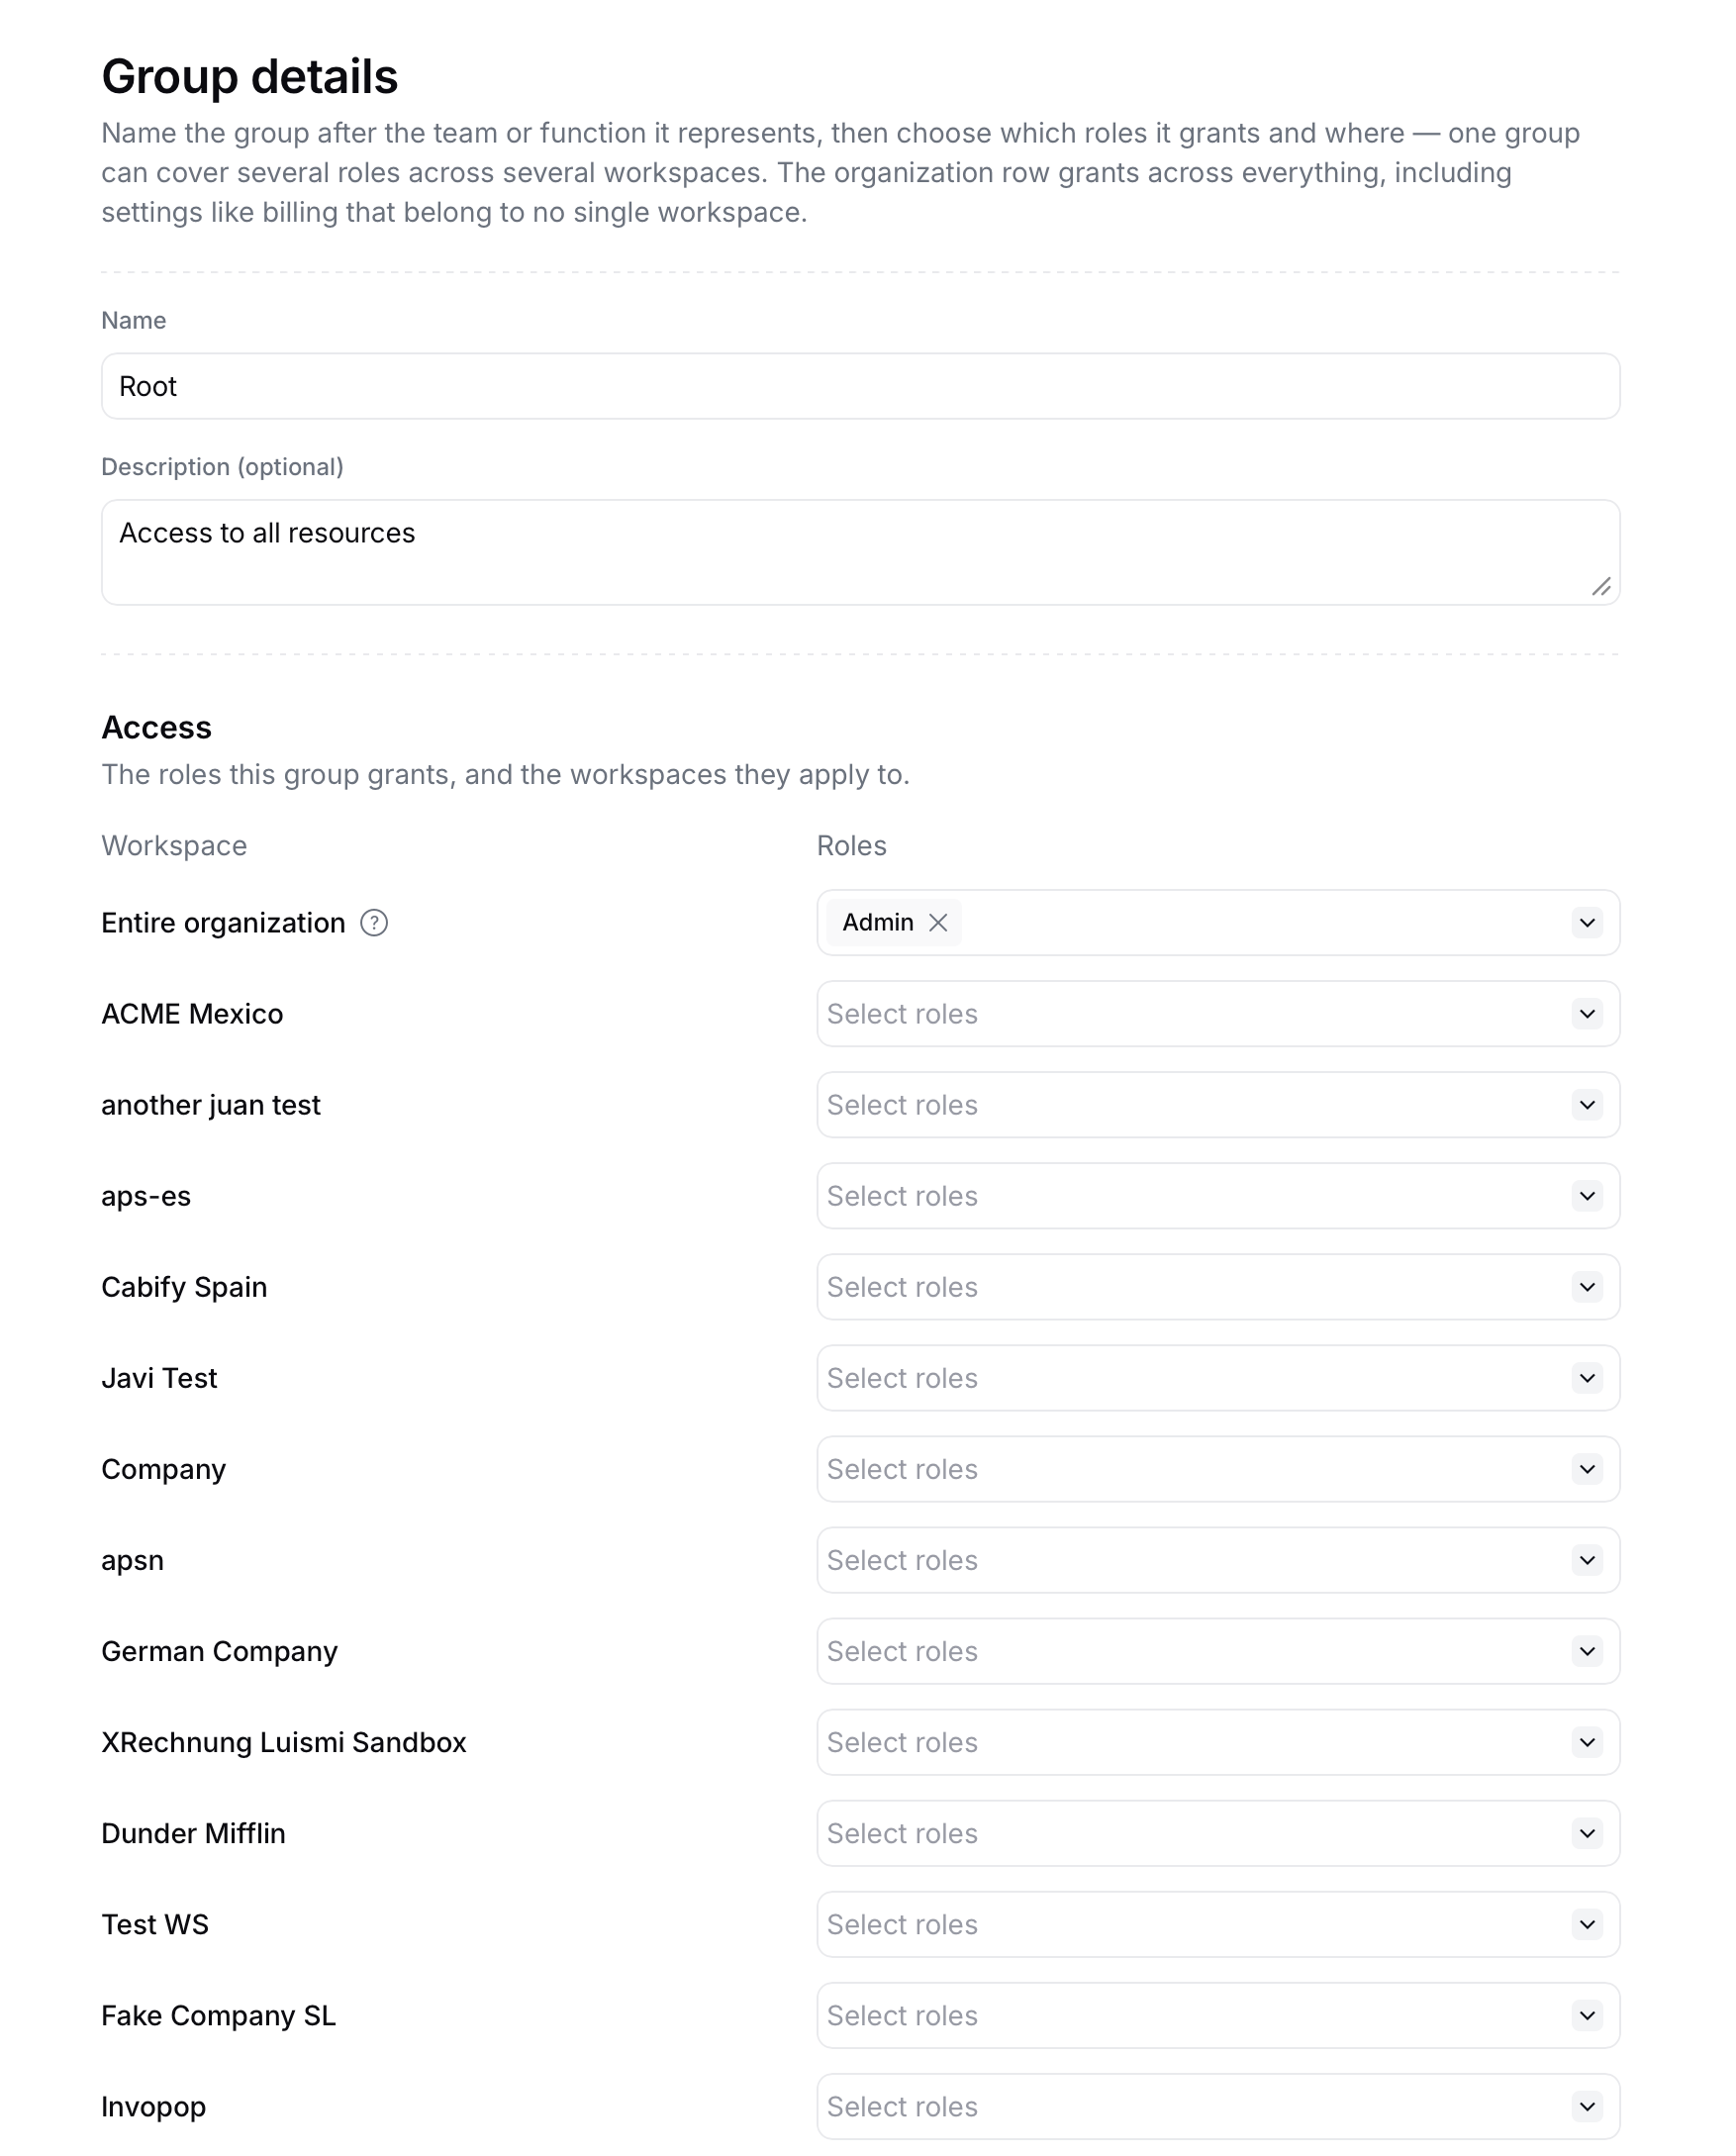
New group form with roles granted per workspace
You need at least one role before the group form lets you grant anything. If the Access section reads No roles yet, use the Create role shortcut to define one first.
Assign groups to a member
Groups are assigned from the member’s own page:- Navigate to Members in admin and open the Directory tab.
- Click the member’s row.
- In the Groups section, select the groups the member belongs to. Remove a group by clicking the cross on its chip.
- Save the member.
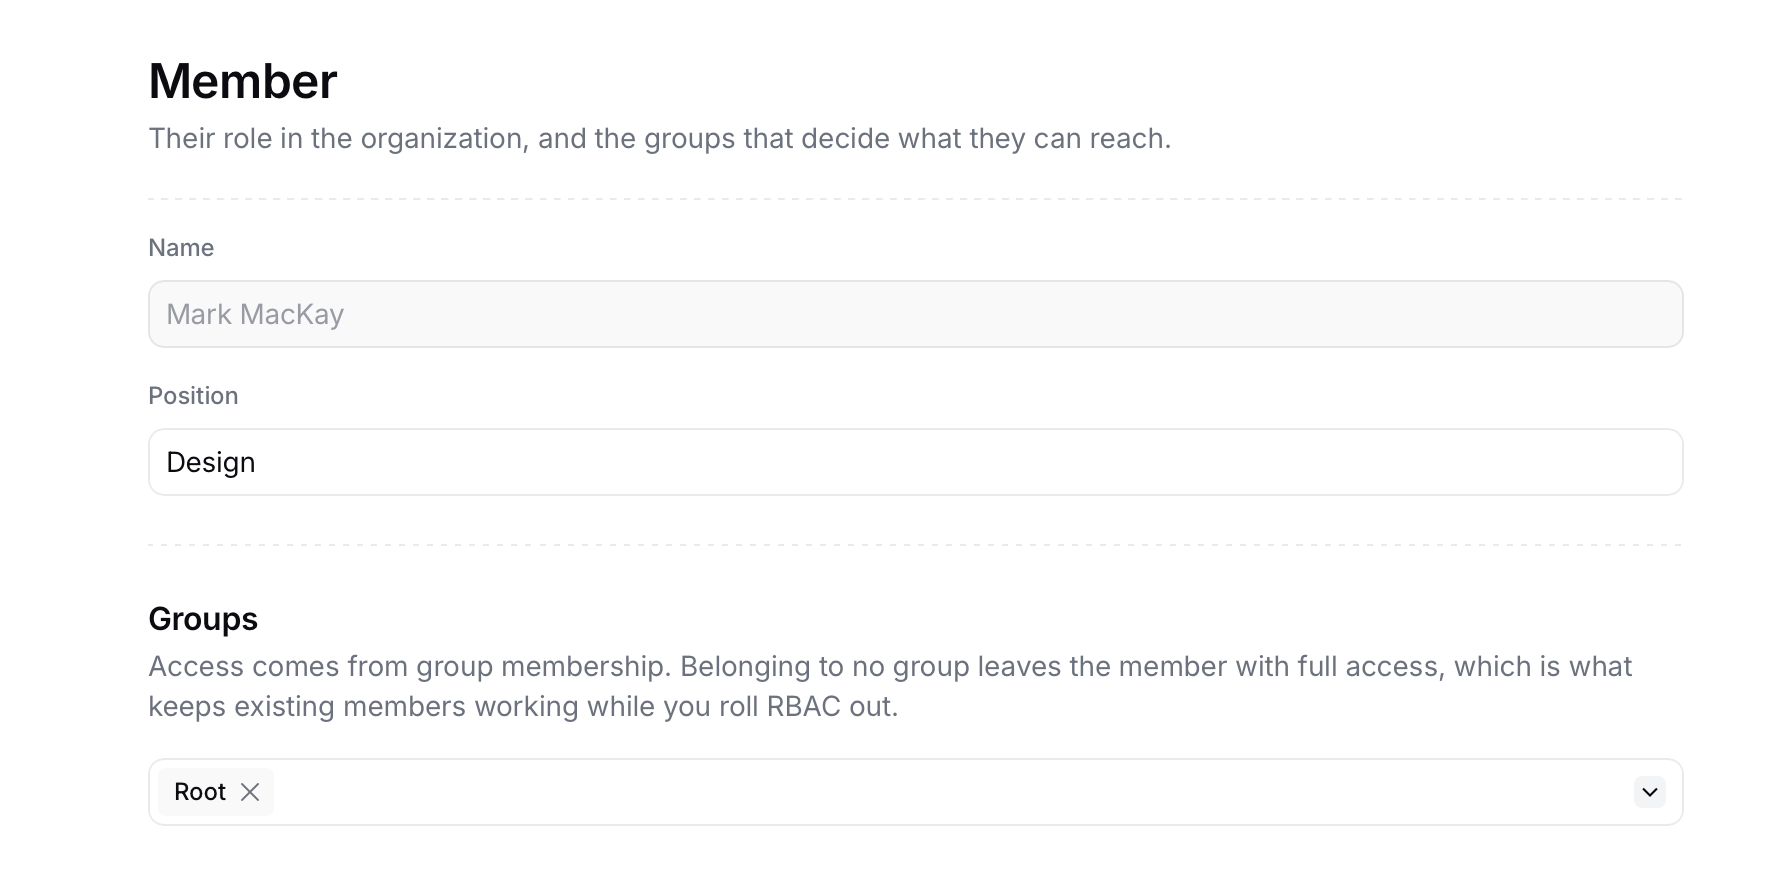
Member page with the Groups selector
Example: a finance team with read-only auditors
Suppose you run two workspaces, Spain and Portugal, and want:- The finance team to manage documents in both workspaces.
- An external auditor to read documents in Spain only.
- Two administrators with full control.
- Create three roles: Operator (Admin on Silo Entries, Read on Transform), Viewer (Read on Silo and Transform) and Owner (Admin on Everything).
- Create a Finance group granting Operator on the Spain and Portugal rows, and add the finance team.
- Create an Auditors group granting Viewer on the Spain row only, and add the auditor.
- Create an Admins group granting Owner on the Entire organization row, and add the two administrators.
FAQ
What happens to members who are not in any group?
What happens to members who are not in any group?
They keep full access to every workspace, exactly as before RBAC. Access is only restricted once a member belongs to at least one group, so review the Directory for members whose Groups column reads None once your rollout is complete.
Can a member belong to several groups?
Can a member belong to several groups?
Yes. Their permissions are the union of every role granted by every group, per workspace. There are no deny rules, so adding a second group can only widen access. Adding the first group narrows it, since it replaces the default full access.
Can I give a role different scopes in different workspaces?
Can I give a role different scopes in different workspaces?
No. A role is a fixed set of scopes. Create separate roles if two workspaces need different permission sets, then grant each role on the relevant workspace rows of a group.
Why can't I manage billing or members with a role granted on a workspace?
Why can't I manage billing or members with a role granted on a workspace?
Billing, members, domains and other Access scopes belong to the organization, not to any single workspace. Grant the role on the Entire organization row of the group instead.
How do I remove a member's access?
How do I remove a member's access?
Remove them from their groups to narrow their access, or deactivate them to remove it entirely. See Disable members.