

Introduction
To issue invoices in Argentina through ARCA, each supplier must generate a digital certificate from the ARCA website and upload it to Invopop. This guide walks you through the complete registration process.Setup
1
Connect the Argentina app
- Go to Configuration → Apps in the Console.
- Find Argentina in the app list.
- Click Connect to activate the app.
2
Create a supplier registration workflow
Create a new workflow for registering suppliers. Start with the template below:
ARCA supplier registration workflow
Add to my workspace →
- Workflow
- Code
Register a supplier
The registration process is the same whether you’re issuing invoices on behalf of third parties (white label) or under your own company name.1
Create a supplier entry
Via API
Use the Create an entry endpoint to create a new supplier party. The required fields are:
Navigate to Parties > Suppliers and click on + New supplier. The following JSON code will appear in the editor:Fill in the necessary information and click on Build and then Save.
Use the Create an entry endpoint to create a new supplier party. The required fields are:
name- company nametax_id- tax identification number
folder parameter to suppliers so the entry appears in the suppliers section. The entry will have an Empty status initially.Via ConsoleNavigate to Parties > Suppliers and click on + New supplier. The following JSON code will appear in the editor:
2
Run the registration workflow
Via API
Use the Create a job endpoint with the following payload:You can obtain the
Open the supplier entry, click Run workflow, and select Register in ARCA.The supplier’s status will change to
Use the Create a job endpoint with the following payload:
workflow_id from the workflows list, and the silo_entry_id from the Meta tab in the supplier entry.Via ConsoleOpen the supplier entry, click Run workflow, and select Register in ARCA.The supplier’s status will change to
Processing while awaiting registration completion.3
Access the registration wizard
Your own company
In the Console, open the supplier entry and navigate to the Meta tab. Click on gov-ar.invopop.com to launch the registration wizard.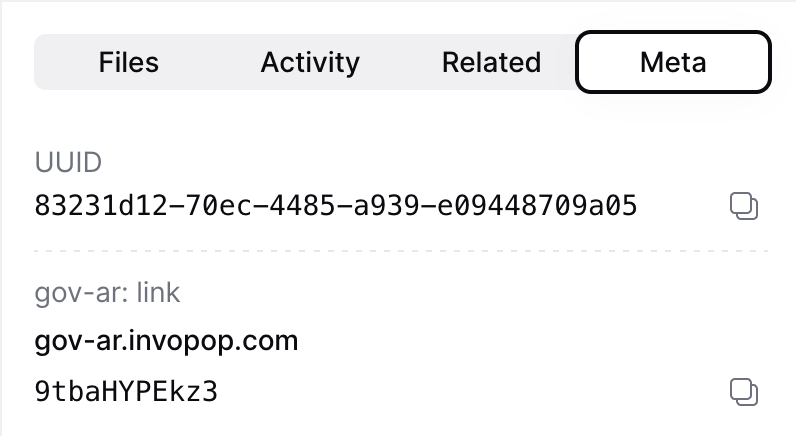
To send the registration link to your customer, add a webhook step before Wait for ARCA certificate upload.The webhook payload includes theSend the
In the Console, open the supplier entry and navigate to the Meta tab. Click on gov-ar.invopop.com to launch the registration wizard.
To send the registration link to your customer, add a webhook step before Wait for ARCA certificate upload.The webhook payload includes the
siloEntryId. Use the Fetch an Entry endpoint to retrieve the full entry, including the meta object containing the registration link.Example webhook response
link_url to your customer to complete their registration.Complete the registration wizard
The wizard will guide the user to create a certificate in ARCA’s portal and upload it to Invopop. The steps differ between sandbox and production. For your convenience, we provide guides in Spanish which you can share with your customers or adapt to your own needs:- Sandbox: ARCA certificate wizard (in Spanish)
- Production: ARCA certificate wizard (in Spanish)
Point of sales (Punto de venta)
In Invopop, the point of sale is specified in theseries field of the invoice. Once the registration process is complete, in sandbox you can use any point of sale number, while production requires registering each point of sale in ARCA before using it. The registration process varies depending on your tax classification:
- Monotributista: A simplified tax regime for small businesses and freelancers in Argentina
- Registered taxpayer (Responsable Inscripto): Standard tax regime for companies registered for VAT
1
Navigate to point of sale administration
In ARCA, go to Administración de puntos de venta y domicilios (Point of Sale and Address Administration).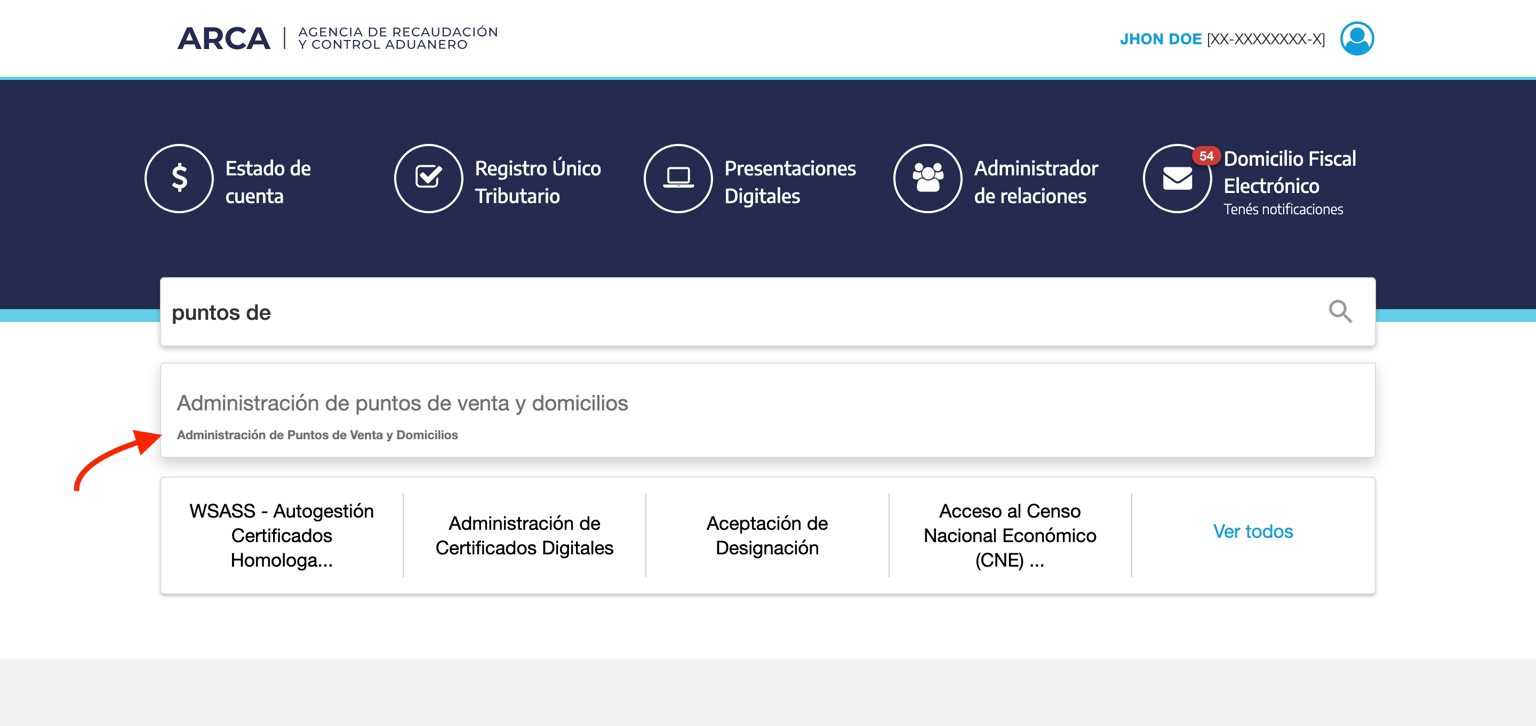
2
Register a new point of sale
Select A/B/M de puntos de venta, then click Agregar nuevo punto de venta (Add new point of sale). Choose the appropriate option for your tax classification:For monotributista: Select “Factura electronica - Monotributo - Web Service”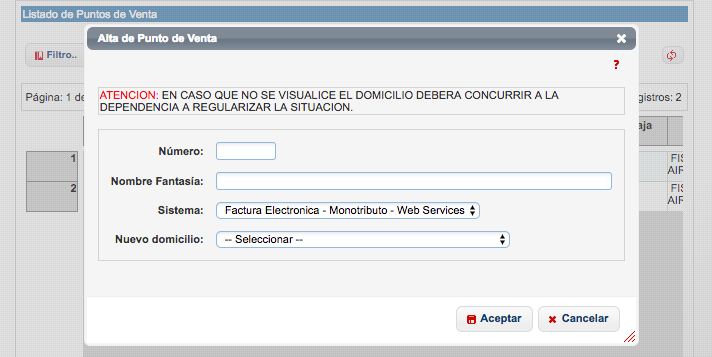

FAQ
Do I need to upload digital certificates to Invopop?
Do I need to upload digital certificates to Invopop?
Yes, to issue invoices through ARCA’s web services, you need to upload your ARCA digital certificate to Invopop. This certificate is issued by ARCA and is used to authenticate your requests to their system.The registration process involves:
- Generating a certificate signing request (CSR) with ARCA
- Downloading the certificate and private key
- Uploading them to Invopop through the supplier registration flow
What information is required to register a supplier?
What information is required to register a supplier?
To register a supplier for ARCA invoicing, you need:Company Information:
- Legal name (Razón Social)
- CUIT (tax ID)
- Fiscal address
- Economic activity code
- Tax classification (Responsable Inscripto or Monotributista)
- ARCA digital certificate (.crt file)
- Private key (.key file)
- Key password (if applicable)
How long does supplier registration take?
How long does supplier registration take?
The supplier registration process typically takes a few minutes once the supplier has their digital certificates ready. The steps are:
- Generate a registration link in Invopop
- Supplier uploads their certificate and key
- System validates the credentials with ARCA
- Registration is complete
Can I register multiple puntos de venta for one supplier?
Can I register multiple puntos de venta for one supplier?
Yes, a single supplier can have multiple puntos de venta. Each punto de venta operates independently with its own sequential numbering for each invoice type.When registering a supplier, you specify which punto de venta to use. You must register each punto de venta with ARCA in production before using it to issue invoices.
What happens if a supplier's certificate expires?
What happens if a supplier's certificate expires?
Digital certificates issued by ARCA have an expiration date. When a certificate is about to expire, the supplier must generate a new one through ARCA’s portal and upload it to Invopop.To update an expired certificate:
- Obtain a new certificate from ARCA
- Use the supplier registration workflow to upload the new certificate
- The new certificate will replace the old one
Does Invopop support white-label invoicing in Argentina?
Does Invopop support white-label invoicing in Argentina?
Yes, Invopop supports white-label (B2B2B) operations in Argentina. This means you can issue invoices on behalf of your clients using their CUIT and digital certificates.This is particularly useful for platforms and software providers who want to offer invoicing services to their customers without requiring them to integrate directly with ARCA.Each supplier (your client) needs to complete the registration process with their own certificates, and then you can issue invoices on their behalf through Invopop’s workflows.
What certificates are required to integrate with ARCA?
What certificates are required to integrate with ARCA?
An ARCA digital certificate, consisting of a
.crt X.509 certificate and the matching .key private key. Both files are uploaded together; the certificate must be valid (not expired, not revoked) and authorized for the ARCA web services you intend to use — WSFE for Factura A, B and C, WSFEX for Factura E, and WSCT for Factura T.How do I onboard a new supplier in Argentina?
How do I onboard a new supplier in Argentina?
Generate a registration link via the ARCA Register Supplier workflow, send it to the supplier, and have them upload their ARCA digital certificate and private key. Once validated, the supplier is ready to issue. See the ARCA Supplier Onboarding guide.
How are supplier credentials stored in Invopop for Argentina?
How are supplier credentials stored in Invopop for Argentina?
The ARCA digital certificate (
.crt) and private key (.key) are stored encrypted. Invopop only uses them to authenticate ARCA web service requests (WSFE and WSCT) on the supplier’s behalf and never returns the key in API responses.🇦🇷 Invopop resources for Argentina
🇦🇷 Invopop resources for Argentina

Participate in our community
Ask and answer questions about invoicing in Argentina →